
- Chat! Get help. Share Monsters.
- World-wide fans & players
- Community run & moderated MR Subreddit
- If Discord isn't your thing.
Community Tournaments
- PVP & Event Calendar
- Multiple Hosts, Games & Formats Challenges
- Speed Runs & Nuzlocke Social Media & Websites
- Official and Fan channels
Please Donate!
Your contributions help keep
the site and archives going!
Create Monsters at the Shrine! MR1 DX Song List (EN) MR2 DX Song List (EN) Ultra Kaiju MR Keywords (EN) Ultra Kaiju MR Song list (SEA)
PS1 CD DB & Tools
 GameBoy Advance
 Ultra Kaiju MR
Feeding & Drill Schedules for Monster Rancher 2
Everything you need to know for raising your monster in Monster Rancher 2, from Feeding and Drill schedules, Raise Routes, to values of Stress and Fatigue for typical actions.We break down several of the aspects of the game into smaller consumable bits of information that you can apply to any monster. Some of the advanced raising schedules won't really be affordable on a fresh game, it's OK to use a first monster or two to help stockpile your funds so you can concentrate on a very strong monster later.
MR2DX changes several item properties which opens up new Feeding and Drill options for all monsters. Schedules that apply are now separated by game version!
Cheap Schedules (All versions)
This method works for Original or DX and is for: New players, Starting a new save with low money, or raising on a budget until you can afford the more costly (and more effective) No-Rest method.
Choose Schedule #1, or #2, or mix it up between both of them.
- Schedule 1: 4,200 G per Year & uses (Fish: 100g Or Cup Jelly: 150g) + Mint Leaf: 200g.
- Schedule 2: 4,920 G per Year & uses (Fish: 100g Or Cup Jelly: 150g) + Mango: 60g + Mint Leaf: 200g.
| 300-350g/mo | ||
| Monthly: |
| |
| Week 1: | No Item | Light Drill |
| Week 2: | No Item | Light Drill |
| Week 3: | No Item | Light Drill |
| Week 4: | Rest | |
| 360-410g/mo | ||
| Monthly: |
| |
| Week 1: | No Item | Hard Drill |
| Week 2: | Light Drill | |
| Week 3: | No Item | Light Drill |
| Week 4: | Rest | |
Caveats, Costs and other info
These Feeding and Drill schedules maximize lifespan and drills while staying within an easy to maintain budget, especially on a new game.
- [1]1999 MR2 or DX: Monster Must LIKE or be Neutral to either Fish or Cup Jelly (Check for "Likes" or natural item preference OR the monster data screen.) for this to work without lifespan hits.
- [2]1999 MR2: Fish or Cup Jelly MUST be "Liked" in natural item preferences OR the monster data screen.
- [2]2021 MR2DX you can utilize Gemini pots in your inventory If Neutral to Fish or Cup Jelly:
- Neutral to Fish: Have 3 Gemini pots in inventory.
- Neutral to Cup Jelly: Have 1 Gemini pot in inventory.
- LIKES either Fish or Cup Jelly: 0 Gemini pots needed.
DX No-Rest Schedules (2021)
What is your monster's Tablet (or other item) preference if it's not shown on Likes and Dislikes? See Monster Food Preferences to know for sure. It still applies even if you don't see it!
Nomenclature: What is a "H.A.D." monster?
It is an abbreviation to refer to any monster with Henger, Arrow Head, Durahan present as a main breed, or sub breed (or both) of the monster.
Lazy No Rest: (No Bananas)
This is called "Lazy" as it won't require save-scumming for Magic Banana outcomes to squeeze in the extra 3rd Hard Drill.The below schedule does NOT account stress from Scold/Deny/breaking Promises. Determine how many Pots you will need
(Any Monster & Tablet preference)
| 1 to 7 Gemini Pots | ||
| Monthly: | ||
| Week 1: | Hard Drill | |
| Week 2: | Light Drill | |
| Week 3: | Hard Drill | |
| Week 4: | Light Drill | |
(Henger, Arrow Head, Durahan)
| H.A.D. w/ 2 or 4 Gemini Pots | ||
| Monthly: | ||
| Week 1: | Hard Drill | |
| Week 2: | Hard Drill | |
| Week 3: | Light Drill | |
| Week 4: | Hard Drill | |
(Henger, Arrow Head, Durahan)
| H.A.D. w/ 10 Gemini Pots | ||
| Monthly: | ||
| Week 1: | Any Item1 | Hard Drill |
| Week 2: | Hard Drill | |
| Week 3: | Light Drill | |
| Week 4: | Hard Drill | |
Determine # of required Gemini Pots:
This is a baseline determination which used to reset remainder of Stress (from week 4 + Tablet on Week 1) back to 0 at the start of every month when considering the "Any Monster" Magic Banana 3x Hard Drills per month.
This allows a continuing training loop without losing additional lifespan, and always beginning the Schedule on week 1 with 0 Stress (and 0 fatigue from item use).
| Tablet Preference | # Gemini Pots |
|---|---|
| Likes Tablet | 3 Gemini Pots |
| Neutral to Tablet | 5 Gemini Pots |
| Dislike Tablet | 8 Gemini Pots |
| Custom Scenarios | 10+ Gemini Pots |
10 Gemini pots + Like/Neutral to Tablet is recommended to allow for wiggle room with Scolds/Deny Request, etc. but is not required if you are Save-Summing to avoid cheats or your monster asking for things.
How do I know my Monster's Tablet preference?
- Monsters have baseline preferences and may Like/Neutral/Dislike Tablet even without it being specified.
- Likes & Dislikes override the baseline preferences.
- If a monster Likes or Dislikes "You", this does NOT override their original specified Likes/Dislikes.
| Preference | No Lifespan Hit | No Stress left |
|---|---|---|
| Likes | 0 Gemini Pots | 2 Gemini Pots |
| Neutral | 0 Gemini Pots | 3 Gemini Pots |
| Dislike | 1 Gemini Pots | 7 Gemini Pots |
| Preference | No Lifespan Hit | No Stress left |
|---|---|---|
| Likes | 4 Gemini Pots | 10 Gemini Pots |
| Neutral | 6 Gemini Pots | 12 Gemini Pots |
| Dislike | 12 Gemini Pots | 18 Gemini Pots |
| Preference | No Lifespan Hit | No Stress left |
|---|---|---|
| Likes | 6 Gemini Pots | 11 Gemini Pots |
| Neutral | 8 Gemini Pots | 14 Gemini Pots |
| Dislike | 13 Gemini Pots | 19 Gemini Pots |
DX Magic Banana No Rest (2021)
No Rest + Magic Bananas (DX)
Due to the Magic Bananas change for MR2DX, and stacking effect of Gemini pots, a few new options open up which allows for any monster to have 3 Hard Drills every month.The below schedule does NOT account stress from Scold/Deny/breaking Promises.Determine how many Pots you will need
| 3 to 8 Gemini Pots with MB | ||
| Monthly: | ||
| Week 1: | Hard Drill | |
| Week 2: | -10 Stress | Hard Drill |
| Week 3: | Hard Drill | |
| Week 4: | Light Drill | |
| Fear | Spoil | Form | Fatigue | Stress |
| +10 | +10 | -1 | 0 | -10 |
| -10 | +10 | 0 | -15 | -5 |
| -10 | -10 | +1 | -30 | 0 |
How Magic Bananas Work
Your "Style" indicates if you have more Fear or Spoil.
+10 in Loyalty = (Fear: +10/2) + (Spoil: +10/2)
Differing at high loyalty, or when Fear or Spoil can no longer increase.
PS1 No-Rest Schedules (1999)
What is your monster's Tablet preference if it's not shown on Likes and Dislikes? See Monster Food Preferences to know for sure. It still applies even if you don't see it!
Nomenclature: What is a "H.A.D." monster?
It is an abbreviation to refer to any monster with Henger, Arrow Head, Durahan present as a main breed, or sub breed (or both) of the monster.
Alternate every second Month between schedule A and B. If you start January Week 1 your schedule will look like: Jan A, Feb B, Mar A, April B, and so on..
| Any Monster: A | ||
| Monthly: | ||
| Week 1: | Hard Drill | |
| Week 2: | Light Drill | |
| Week 3: | Hard Drill | |
| Week 4: | Light Drill | |
| Any Monster: B | ||
| Monthly: | ||
| Week 1: | Hard Drill | |
| Week 2: | Light Drill | |
| Week 3: | Light Drill | |
| Week 4: | Light Drill | |
- Demo: Dislike Tablet Non-H.A.D. monster
- Non-H.A.D monsters must Like or be Neutral to Tablet*
- * If a Non-H.A.D. monster asks for an item you must give it to it, or save-scum until it doesn't ask for the item. (Denying the item adds too much stress to stay in bounds of lifespan index).
- H.A.D. monsters can still do this if they Dislike Tablet.
| Every Month | ||
| Monthly: | ||
| Week 1: | Hard Drill | |
| Week 2: | Light Drill | |
| Week 3: | Hard Drill | |
| Week 4: | Light Drill | |
- Demo: Neutral to Tablet Non-H.A.D. monster
- Demo: Dislikes Tablet H.A.D. monster
For H.A.D. Monsters Only that Likes or Neutral to Tablet
No-Rest method for H.A.D. monsters:Alternate every second Month between schedule A and B. If you start January Week 1 your schedule will look like: Jan A, Feb B, Mar A, April B, and so on..
| H.A.D. Month A | ||
| Monthly: | ||
| Week 1: | Hard Drill | |
| Week 2: | Hard Drill | |
| Week 3: | Light Drill | |
| Week 4: | Hard Drill | |
| H.A.D. Month B | ||
| Monthly: | ||
| Week 1: | Hard Drill | |
| Week 2: | Light Drill | |
| Week 3: | Hard Drill | |
| Week 4: | Light Drill | |
- Demo: Neutral to Tablet H.A.D. monster
PS1 Magic Banana (1999)
The Magic Banana schedule requires a lot of Saving and Reloading. Be Warned!
Magic Bananas have a 1 in 3 chance for an effect that can extend lifespan by 1 week. This can effectively immortalize your monster, meaning you can Max all Stats on any first generation monster, at the cost of your sanity.
For every week:
- Save before feeding the Magic Banana.
- Feed Magic Banana. If the result is NOT the highlighted effect below: Reload and try again.
- If you got the desired highlighted effect, Save before doing a Drill.
- Do the Drill. If you did NOT get the desired drill result (presumably "Success" or "Great"): Reload and try again.
- Obviously if this is a Rest week, you don't need to reload unless you're save scumming for the most Stress/Fatigue relief from resting.
- Repeat from Step 1
| During Stage 5 or 6 | ||
| Monthly: | ||
| Week 1: | Light Drill | |
| Week 2: | Rest | |
| Week 3: | Light Drill | |
| Week 4: | Hard Drill | |
| During Any Stage | ||
| Monthly: | ||
| Week 1: | Light Drill | |
| Week 2: | Light Drill | |
| Week 3: | Light Drill | |
| Week 4: | Rest | |
| Fear | Spoil | Form | Lifespan |
|---|---|---|---|
| +10 | +10 | -1 | -1 |
| -10 | +10 | 0 | 0 |
| -10 | -10 | +1 | +1 |
needs to drop 10 points
or drop to/stay at 0.
When using the Magic Banana at 0 loyalty, if it remains at 0 you have gained the extra week of lifespan. The other two results would add Fear or Spoil which would raise Loyalty, indicating one of the other two effects happened instead.
Succeeding drills has several factors involved: Fear, Life Stage, Drill Level, Stat Gain for the Drill's primary stat. Once a Heavy Drill becomes 3 Stars you'll start seeing far more failures than usual especially due to the 0 Loyalty, consider dropping to Light Drills at this point, or time to stop doing this method so you can raise loyalty and finish out with No-Rest schedules.
Other Tips from Alchius' Banana Scumming Guide
- The desired result also increases Form, so if you use a lot of bananas, your monster will end up fat.
- Use Magic Bananas during Prime. It’s usually a waste of effort to do it at other times. Monsters recover more stress/fatigue from resting during Prime.
- For many monsters, Magic Bananas are not really necessary when considering Gold and Silver Peaches exist, but for certain monsters with very short primes they can be a good choice.
- If your monster requests something before a drill and you say no, they will gain stress! It’s worth reloading or loading state if this happens, as it will mess up most tight training methods.
Which Drills to use with the Schedules?
- What are the Stat Gains of the monster for the Stat you want to train?
- What stage of Life is your monster at currently?
- Are there Stats you don't need to focus on?
- Deciding on INT or POW focus can change up how things are done
The typical strategies formaximum stat numbers involve raising only the stats a monster has a high aptitude (4/B or 5/A) in during the Baby Stages (1, 2, 3), then in stages 4 through 7 you can focus on any required Stats with lower gains since this is where you will get the most points per Drill.
See Maximizing Gains for more information, OR Reference the Raising Routes for basic raising demonstrations applicable to most INT or POW type monsters.
Should I use Drugs?
If a Monster has very bad POW and/or SKI gains (1/E or 2/D) and you want to focus on POW, you can use Troron or Paradoxine during Stage 1 & 2 for a significant boost.
Yes the drugs reduce lifespan, but it is only reducing it in the stage that it is used. Baby Stage gives terrible gains, and the drugs can provide more stats in total, than not using them and only doing drills. Normal or Late Bloom aging types are generally best for using these drugs since they have more weeks to sacrifice in these early stages.
The Drug Calculator can help you determine how many total weeks using them will consume for each drug used.
Stats and what they mean
Before you begin to do drills, know what the stats actually do, this can help you focus on which stats you want, or need.- LIF: This is your Health bar. It also determines how long you can explore during expeditions.
- POW: A damage stat that modifies base damage for Power techs, indicated by yellow icons. It also provides a bit of defense against opponent POW based attacks. For expedition, this can remove obstacles.
- INT: A damage stat that modifies base damage for Intelligence techs, indicated by green icons. It also provides a bit of defense against opponent INT based attacks. For expedition, this can discover hidden paths and find items in buildings.
- SKI: An accuracy stat that modifies a tech's base chance to hit, and helps counter opponent SPD.
- SPD: A speed stat, affected by form, that increases your chance to dodge an attack, and helps counter opponent SKI.
- DEF: A defense stat, affected by form, that reduces damage but is more effective when combined with a damage stat. (high DEF and high POW provides better protection from enemy POW techs)
Drill Planning: What drills do I use?
General Advice
- Know your monster's Attacks and plan around them (See Tech List). Decide if you're going to use POW or INT based attacks and focus the corresponding supporting stat.
- Pick 1 Attack Stat: POW or INT.
This determines Domino or Study for Light Drills, and Pull or Meditate for heavy drills. - Pick 1 Defensive Stat: SPD or DEF.
This determines Dodge or Endure for Light Drills, and Leap or Swim for heavy drills. - Fill in with SKI and just enough LIF to avoid KOs.
SKI and LIF only have Light Drill options, so you'll want to fill in with these where possible.
Should I scold or not?
Scolding or not does a few things, and it entirely depends on what you want to happen. The side effects of scolding (namely stress) can be mitigated with Mint Leaves or Rest. In Single Player it is suggested to Scold Cheats, and Praise Greats. Never scold Fails as there's no real benefit. Barring niche scenarios like desiring a bad-natured tech etc., you typically want as high a Nature as possible in Single Player so that you can get more Greats and fewer Cheats on drills.
| Result | Reaction | Nature | Stress | Fear | Spoil |
|---|---|---|---|---|---|
| Cheat | Scold | ||||
| Cheat | Don't Scold | - | |||
| Great | Praise | - | |||
| Great | Don't Praise | ||||
| Fail | Scold | - | |||
| Fail | Don't Scold | - | - |
Maximizing Gains:
When you do which drills is important. You can gauge what life stage your monster is in by its size. It can be hard to notice sometimes, so there's a visual reference guide to help just in case.
| Life Stage | 1 | 2 | 3 | 4 | 5 | 6 | 7 | 8 | 9 | 10 |
| Size | Small | Medium | Large (Final Size) | |||||||
| Gain Scaling | Low | Med. | High | Med. | Low | |||||
- Gains: Know your monster's Stat Gains (Original -- MR2DX).
(E or 1 are the lowest gains. C or 3 is average. A or 5 are the highest gains) - Gain Scaling: Regardless of the monster's aptitudes, all stat gains will scale up as it ages towards Prime, and back down as it becomes elderly. "A" gains will always be better than "E" Gains, but the value earned in drills scales based on their Life Stage.
- Before Prime (Stages 1-4): For A and B gain stats, Focus-raise the stats.
(Baby stage through adolescence should be enough to max out one or two of these with No-Rest since B and A gains can still get high/20s in Great!s before Prime) - Around/During Prime (Stages 4-7): Raise any remaining desired stat a given monster has low gains in.
(This is the best Gains-per-week a low gain stat can get and is the best time to catch these up.) - Prime (Stage 5 exactly) is THE peak stage with the highest scaled gains. Using Peaches after prime is over will rewind time and let you live through Prime again.
- Dump Stat: Heavy drills drop a given stat by a low amount based on the drill, but you may not need the dropped stat, or it may be a stat you can easily catch back up later. Heavy Drills are key for maxing multiple stats.
- Using any of the training schedules, choose Hard Drills and Light Drills that Compliment each other. Avoid constantly alternating drills that raise and lower the same stat, instead just stick with 1 until you're ready to switch.
Raising Route Examples with Screenshots
Other Considerations:
- Once your main stats are maxxed out (or as high as you want them to be) then you can start raising the lower stats up. This optimizes stat gains instead of swapping between drills that raise and lower a stat over and over..
- Techs: Know what you want prior to training. This helps you know how you are going to raise your monster and know stat requirements for techs in advance, and avoid unnecessary lifespan hits by sending to the wrong errantries.
- Drugs? Please read the Drugs and Peaches section. Planning ahead can yield great results. Using at the wrong time is a waste of lifespan.
- See the item list for a deeper understanding on why the items work.
Below is a basic breakout of Drills. See the complete Drill Processing breakdown for all scenarios.
+10 Fatigue
-1 Form
| Drill | Main | Stress | Fatigue |
|---|---|---|---|
| Domino | Pow ↑ | +5 | +10 |
| Shoot | Ski ↑ | +5 | +10 |
| Study | Int ↑ | +5 | +10 |
| Dodge | Spd ↑ | +5 | +10 |
| Run | Lif ↑ | +5 | +10 |
| Endure | Def ↑ | +5 | +10 |
+15 Fatigue
-2 Form
| Drill | Main | Sub | Drop | Stress | Fatigue |
|---|---|---|---|---|---|
| Pull | Pow ⇈ | Lif ↑ | Spd ↓ | +12 | +15 |
| Leap | Spd ⇈ | Int ↑ | Pow ↓ | +12 | +15 |
| Meditate | Int ⇈ | Ski ↑ | Def ↓ | +12 | +15 |
| Swim | Def ⇈ | Lif ↑ | Int ↓ | +12 | +15 |
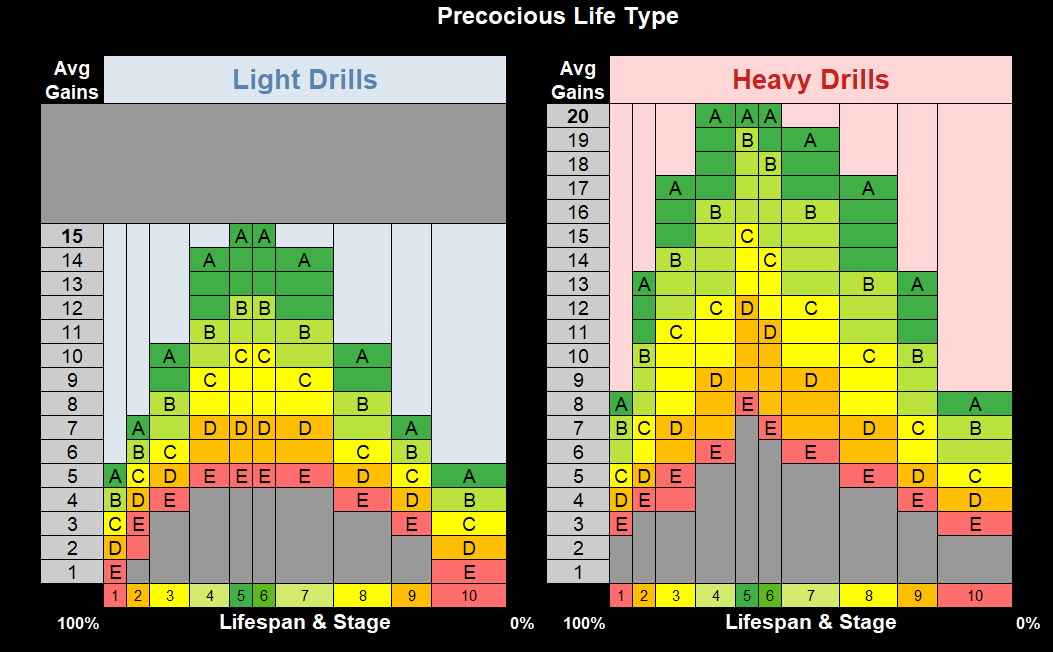
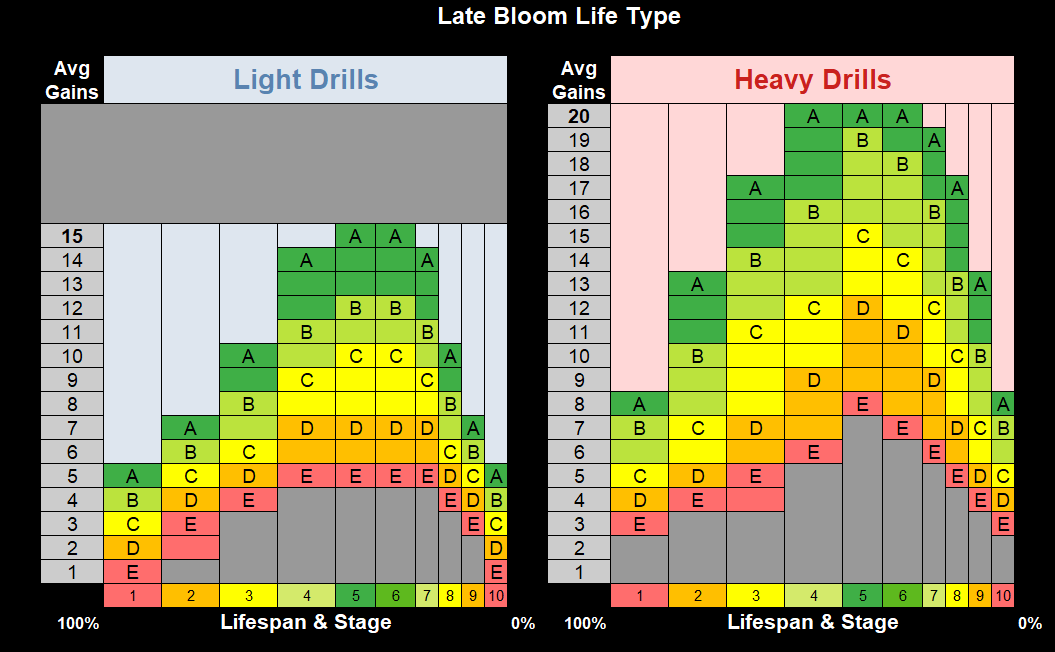
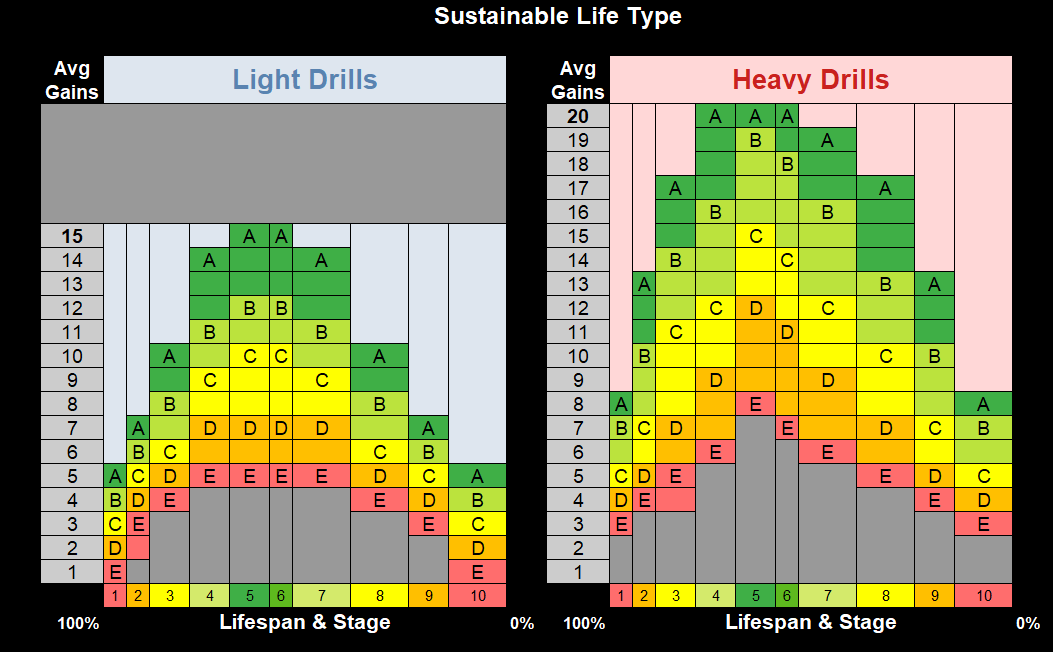
This is a visual approximation of the Light/Hard drill data tables.

| Life Stage | Gain: 1/E | Gain: 2/D | Gain: 3/C | Gain: 4/B | Gain: 5/A |
|---|---|---|---|---|---|
| 1 | 1-1-2-3 | 1-1-2-3 | 1-2-3-4 | 2-3-4-5 | 3-4-5-6 |
| 2 | 1-2-3-4 | 2-3-4-5 | 3-4-5-6 | 4-5-6-7 | 6-7-8-9 |
| 3 | 2-3-4-5 | 3-4-5-6 | 5-6-7-8 | 7-8-9-10 | 9-10-11-12 |
| 4 | 2-3-4-5 | 4-5-6-7 | 6-7-8-9 | 8-9-10-11 | 11-12-13-14 |
| 5/Prime | 4-5-6-7 | 6-7-8-9 | 8-9-10-11 | 11-12-13-14 | 14-15-15-15 |
| 6/Sub-Prime | 3-4-5-6 | 5-6-7-8 | 7-8-9-10 | 10-11-12-13 | 13-14-15-15 |
| 7 | 2-3-4-5 | 4-5-6-7 | 6-7-8-9 | 8-9-10-11 | 11-12-13-14 |
| 8 | 2-3-4-5 | 3-4-5-6 | 5-6-7-8 | 7-8-9-10 | 9-10-11-12 |
| 9 | 1-2-3-4 | 2-3-4-5 | 3-4-5-6 | 4-5-6-7 | 6-7-8-9 |
| 10 | 1-1-2-3 | 1-1-2-3 | 1-2-3-4 | 2-3-4-5 | 3-4-5-6 |
| Life Stage | Gain: 1/E | Gain: 2/D | Gain: 3/C | Gain: 4/B | Gain: 5/A |
|---|---|---|---|---|---|
| 1 | 3-3-3-4 | 3-3-4-5 | 3-4-5-6 | 5-6-7-8 | 6-7-8-9 |
| 2 | 3-3-4-5 | 4-5-6-7 | 6-7-8-9 | 8-9-10-11 | 11-12-13-14 |
| 3 | 4-5-6-7 | 6-7-8-9 | 9-10-11-12 | 12-13-14-15 | 15-16-17-18 |
| 4 | 5-6-7-8 | 8-9-10-11 | 11-12-13-14 | 15-16-17-18 | 19-20-20-20 |
| 5/Prime | 7-8-9-10 | 11-12-13-14 | 14-15-16-17 | 19-20-20-20 | 20-20-20-20 |
| 6/Sub-Prime | 6-7-8-9 | 10-11-12-13 | 13-14-15-16 | 18-19-20-20 | 20-20-20-20 |
| 7 | 5-6-7-8 | 8-9-10-11 | 11-12-13-14 | 15-16-17-18 | 19-20-20-20 |
| 8 | 4-5-6-7 | 6-7-8-9 | 9-10-11-12 | 12-13-14-15 | 15-16-17-18 |
| 9 | 3-3-4-5 | 4-5-6-7 | 6-7-8-9 | 8-9-10-11 | 11-12-13-14 |
| 10 | 3-3-3-4 | 3-3-4-5 | 3-4-5-6 | 5-6-7-8 | 6-7-8-9 |
| Life Stage | Gain: 1/E | Gain: 2/D | Gain: 3/C | Gain: 4/B | Gain: 5/A |
|---|---|---|---|---|---|
| 1 | 2 | 2 | 2-3 | 2-3 | 2-4 |
| 2 | 2 | 2-3 | 2-4 | 2-5 | 2-5 |
| 3 | 2-3 | 2-4 | 2-5 | 3-6 | 4-7 |
| 4 | 2-3 | 2-4 | 3-6 | 4-7 | 5-8 |
| 5/Prime | 2-4 | 2-5 | 4-7 | 6-9 | 7-10 |
| 6/Sub-Prime | 2-4 | 2-5 | 3-6 | 5-8 | 7-10 |
| 7 | 2-3 | 2-4 | 3-6 | 4-7 | 5-8 |
| 8 | 2-3 | 2-4 | 2-5 | 3-6 | 4-7 |
| 9 | 2 | 2-3 | 2-4 | 2-5 | 2-5 |
| 10 | 2 | 2 | 2-3 | 2-3 | 2-4 |
| Drill Result | Drop Amount |
|---|---|
| Great | -2 to -3 |
| Success | -2 to -3 |
| Cheat | -1 to -4 |
Errantry during the No Rest method
- You WILL have to rest your monster if you Errantry.
- Never Errantry (or Battle) during a monster's prime. This is a huge lifespan loss VS stat gains for this stage of Life.
- Errantry early to get techs. (Or monster unlocks). If you DON'T get a tech, reset or don't go at all.
- Only errantry later if you really want a tech chain and can't get it until later in life.
- Go to errantry on the 1st week of the month with 0 stress/ 0 fatigue, after feeding Tablet/Nuts Oil.
- Your monster will likely be Very Tired when you return. You will be able to give it Tablet and Nuts Oil again, then Rest. This should get it back to "is Well". One more Nuts Oil should get you to Very Well.
- You should be able to resume the No Rest method from this point from the second week in the schedule. (Don't forget to feed it the items!)
- Once this short training week is finished, and you have once again fed Tablet and Nuts Oil on the following month week 1, you should be back at 0 Stress / 0 Fatigue, and can resume the No Rest method every week as per usual.
Plan errantry or battles early or late in life, and here's why:
- Stages 5 & 6 are technically "Prime / Best stat gains". Also, before and after Prime as well (stage 4 & 6), since stat gains are still pretty great.
- Week 1 is the optimal week to send on errantry as it allows you to feed items (Tablet) before, and immediately after return, helping minimize lifespan loss from stress.
- MR2 1999: It's huge potential lifespan loss VS stat gains for this stage of Life. Every week of errantry is +18 Fatigue, +7 Stress without the ability to reduce it.
On the best case scenario (0 Fatigue/0 Stress & start week 1):
- Success: -10 weeks Total: -4wks errantry + -1wk LI + -2wks LI + (-3wks LI on wk1 return bug where Stress and fatigue is calculated twice).
- Your Monster is KOd: need validation of LI with Monster KO.
- MR2DX:
- Success: -7 weeks Total: -4wks errantry + -3wks LI
- Your Monster is KOd: -13 weeks Total: -4wks errantry + -3wks LI + -6wks KO penalty.
+7 Stress / +18 Fatigue Per Week (Total: +28 S / +72 F)
| Location | Main | Sub | Stress | Fatigue |
|---|---|---|---|---|
| 1. Papas (Sharp Tech) | Spd ⇈ | Lif ↑ | +7/wk | +18/wk |
| 2. Mandy (Heavy Tech) | Pow ⇈ | Lif ↑ | +7/wk | +18/wk |
| 3. ParePare (Withering) | Int ⇈ | Lif ↑ | +7/wk | +18/wk |
| 4. Torble Sea (Hit Tech) | Ski ⇈ | Lif ↑ | +7/wk | +18/wk |
| 5. Kawrea (Special Techs) | Def ⇈ | Lif ↑ | +7/wk | +18/wk |
| Stat Gain level for Locale's stat | ||||||
|---|---|---|---|---|---|---|
| Life Stage | 1 | 2 | 3 | 4 | 5 | +LIF* |
| 1 | 2-4 | 2-5 | 2-5 | 2-6 | 3-7 | 3 |
| 2 | 2-5 | 2-6 | 3-7 | 4-8 | 5-9 | 5 |
| 3 | 3-7 | 4-8 | 5-9 | 6-10 | 8-12 | 7 |
| 4 | 3-7 | 4-8 | 5-9 | 6-10 | 8-12 | 7 |
| 5 | 5-9 | 7-11 | 8-12 | 10-14 | 13-15 | 10 |
| 6 | 4-8 | 6-10 | 7-11 | 9-13 | 11-15 | 9 |
| 7 | 3-7 | 5-9 | 6-10 | 7-11 | 9-13 | 8 |
| 8 | 3-7 | 4-8 | 5-9 | 6-10 | 8-12 | 7 |
| 9 | 2-5 | 2-6 | 3-7 | 4-8 | 5-9 | 5 |
| 10 | 2-4 | 2-5 | 2-5 | 2-6 | 3-7 | 3 |
Errantry Success/Injury Chances & examples
In short, the best chances of Errantry success: The less fatigue it has, the older the monster is, the more Fear it has, the higher the Stat Gain is for the locale you've sent it to. But this will break down manual calculation and also some tables for worst case/best case scenarios for each week of the 4 week Errantry.Errantry Success Chance
Be aware that these values are not visible in normal play. You must know them already (Song List, General game knowledge) or use tools (AV, Mods, CE, etc.) to know the exact values. You can make estimations of Fear and Fatigue based on your Style & Loyalty and Colt's weekly messages respectively.
Inputs for Errantry Success
The "Location Stat Gain" value should match your monster's Stat Gain (aptitude) for the primary stat of the Errantry you've sent it to.
- Papas: Use monster's SPD gain value.
- Mandy: Use monster's POW gain value.
- Parepare: Use monster's INT gain value.
- Torble: Use monster's SKI gain value.
- Kawrea: Use monster's DEF gain value.
Success values after inputs.
| Life Stage | Week 1 | Week 2 | Week 3 | Week 4 |
|---|---|---|---|---|
| 1 | 100.0% | 55.2% | 6.9% | 0.0% |
| 2 | 100.0% | 69.0% | 20.7% | 0.0% |
| 3 | 100.0% | 82.8% | 34.5% | 0.0% |
| 4 | 100.0% | 96.6% | 48.3% | 3.4% |
| 5 | 100.0% | 100.0% | 62.1% | 17.2% |
| 6 | 100.0% | 100.0% | 75.9% | 31.0% |
| 7 | 100.0% | 100.0% | 89.7% | 44.8% |
| 8 | 100.0% | 100.0% | 100.0% | 58.6% |
| 9 | 100.0% | 100.0% | 100.0% | 72.4% |
| 10 | 100.0% | 100.0% | 100.0% | 86.2% |
Manual Calculations for Success/Fail/Injury
- drill_gain = drill gain for corresponding errantry (1-5) [ torble-ski, papas-spd, mandy-pow, jungle-int, kawrea-def ]
- life_gain = life drill gain (1-5)
- lifestage = life stage (1-10)
- fatigue = fatigue (0-100)
- fear = fear (0-100)
- rnd(x) = random number between 0 and x-1
any division is integer division and will result in the loss of any decimal places
Threshold = [ 0->5, 1->15, 2->25, 3->35 ] : this value depends on the number of weeks you have previously passed during this errantry Strength >= Threshold, then success (else failure).
The Week Percentages assume that you passed the previous week. If you don't you stay on that weeks chance
% Chance of Injury = INT( ( fatigue - 50 ) / 2 ) , limited to 0% If you do get injured, then you will be missing for:
- 3 days for fatigue >= 90
- 2 days for fatigue >= 70
- 1 day for fatigue < 70.
Note: you can't be injured if fatigue is <= 51. So, if you start out with 0 fatigue, then only on the 4th week if you fail, you have a 2% chance of being injured.
Colt's Life Stage & Retirement Messages
Stage Indicators:
Of the 10 Life Stages all monsters go through, only one Life Stage directly triggers a message; Stage 5, Prime / Peak.- Stage 1-4: No Life Stage messages.
- Stage 5 (Prime): One of the following:
- Msg #1: ... [Trainer Name], From now on, it will be a important time for [Monster Name]. Let's give it some extra care.
- Msg #2: ... [Trainer Name], from now on, [Monster Name]'s strength will be affected depending upon how we raise it. This is where we must use our Training Skill!
- Stage 6-10: No Life Stage Messages.
Retirement Indicators
Unlike the Prime warning, the following are based on a specific amount of weeks remaining, rather than specifically by entering a given life stage. Messages will vary slightly and can occur mid-stage, though they can be offset by as much as 10 weeks if interrupted by a birthday event etc.)- 49 weeks remaining Retirement Messages:
Msg #1: [Monster Name] looks very exhausted. Maybe we should consider retiring it...
Msg #2: Hmmm... [Monster Name] doesn't look very good these days. Maybe we should consider retiring it... - 29 weeks remaining Retirement Messages: (May or may not receive this warning)
Msg #1: It doesn't look well, these days... I guess we have to consider its retirement... - 9 weeks remaining Retirement Messages:
Msg #1: [Trainer Name], [Monster Name] has done enough. We should let it retire.
Msg #2: [Monster Name] can't go further. We better retire it soon or else we'll get into some serious trouble. Better late than never.
Colt's Stress and Fatigue Messages
| Fatigue | Message: Every Week |
|---|---|
| 0 | [Monster] is very well. |
| 1-19 | [Monster] is well. |
| 20-39 | [Monster] seems well. |
| 40-59 | [Monster] seems tired. |
| 60-79 | [Monster] seems pretty tired. Give it some rest. |
| 80-95 | Oh...... [Monster] seems very tired. |
| 96-100 | You are too hard on it... [Monster] will pass out. |
| Stress | Message: Week 1 Only! |
|---|---|
| 0-19 | No message. |
| 20-100 | [Monster] is stressed out. We have to take care of it... |
It is possible to grossly underestimate how much stress you are accruing since you are only warned about it on Week 1.
If you aren't following one of the proven raising schedule, you can use the Training Planner to validate your raising methods and make sure you're not taking unnecessary lifespan hits.
- The "stressed" or "tired" messages from Colt is an indicator that the lifespan index calculation very likely hit a point that begins reducing lifespan. (How much depends on the calculation).
- If you save frequently enough, you can Reset & Reload if you see these messages. After a reset you can try something different, such as doing a Light Drill instead of a Hard Drill (or even rest). You can wing it a bit to fit your needs based on the messages you see.
- With the No-Rest method you should not see these messages unless you do activities outside of the Feeding/Drill schedule (like scolding or refusing requests).
Lifespan Index: Values and calculations
| Stage | Fatigue | Stress |
|---|---|---|
| 1 | -36 to -39 | -5 to -8 |
| 2 | -38 to -43 | -5 to -8 |
| 3 | -40 to -47 | -5 to -10 |
| 4 | -42 to -51 | -7 to -10 |
| 5 | -44 to -55 | -9 to -12 |
| 6 | -44 to -55 | -9 to -12 |
| 7 | -40 to -47 | -5 to -10 |
| 8 | -32 to -39 | -5 to -8 |
| 9 | -32 to -37 | -5 to -8 |
| 10 | -32 to -35 | -5 to -6 |
| Stage | Fatigue | Stress |
|---|---|---|
| 1 | -18 to -19 | -10 to -16 |
| 2 | -19 to -21 | -10 to -16 |
| 3 | -20 to -23 | -10 to -20 |
| 4 | -21 to -25 | -14 to -20 |
| 5 | -22 to -27 | -18 to -24 |
| 6 | -22 to -27 | -18 to -24 |
| 7 | -20 to -23 | -10 to -20 |
| 8 | -16 to -19 | -10 to -16 |
| 9 | -16 to -18 | -10 to -16 |
| 10 | -16 to -17 | -10 to -12 |
| Index | LI# | Additional Life Lost |
|---|---|---|
| 0 - 69 | 1 | 0 (Current week) |
| 70-104 | 2 | 1 additional wk |
| 105-139 | 3 | 2 additional wks |
| 140-174 | 4 | 3 additional wks |
| 175-209 | 5 | 4 additional wks |
| 210-244 | 6 | 5 additional wks |
| 245-269* | 7 | 6 additional wks |
| 270-300* | 8 | 7 additional wks |
or go to the hospital if the LI is 250 or more)
Calculating Lifespan Index:
LI = ((Stress * 2) + Fatigue)
It occurs at the black screen when rolling over into the next week, and if the Lifespan Index value had reached 70 and above (or fails to drop below 70).
Reducing Stress/Fatigue bringing the Lifespan Index value below 70 after this, and at the point you can feed an item only helps prevents further lifespan hits, not gain back the lifespan hits you've already taken.
Order of Operations Example:
An example of Week 1 of Month A, to Week 1 of Month B
Assuming you start at 0/0 Stress/Fatigue.
Activities that cause Stress and Fatigue:
- Light Drills: +5 Stress & +10 Fatigue
- Hard Drills: +12 Stress & +15 Fatigue
- Errantry: +7 Stress & +18 Fatigue Per Week (Total: +28 S & +72 F)
- MR2 original: LI is calculated twice upon return: -13 weeks = -4wks errantry + -3wks LI + -3wks LI again.
- MR2DX Success: -7 weeks = -4wks errantry + -3wks LI
- MR2DX Get KOd: -13 weeks = -4wks errantry + -3wks LI + -6wks KO penalty.
- Expedition: +0 Stress & +70 Fatigue; Minimum 8 weeks lifespan cost: (3+3 * LI for expedition) + (1 + 1*LI start of week 1). This can scale exponentially if expedition is started with Stress/Fatigue causing a higher LI since the values are multiplied by the LI number.
- MR2DX: Minimum 2 weeks lifespan cost: (0 lifespan hit for expedition) + (1 + 1*LI start of week 1).
- Battle: Lifespan hit is: (3*LI#)+1. See Lifespan Index Table chart below
- The +1 is the current week alive. This means in a monster's best condition it will be (3*1)+1 weeks lifespan per tourney (Minimum 4 weeks).
- Taking your [maximum health value] * 3 damage or more will result in monster death.
- Denying requests, and Scolding Truants, Failures, and Cheats can also can increase stress. The amount varies depending on your monster's Nature & Training Style. Click an action to see the detailed Drill Processing tables.
*MR2DX seems to default to +10 stress regardless of Style or Nature.Ranges based on style -100 to +100 Action Nature >= 0 Nature < 0 Truant scold 0 to 8 stress 0 to 16 stress Cheat scold 0 to 8 stress 0 to 24 stress Failure scold 0 to 4 stress 0 to 8 stress Deny Request 1-10 Stress* Broken Promise 10-30 Stress
Items that reduce Stress and Fatigue
- Nuts Oil: -28 Fatigue & (For Henger, Durahan, Arrowhead main or subs: Also -20% Stress (rounded down))
- Mint Leaf: -50% stress
- Gemini Pot (Original): -1 to -3 Stress if over 33 Stress, +1 Fear (Mostly used for Fear).
- Artemis Statue (Original): -1 to -3 Fatigue if over 33 Fatigue, +1 Spoil,
- Gemini Pot (MR2DX): Always -1 stress minimum, up to -3 stress, and +1 Fear.
- Artemis Statue (MR2DX): Always -1 Fatigue minimum. Spoil effect removed.
- Magic Bananas in MR2DX: Typically you want the Static Stress reduction effect which also has the added benefit of raising Loyalty. It's slightly better than Nuts Oil for Fatigue but that effect drops loyalty.
Stress Reduction also raises Loyalty 10 points Fear Spoil Form Fatigue Stress +10 +10 -1 0 -10 -10 +10 0 -15 -5 -10 -10 +1 -30 0
Guts Regeneration is a value for how many frames per second it takes to generate 1 Guts. The higher the value, the slower guts regeneration is for your monster. This directly determines how often a monster can afford to swing a hit in battle. Faster Guts regen will allow for more swings in a given fight, while slower Guts regen affords higher bonuses.
Damage Correction (Or Guts Correction) can provide more damage than usual for landed attacks. The bonus increases the more guts you have (up to 99). Based on a monster's actual Guts Regeneration value; The slower the guts regeneration is, the more of this benefit is afforded.
Damage Reduction Higher Guts can provide damage reduction. The bonus increases the more guts you have (up to 99). Slower Guts regen also has a slight bonus to damage reduction.
Tech Accuracy is increased the more Guts you have. Many things factor into your hit percent, like a Tech's accuracy, Monster SKI stat, Opponent SPD stat. Whatever this final value is, Higher guts helps raise that chance further. Slower Guts regen also has a slight bonus to accuracy.
Keep in mind that in Auto-Battles you have to hope for the best, but under manual control, saving up your guts before attacking helps increase your tech's accuracy, reduces damage taken, and improves damage done.
- Fast Guts Regen: Receives a lesser amount of these bonuses, but can afford to attack more often.
- Slow Guts Regen: Receives a higher amount of these bonuses, but may feel more risky since it can't afford to attack as often, and is also susceptible to withering.
You'll have to weigh which you'll want by selectively choosing your monster's breed and sub-breed (or special variant, or cocooned). Here's a Guts per Match chart to help you decide. You can see maximum potential guts generated and cross-reference with your monster's tech costs and animation times.
Guts per Match
| GR | Guts/Match | GR | Guts/Match |
|---|---|---|---|
| 5 | 360 | 13 | 138 |
| 6 | 300 | 14 | 128 |
| 7 | 257 | 15 | 120 |
| 8 | 225 | 16 | 112 |
| 9 | 200 | 17 | 105 |
| 10 | 180 | 18 | 100 |
| 11 | 163 | 19 | 94 |
| 12 | 150 |
This does not include:
- Starting 50 guts.
- Guts not gained when reaching max guts.
- Guts not gained during attacking animations.
Post Battle Gains & Battle Preference
Explanation of your monster "Like" or "Dislike" Battle, and What determines the gains after a fight.- After doing a tournament, you will see a screen that has 3 randomly chosen stats, and gains.
- Higher level tournaments give more Post-Battle gains than lower tournaments.
- Liking or Disliking Battle in the Monster's Preference can adjust these gains by 1 point.
| Grade | 1st Range | Not Last Range |
|---|---|---|
| E | 1 - 5 | 1 - 3 |
| D | 2 - 7 | 1 - 4 |
| C | 3 - 9 | 1 - 5 |
| B | 4 - 11 | 1 - 6 |
| A | 5 - 13 | 1 - 7 |
| S | 6 - 15 | 1 - 8 |
| F | 1 - 9 | 1 - 5 |
| Monster Preference | Post Battle Gains |
|---|---|
| Likes Battle | +1 to gains |
| Dislikes Battle | -1 to gains |
| No indicator | +/- 0 to gains |
Death by Battle
- Taking your [maximum health value] * 3 damage or more will result in monster death.
Battle Specials and Nature
Battle specials are something that triggers during fights. See Battle Specials page for full and complete information about how these work.- Battle specials are initially a trait based on a monster's breed or sub-breed.
- Through combining you can begin to pass down Battle Specials of parent monsters even to monsters that don't innately have them.
- There are some exceptions of battle specials that cannot be passed down.
- Certain Battle Specials are breed specific and will not pass down to monsters that don't include that main or sub.
- Certain monsters are hard-coded to specifically not acquire either Anger, or Power, and will not learn this through nature adjustment, though this only applies when created directly from the Shrine.
| Good Nature | Bad Nature |
|---|---|
 |  |
| Nature Displayed | Worst | Bad | Neutral | Good | Best | |
|---|---|---|---|---|---|---|
| Nature Value | -100 to -60 | -59 to -20 | -19 to -1 | 0 to 19 | 20 to 59 | 60 to 100 |
| Battle Special | Anger | Neither | Power | |||
Adjusting Nature while raising
- Adjustments can only be +100 or -100 from a monster's initial starting nature.
- If your monster starts at -60 Nature, the highest it can be raised is 40, and lowest is -100.
- Raising Nature:
- Scolding Cheats & Praising Greats.
- Sour Jellies
- Hero Badge (Niche use. Generally not worth wasting inventory space for a negligible amount of adjustment)
- Lowering Nature:
- Don't Scold Cheats & Don't Praise Greats.
- Sweet Jellies
- Heel Badge (Niche use. Generally not worth wasting inventory space for a negligible amount of adjustment)
My monster is Skinny or Fat, what does this mean?
Form has a direct effect on your SPD and DEF at all times. It is a sliding scale between 0% (Normal) and +/- 25% (Plump/Skinny).
The game screen only shows you a vague range of their form so without tools, it's impossible to know your exact % adjustment.
At their extremes, Form affects your stats like so:
- Max Plump (+100): -25% SPD / +25% DEF
- Max Skinny (-100): +25% SPD / -25% DEF
- * Effective (post-bonus) stat can't drop below 1, or exceed 999.
- * Bonus is NOT visible in-game but is applied none the less.
| Form Value Ranges In-Game | |||||
|---|---|---|---|---|---|
| Verbiage | Skinny | Slim | Normal | Fat | Plump |
| Range | -100 to -60 | -59 to -20 | -19 to 19 | 20 to 59 | 60 to 100 |
| Max Form Adjustments | PS1 (1999) | MR2DX (2021) |
|---|---|---|
| SPD or DEF is at: | 760 | 800 |
| +/- 100 Form (25%) = | 950 | 999 |
Fatigue values between Skinny/Plump
| Description | Explanation |
|---|---|
| Win tournament | 1st Place |
| Do OK in tournament | Not First/Not Last |
| Lose tournament | Last Place |
| Tournament outcome | Fatigue | Stress |
|---|---|---|
| Win tournament | 30 + Form / 13 | -45 |
| Do OK in tournament | 40 + Form / 10 | -38 |
| Lose tournament | 50 + Form / 8 | -30 |
| Fatigue Ranges | -100 Form | 0 / Normal | +100 form |
|---|---|---|---|
| Win tournament | 22 | 30 | 37 |
| Do OK in tournament | 30 | 40 | 50 |
| Lose tournament | 39 | 50 | 62 |
| Form | Fatigue | Stress |
|---|---|---|
| -100 | +38 | -30 |
| -50 | +44 | -35 |
| 0 | +50 | -40 |
| 50 | +56 | -45 |
| 100 | +62 | -50 |
- A single tournament of any size will incur a lifespan hit of (LI# * 3)+1. This is a minimum -4wks of life;
- (LI# * 3) (The Battle = 3)
- +1 (The Current Week = 1)
- Note the LI# is not the Lifespan Index value of Stress and fatigue, Refer to the Lifespan Index Table.
- Tournaments drop stress, but you can lose additional weeks lifespan if fatigue is high enough when entering a tournament. (See Training Planner)
- On a new game, you will likely be battling a lot to bring in money to afford either progression upgrades or saving up for a raising schedule.
- For maximizing stat gains, it's recommended to avoid battle during their Prime life-stage due to the minimum 4 week lifespan hit per tournament.
- Some events require you or your monster to be a certain rank, so If you must battle to trigger the events, try to train a few years with the No-Rest method schedule before attempting to battle. Save beforehand, and be sure you can win the bracket. If not, reset and train more.
- If you have the option, Only battle towards the Older stages, (After Prime) when gains drop off.
- Skip official rank battles when ranking up (See Jump/Skip below). If you've trained until after Prime, your monster should be ready to JUMP/SKIP battles easily.
- Higher loyalty will result in less foolery in battle.
- Foolery is when a monster acts confused, loses access to their Techs (All techs become ????)
- Loyalty = (Fear/2) + (Spoil/2). Fear & Spoil are hidden values.
- You can tell if you have more Fear or Spoil based on your Style
- Keeping your style at Even will help ensure you eventually get to 100 loyalty. (Doting, for example is 0 Fear and 100 Spoil. (0/2) +(100/2) = 50 Loyalty)
- When a monster gets Foolery, the attacker gets a sizable hit% bonus against the confused monster.
| Loyalty | Foolery % | Loyalty | Foolery % |
|---|---|---|---|
| 0 | 50% | 55 | 10% |
| 5 | 45% | 60 | 8% |
| 10 | 40% | 65 | 6% |
| 15 | 36% | 70 | 4% |
| 20 | 32% | 75 | 3% |
| 25 | 28% | 80 | 2% |
| 30 | 24% | 85 | 1% |
| 35 | 21% | 90 | 1% |
| 40 | 18% | 95 | 1% |
| 45 | 15% | 100 | 1% |
| 50 | 12% |
| Spoil-Fear | Style |
|---|---|
| 80 to 100 | Doting |
| 50 to 79 | Fond |
| 20 to 49 | Soft |
| -19 to 19 | Even |
| -49 to -20 | Strict |
| -79 to -50 | Harsh |
| -100 to -80 | Spartan |
Fighting:
- GUTS: The more guts you have, the more damage your techs will do and the less damage you take. This applies to opponents too.
- The attacking monster's guts generation is frozen during the attack animation, while the defending monster's guts continue to generate.
- In MR2DX Enemies can attack at any guts value. In the original game enemies will NOT attack under 45 guts so you can plan/wait/attack accordingly.
- Note your enemy's stats and pay attention to the weakest one, POW (yellow techs) or INT (green techs). While fighting, attempt to stay in the range slot of the weakest moves allowing them to barely damage you while you save up your guts for optimal attacks.
- You don't have to fight as soon as you can win the next Grade tournament. You can choose to wait until you are strong enough to win S class, and climb the ranks in fewer fights.
- Once you are "S Grade Worthy" (even if your monster is currently E class), you can be S Grade ready in just 3 fights and be ready to fight in the M4 tournaments where you can get big money!
- To JUMP/SKIP over "Class Official Tournaments", fight in a Grade 1 Grade higher than your own. Winning places you 1 Grade higher than the Grade you beat!
Example:- Current Grade E → Fight in IMa Official Cup (D) bracket → Get promoted to C Grade.
- Current Grade C → Fight in IMa Official Cup (B) bracket → Get promoted to A Grade.
- Current Grade A → Fight in IMa Official Cup (S) bracket → Get promoted to S Grade.
Drugs and When to use them
This is a very abbreviated guide to using drugs.- Monsters with long lifespans, and/or especially monsters with long baby life stages are great candidates for drug use.
- Generally you'll use Drugs in the earlier stages of life, when the gains from the drugs would surpass the gains during the lost weeks of lifespan.
- To help determine which drug to use and if it is worth the lifespan hit:
Paradoxine (1 dose lasts 4 weeks):
+30 POW & +30 SKI
-10% SPD, -10% DEF
-18 weeks lifespan:Troron (1 dose lasts 4 weeks):
+10 POW & +5 SKI
-6 weeks lifespan
Life Stage Calculator
| Prime | Lifespan: | wks | ||||||||
| Life Stage | 1 | 2 | 3 | 4 | 5 | 6 | 7 | 8 | 9 | 10 |
| Duration in Stage | 10% | 10% | 15% | 15% | 10% | 5% | 10% | 5% | 5% | 15% |
| Weeks in Stage | 50 | 50 | 75 | 75 | 50 | 25 | 50 | 25 | 25 | 75 |
| Weeks Left | 500 | 450 | 400 | 325 | 250 | 200 | 175 | 125 | 100 | 75 |
| Gain Scaling | Low | Medium | High | Medium | Low | |||||
| Monster Size | Small | Medium | Large (Final Size) | |||||||
Example: Type 1 at 300 weeks has 50 weeks in stage 1. One Paradoxine subtracts 18 weeks from that stage; making Stage 1 last 32 weeks. You will have gained 120 POW & 120 SKI. Could you have achieved those stats at this stage in 18 weeks without it? If not, Paradoxine might be for you!
Drug Calculator
![]() Paradoxine uses 18 weeks of lifespan on use. Effect lasts 4 weeks.
Paradoxine uses 18 weeks of lifespan on use. Effect lasts 4 weeks.
| Enter Starting Stat Value: |
|||||
| Chosen Drug Effects: |
POW (+30/wk) |
SKI (+30/wk) |
SPD (-10%/wk) |
DEF (-10%/wk) |
Lifespan (wk) |
|---|---|---|---|---|---|
| Wk 1: Drug #1 | |||||
| Wk 2 | |||||
| Wk 3 | |||||
| Wk 4 | |||||
| Wk 1: Drug #2 | |||||
| Wk 2 | |||||
| Wk 3 | |||||
| Wk 4 | |||||
| Wk 1: Drug #3 | |||||
| Wk 2 | |||||
| Wk 3 | |||||
| Wk 4 | |||||
| Wk 1: Drug #4 | |||||
| Wk 2 | |||||
| Wk 3 | |||||
| Wk 4 |
Save before every training, and RESET if it fails. (The drug only works on a cheat/success/great). You are also not notified of the stat gains on the training results window, but you can determine that the monster did gain the extra stats when you look at the Monster Data screen.
Training schedule with Paradoxine during Baby stages, Feeding/Training schedule will be:
| Paradoxine & Troron Schedule | ||
| Monthly: | ||
| Week 1: | Drug ( | Light Drill |
| Week 2: | Hard Drill or Light Drill | |
| Week 3: | Light Drill | |
| Week 4: | Light Drill | |
Feeding Peaches
Optimizing Prime (best gains) in single player is the most efficient way to maximize stat gains. Peaches extend the life of your monster by setting its biological clock backwards by those amount of weeks. Essentially, if you feed Peaches towards the end of Prime, your monster will get to live that many weeks of Prime again. If you use them too soon (or too late) it may place you at a life-stage where stat gains are not optimal.- DON'T Use Peaches the second your monster hits Prime!...
- 50 weeks AFTER your monster enters Prime is the time to use a Gold Peach; Obtained from ParePare expedition
- 25 weeks AFTER Prime (or 25 weeks AFTER you fed a Gold Peach) you can use a Silver Peach; Obtained from the Elder's Cup Tournament
- You can earn peaches with a different monster, and keep the items for a future monster.
- OPTIONAL: If using Paradoxine/Troron for Baby stages, you can use Peaches to extend baby stages instead, increasing the number of training drugs you can use during this stage.
- Peaches add weeks by rewinding time, which can put you into an earlier Life Stage, allowing you to increase the time spent in a particular stage.
- Peaches in Life Stage 1 extend stage 1.
- Peaches in Life Stage 2 extend stage 2.
- Peaches in any other Life Stage can rewind time to a previous live stage, however, it cannot rewind time earlier than Life Stage 2.
Various build and format examples
If you're struggling to raise your monster well enough, save up some Gold, maybe get a Gold Peach, and be ready to dive into one of these based on your needs! The amount of gold needed is minimal if you save up, and a Gold Peach has such low requirements to obtain that I feel it is safe to include in these demonstrations.This details which drills of a feeding/drill schedule to use and when, so you can understand how to apply the schedules to any monster in practice. There are many different lifespans and aging types, your results may come sooner or later than exampled below.
Apply the following practices regardless of what you raise:
- Of the desired stats: Raise highest aptitude stat gains in the baby/early/late stages, and the lowest aptitude stat gains in and around Prime. Ignore undesired stats.
- Save-Scumming isn't required but is recommended for Failures, and especially in and around prime stages for unwasted stat gains.
- Following proper Peach feeding timings if you have a Gold or Silver Peach to use.
INT Monster (Lazy No Rest)
Training an INT attacker
Training an INT based monster is one of the easiest and straight forward raising patterns due to Drill synergy. This build aims to raise INT/SKI/SPD and supplement a bit of LIF. This allows an incredibly high chance to Dodge while being able to land almost every attack with force. You won't need much LIF, though it's recommended to raise it enough to be able to soak an unlucky hit.The following assumes your Monsters have at least average aptitudes for INT/SKI/SPD and preferably at least one of these above average.
- Using DX Lazy No Rest or PS1 Any Monster schedules, Use one of two Hard Drills: Meditate (or Leap whichever has the highest stat gain), and Shoot for Light Drills, until INT is about 700 (or SPD is about 500)
- Once ~700 INT (or ~500 SPD) is reached, Swap Hard Drills (From Meditate to Leap, or vice-versa), and continue to do Shoot for Light Drills.
- Meditate's secondary stat is SKI and Leap's secondary stat is INT so these Hard Drills support each other well and usually you'll get close to max stats, or very close, before Prime.
- Note about Form: No-Rest method naturally makes your monster Skinny. You will likely not need to raise SPD above 760 (PS1) or 800 (DX) since maximum Skinny form (-100) increases effective SPD by 25%.
- Weigh your monster's stat gains, if LIF gains are low and SKI gains are high, You may decide to use Run for Stages 4 through 7's Light Drills to fill out at least enough LIF to soak any unlucky hits.

Fresh off the shrine.

Lazy No-Rest with Meditate and Shoot.>
Also save-scummed Errantry to get Twister Claw once it was 15%

Switched to LIF when Prime hit @ 2.5yrs.

Optional Silver Peach (+25 wks) after Prime; Continued LIF drills.

Cost to Raise: 63,500 G. Maximum Skinny (+25% SPD) and effectively 999 SPD.
Clawful is still E grade but has 219 wks left (+75 wks if using Gold Peach).
This is up to 6 years remaining to do whatever else is needed.
Other Considerations
- If you're able to qualify for a desirable tech from Errantry, learn it as soon as possible, preferably while still in stage 1 or 2. You can often acquire it with under 50% chance since each week of errantry is a roll for the tech.
- If you plan on battling early, or LIF gains are C, B, or A You can also consider alternating Shoot and Run. If LIF gains are E or D you should wait until adolescence or Prime to raise LIF.
- A monster's Aging type will determine how quickly you reach Prime. Precocious monsters will likely need to switch gears earlier for secondary stats like LIF, especially if it's a low Stat Gain value. Take advantage of the highest possible results from the lowest stat gain values for their breed during this time.
- For Precocious monsters, If your other stats aren't maxed out before swapping to LIF as the Light Drill, you can switch back to them in the later stages (or on the second pass through Prime stages when using Peaches) if needed since they gains should still be reasonable.
- Switching Hard Drills from Meditate to Leap (Or from Leap to Meditate) should be done around 675 if INT and SPD gains are A since you will likely be getting near capped gains from these drills in the mid-stages even without Greats.
- It's OK if stats aren't drilled to 999. You'll get bonus Stats from tournaments. More bonus from higher tournaments.
POW Monster (Lazy No Rest)
Training a POW monster without Paradoxine or Troron
Training a POW based monster takes a little bit of patience and a bit more time as you may have to regain dropped stats from previous Hard Drills. The following assumes your Monsters have at least average aptitudes for POW/LIF/SKI with preferably one of these above average, and following proper Peaching rules (Feed Gold Peach 50 weeks after Prime, or Silver peach 25 weeks after Prime or Gold Peach).- Using the DX Lazy No Rest or PS1 Any Monster schedules, Use Pull as the Hard Drill. Use Run or Shoot (whichever has the highest stat gain) for the Light Drill.
- If you can qualify for a desirable tech from Errantry, try to acquire it in stage 1 or 2, or wait until late stages.
- While continuing Lazy No Rest, Switch to Shoot as your Light Drill at Stage 2, or no later than Stage 3 if it was not your light drill when you started.
- At around 900+ POW or if you reach Prime you have a decision to make: Raise SPD or not?
- Focusing SPD: Switch to 4 Light Drills per month during Prime and Sub-Prime Weeks, doing all Dodge drills.
- Once SPD reaches 500 or your desired limit, continue all Light Drills to raise any other stats needed, like SKI and LIF.

Fresh off the shrine.

Lazy No-Rest with Pull and Shoot.
Sent to Errantry to get a Heavy Tech.

Switched to all Dodge (SPD) during Prime.

Optional Gold Peach (+50 wks) after Prime;
Continued SPD drills through Second Prime.

After SPD reached 700, Switched to SKI and LIF

Cost to Raise: 78,000 G. Maximum Skinny (+25% SPD) and effectively 853 SPD.
It's is still E grade but has 247 wks left (+25 wks if using Silver Peach).
This is up to 5.6 years remaining to do whatever else is needed.
Other Considerations
Not Focusing SPD? It may be easier to raise DEF depending on the monster, but DEF is the weakest of the stats. The plus side is it continues to raise LIF.- Choosing DEF: continue Lazy No-Rest but with Swim as the Hard Drill.
- You can keep committing to Shoot, or alternate Shoot and Dodge depending on what you're comfortable with
- Optional: Spend stage 1 feeding Mangos & Mint Leaves if you're low on cash and stick to just best stat gain Light Drills.
- Optional: Use Magic Bananas and Nuts Oil to raise loyalty only doing the highest stat gain Light Drills. This will require save scumming for the 10 Magic Bananas you feed but will get you to 100 Loyalty in about 13 to 15 weeks.
- It's OK if stats aren't drilled to 999. You'll get bonus Stats from tournaments. More bonus from higher tournaments.
Expedition Monster (Lazy No Rest)

This Expedition monster was fed Gold and Silver peach at this point
and has 344 weeks of Lifespan (7.1 years) to farm expeditions with!
Training an Expedition Monster
You'll want to be able to do this with as little interruption as possible as to avoid accidental lifespan hits from losing track of weeks. This example cost 49,400 G, but try to have at least 60,000 G saved up before beginning, which gives you about 4 years of No-Rest in a row (give or take with item sales). Your chosen monster should have at least C/3 gains in INT/LIF/POW, with higher gains making this easier.This raise route was done with using the #995 ID Centaur in MR2DX. This is arguably the best of the best Expedition monsters in all of DX, but there are still many other monsters that are perfectly fine to use instead.
Different or lower stat gains will need slight tweaks for when to switch from Meditate to Pull, or when to do Run/Study/Shoot Light Drills. Don't worry too much about specifics, you'll get a feel for this after you've done this once or twice and understand where the most optimal drill switches will be.
Raise Route
Stat Priority: INT > LIF > POW > SKI.Optional: 1st 8 to 10 weeks use Magic Bananas to raise Loyalty quickly.
- Using DX Lazy No Rest or PS1 Any Monster schedules; Use Meditate as your Hard Drill, and Run for Light Drills until INT is about 900.
- If your monster has E or D in LIF gains (Why are you using that monster), Use Meditate and Study for the first life stage or two. WAIT until around stage 3+ to swap out Run for the Light Drill.
- Once ~900 INT is reached, Replace Meditate with Pull as your Hard Drill, and continue Run for Light Drills until LIF (max or close to 700) & POW (350+) are in a comfortable spot for you.
- Depending on Gains or reaching 900 INT: Only Pull and Run after, switching to POW/LIF (Mixing in Shoot if you want to reach 300 SKI)
- Fight in D official, then fight in C official. (Freeze your monster between officials if you want to save a bit of lifespan)
- Optionally Use a Star Prune if you need to reach 50 Fame.
- Optionally use Light Drills to top off any remaining stats you might want in INT/LIF/POW/SKI.
- Optionally Gold+Silver Peach and your monster is Expedition ready!
Video of entire raise route
New Game or poor players
40,000k G first year with E & D Tournaments!Starting out fresh on a new game might feel daunting before you can afford expensive No-Rest methods. Fear Not!
- You can use the below tournament dates to bring in a lot of money with any monster at any time.
- Optional: 16x Sueki Suezos you'll destroy these from day 1!
- Sueki Suezo will die in 1 week, and the following week is unusable due to the Death Event scenes.
- These are the reward optimal tournaments you can fight in, accounting for time lost for death events.
- The Blue tournaments are "F" tournaments, (FREE FOR ALL). These have some tough monsters and you'll most likely want to use a Sueki Suezo, but these tournaments provide the largest amount of cash reward available at a low grade.
| Tournament Dates | Tourney Prize | Sell Item | All defeated |
|---|---|---|---|
| Jan WK4 FFA ** | 4000 | 0 | 300 |
| Feb WK2 Torles Tourney | 1000 | 1500 | 100 |
| Mar WK1 Parepare Cup | 2000 | 100 | 150 |
| Mar WK4 IMA Official D | 1000 | 0 | 250 |
| Apr WK2 Spring Carnival | 1000 | 500 | 100 |
| May WK4 Gemini Cup * | 2000 | 1500 | 150 |
| Jun WK2 Freshmen's Cup | 800 | 0 | 150 |
| Jun WK4 IMA Official D | 1000 | 0 | 250 |
| Jul WK2 Nageel Cup | 2000 | 500 | 150 |
| Aug WK2 Desert Moon Cup | 1000 | 500 | 150 |
| Sep WK2 Artemis Cup | 1000 | 1500 | 150 |
| Sep WK4 IMA Official D | 1000 | 0 | 250 |
| Oct WK2 Rookie Cup | 800 | 500 | 100 |
| Oct WK4 Hero/Heels' Cup | 1000 | 5000 | 700 |
| Noc WK2 Galoe Cup | 2000 | 500 | 150 |
| Dec WK1 Parepare Cup | 2000 | 0 | 150 |
| Dec WK4 IMA Official D | 1000 | 0 | 250 |
| Totals: | 24600 | 12100 | 3450 |
| Grand Total: | 40,150 G (38,650 G - Keeping Gemini Pots) | ||
* You may want to keep those Gemini Pots though (At least 3 to 5 on a new game). They'll come in handy later!
** MR2DX: New Year's FFA is bugged and can crash. Try disabling FF to do this tournament. Sometimes this is enough to proceed to participate in it, but can also take multiple resets before it works.
- As you can see, Lower level tournaments can give a decent boost. For a complete schedule, see: Schedule of Annual Events
- You can freeze your monsters until the next event if it's getting close to the end of it's life.
- While a monster is frozen, you can raise a second monster on the cheap to pass time, or work towards your next monster.
- Once you have enough cash to afford a No-Rest method, the resulting monster from that will be a massive return on investment.
Mid-Game: Freezer Method and Tournaments
A whole lot of fighting gives a whole lot of gold!| Class | # of Fights | Prize Money |
|---|---|---|
| B & A | 17 | ~86,000g |
| M4 | 4 | 43,000g |
- Raise a B Grade monster that can also win A Grade fights. Fight in as many Non-Official (Non-promoting) B & A Grade tournaments as you can. You can make quite a bit of money with 1 monster this way.
- Once a monster gets to S Grade and can beat S Grade and/or M4 Tournaments you can use the Freezer method to farm them. Freeze the monster in-between Major 4 battles and only bring it out of the freezer to fight in the Major 4 Battles.
- Do both! Fight M4 battles with 1 monster, and B+A rank battles with another inbetween. (Optionally, You could use the same monster for B+A+S though your fame will drop slightly and you'll go through lifespan faster)
Tournaments use up a minimum of 3 weeks of Lifespan, so factor this in.
When using this method, always use Nuts oil Before and After a tournament to avoid additional lifespan hits. You won't need to use Mint Leaf since Tournaments reduce stress.
- Eventually you may be at a point where you will have multiple monsters at varying life stages and capabilities. Maybe you only bring your M4 monster out for those tournaments, and you also have a new monster you're raising but Expeditions or M4 tournaments sort of interrupt your new monster's schedule and rhythm.
- Consider using a "throw away" monster to sleep through it's life to pass the time until your other monster's feeding/training schedules will be back in sync to the time you put them in the freezer, or to just pass the time until a known event occurs (Event such as a tournament invitation, ranch event, expedition etc.)
Late-Game: Expeditions!
Maximizing gold earned for Lifespan spent. Just 1 expedition monster can bring in hundreds of thousands of gold over it's life.In MR2DX, expeditions are the most efficient method for making money (See why below) but takes planning to raise an optimal expedition monster. Your Mid-game money making should allow you to do this.
| Expedition | Average Take* | High End* |
|---|---|---|
| Torles | 30,000g | 50,000g |
| Kawrea | 30,000g | 50,000g |
| Parepare | 20,000g | 25,000g |
What monster to use for Expedition?
Key stats are INT > LIF > POW (and > SKI for very specific scenarios). The below table has filtered down to some of the best compliments of monsters to use. There are plenty of good expedition monsters if you don't like the suggestions below, these are just curated from filtering for the best attributes. See the Song list to look these up, or find other monsters to your preference.
| Unlock Progress | Rating | Monster Type | DB ID# | Title/Artist |
|---|---|---|---|---|
| Nothing Unlocked | #1 #2 #3 | Caloriena (Mocchi/???) Time Noise (Naga/???) Sumopion (Arrowhead/???) | 1027 1046 1006 | EKTO/m-flo GOES/BBE Posso/Fara |
| IMA-FIMBA Unlocked | #1 #2 | Garlant (Henger/Dragon) Express Worm (Worm/???) | 1141 1045 | Tes/Maki Darin/Darin |
| 1st Stable Upgrade | #1 | Titan (Golem/Suezo) | 505 | KOE/ASCA |
| Centaur Unlocked | Best* | Blue Thunder (Centaur/???) | 995 | Matr/Yaz |
| Unlock Progress | Monster Type | DB ID# | Title/Artist |
|---|---|---|---|
| Nothing Unlocked | Green Suezo (Suezo/Plant) Queen Plant (Plant/Pixie) Metal Jell (Jell/???) Daina (Pixie/Dragon) | 225 1160 1031 1138 | Caisson/Loscil Sujak/XXX Eld/Skogen Lazer/CTS |
| IMA-FIMBA Unlocked | Eye Worm (Worm/Suezo) | 1178 | Tika/Silva |
| 1st Stable Upgrade | Big Blue (Golem/Tiger) Ecologuardia (Golem/Plant) | 1143 686 | IzWE/Kes Hashi/Actium |
| Everything Else | Pole Mock (Mock/???) | 1037 | Zlato/Sha |
Now, check out the Raise Route for Expedition Monsters
Maximizing valuable items and inventory:
- Empty your inventory before expedition (Keep the Gemini Pots though). Even if you sell the items, you'll get some money back, rather than deleting the item while on expedition.
- Use the Expedition Maps to help you locate the buildings that can drop the high dollar items.
- Torles and Kawrea are usually the most profitable of the 3 expeditions. Since the items are random, you can choose to reset the expedition and try again until you acquire items that sell for the threshold you're trying to make.
- Once your inventory fills up, keep searching! Replace the lowest value items with the highest value items you continue to find.
- Refer to the complete Item List if you're unsure what stuff sells for. (Platina 8k, Gold 6k, Silver 4k, Disc Chips between 500g-2kg etc.)
Example Expedition
- 13 free slots
- Torles Mountains
- Feed Nuts Oil, Save, then Rest on week 4 before the expedition
- Over the expedition you get 1 Gold, 3 Silver, 1 Fire Stone, 4 Mock Chips, 3 Centaur Chip, 1 Henger Chip
- Maybe you also got some junk like Half-Eaten nuts but you can delete/replace these as you find other items that are more valuable
- Back on the ranch you feed your Week 1 item
- Sell the expedition take-home items for 36,000g
- Freeze your monster until the next Week 4 prior to an expedition and repeat.
In MR2DX you get 70 Fatigue for expedition. Assuming you were at 0 stress/fatigue when you started, this equates to only 2 week lifespan hit for the 4 weeks lived.
You can still make the same amount of money in expeditions In the original 1999 game, but you take a larger lifespan hit (minimum of 8 weeks).
Cost Analysis/Comparison: The Lifespan cost of Gold
- MR2DX: Expeditions cost 2 weeks of lifespan (minimum).- MR2 1999: Expeditions cost 8 weeks of lifespan (minimum).
- Tournaments cost 3 weeks of lifespan (minimum).
The highest payout tournaments:
- July Wk2 A class: 10,000
- November wk4 A class: 11,000
- "Major 4" S Grade tournaments (Wk2 Feb/May/Aug/Nov) 10,000 each
- The highest payout tournament at 11k gold costs 3 weeks of Lifespan minimum.
- This equates to 3,666g per week of lifespan, and should be your benchmark.
- MR2DX: Take your total amount sold from expedition and divide it by 2.
- If you acquired 28,000 gold in sellable items on a single expedition, then you made 14,000g per week of lifespan.
- Much more take-home pay than the highest paying tournaments in the game!
- Monster Rancher 1999: Take your total amount sold from expedition and divide it by 8.
- If you acquired 30,000 gold in sellable items on a single expedition, then you made 3,750g per week of lifespan. Just over break-even compared to M4 farming
- It's more up to personal preference if you would rather farm pay-out tournaments, or use expedition to make money, but you need to make ~30k or higher for it to be better income per week of lifespan.
These monsters and items won't be available to you immediately but can still be helpful to understand game mechanics that can be applied to new players)
Teawch's Maxxed Monsters step by step tutorials/guides on YouTube.
The below example monsters are detailed out to raise from infancy to Max stats.
Credits
Recent: Discord Community, Teawch, MonsterFenrick, SmilingFaces96, Nash, ArchbishopDave, AlchiusHistoric: Lisa Shock, Mepersoner, Dark Phoenix, Nevistar, Split Infinities