
- Chat! Get help. Share Monsters.
- World-wide fans & players
- Community run & moderated MR Subreddit
- If Discord isn't your thing.
Community Tournaments
- PVP & Event Calendar
- Multiple Hosts, Games & Formats Challenges
- Speed Runs & Nuzlocke Social Media & Websites
- Official and Fan channels
Please Donate!
Your contributions help keep
the site and archives going!
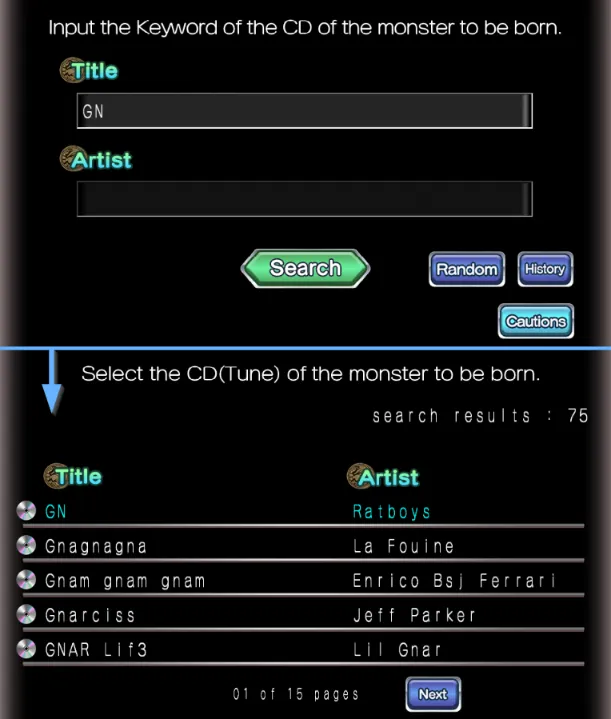
Create Monsters at the Shrine! MR1 DX Song List (EN) MR2 DX Song List (EN) Ultra Kaiju MR Keywords (EN) Ultra Kaiju MR Song list (SEA)
PS1 CD DB & Tools
 GameBoy Advance
 Ultra Kaiju MR
Beginner's Guide & Walk-through for
Monster Rancher 2 (+DX)
What is Monster Rancher?
At its core, Monster Rancher 2 is an open-ended pet raising simulation with real-time battle for tournaments and progression and has a bit more complexity over the original. There are basically 2 budgets; Your Gold and your monster’s Lifespan, and you want to make the most out of both to have a productive monster. Because there is a lot of variety, this walkthrough is not going to give you exact step-by-steps, but instead help you make the required determinations so that it can be applied to any monster.
~ Suggestions for revisions or additions are welcome.
This is not an extensive list, just a few things of note:
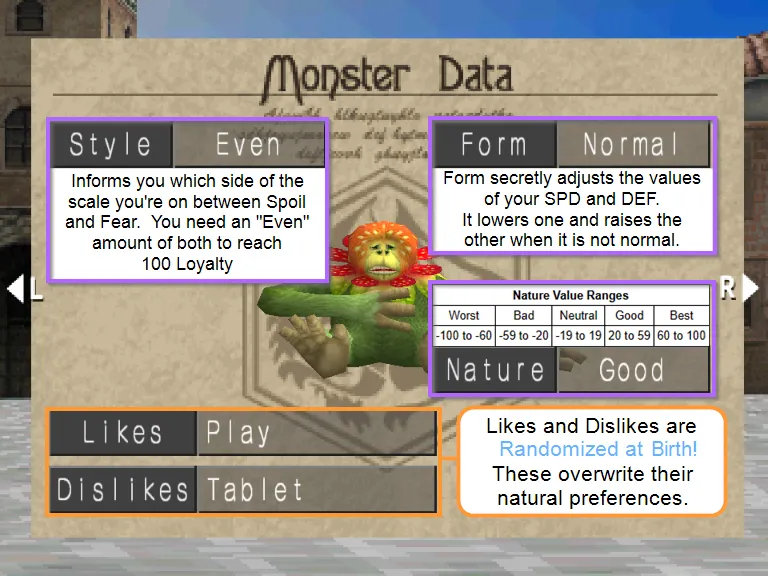
- Monsters now have Monthly food preferences based on their main breed (And 6 choices, instead of 3). Each food given can have 3 different effects depending on their natural preference. These preferences may be randomly overwritten when a monster is born, as indicated in the Likes/Dislikes page of the Monster Data.
- Monsters can only be fed weekly items once per week (MR1 could be fed unlimited).
- Monsters can only be fed 1 Gold peach and 1 Silver Peach (Plant Egg equivalent) in their life.
- Training is now called Errantry, and learning Techs has new mechanics/requirements, and introduces Tech Chains (Some techs must be used x# of times before being able to learn the next in the succession)
- Work is now called Drills, and you are no longer paid for it, but monsters can get "Greats" or "Cheats" during drills as well.
- Will is now called Guts (called guts the rest of the series), but it functionally identical.
- "Seriousness" (a hidden stat that could not be adjusted) is replaced with "Nature" which can change over time based on positive reinforcement to a monster's behavior, or by using items.
- MR2 increases the number and types of Battle specials from 1 type to 13 types, and a monster can have multiple battle specials.
- Expeditions are much less random, cannot be Lost, and can have increased odds when raising the required stats, however you must return to the starting point before your energy runs out.
- Combining is completely overhauled and is no longer seeded by monster ages and times of year.
- Tournaments now award bonus stats afterward (More stats for higher Grade tournaments)
- Disc Chips have more variety and purposes to grant Breed bonuses to other breeds that might not have them. Instead of MR1's lackluster +10 to a stat, Chips in MR2 can now give effects such as Battle Specials and Drill bonuses (See items page).
 On a fresh play-through you will answer a questionnaire (Answers are arbitrary and simply world-building, don't stress about it) then be introduced to your assistant Colt, along with a few IMa organization members (International Monster Association) with a few vague explanations of things if you choose to have Colt explain them. Ultimately you will end up in Town where you can pick your first monster. This can be done either from the Market or the Shrine.

Unlocking some monsters often requires using some found item while fusing 2 monsters together to create a new breed of monster correlating to the used item. For simply unlocking new breeds with a Combination Unlock Item you found, it is suggested to use any 2 unraised market monsters, or use one raised parent as Monster #1 that has learned additional attacks along with any other unraised monster as Monster #2.
Combining can create stronger babies. The combining process can create new crossbreeds for you, or can be beneficial for monsters to pass down Stats, Techs (attacks), or both. On a fresh game as a new player, don't expect to see much from combining except to have a monster possibly start with a few extra attacks, and to unlock hidden monster breeds that use a combining item to unlock them.
Combining for super babies with incredibly high stats is not straight forward and is considered a more advanced topic. Technical details are fully covered in the Combining guides once you're ready for more advanced (but optional) meta mechanics.
Dadge's Analysis might seem like random unhelpful phrases, but each phrase correlates to a Battle Special that a monster has. Battle Specials are things that can trigger during tournaments. Example, if Dadge says "You won't see its true abilities until it's cornered" about your monster, this equates to the "POWER" special, a Good-Natured Battle Special that can trigger when your monster gets knocked into the Yellow healthbar range and gives them 100% bonus damage. These are covered in great detail in the Battle Specials guide.
Now that you have your monster, it’s time to take it to the ranch! This is where most of the menu and choices are. You’ll likely be bombarded with multiple messages from Colt on this first week on the ranch such as Preparing for an Official Tournament, or an Errantry sale notice. IGNORE THIS; This is just an unfortunate lining up of events triggered by the game on the very first week without explanation or context.
Official Tournaments will promote your monster to a higher Grade and more difficult opponents (probably not something you want to do right out of the gate, even though Colt will constantly remind you about the Official Tournaments regardless).
Errantry is for learning new Techs (attacks) and has minimum stat requirements that must be met before they can be learned. As a baby, it’s likely to fail multiple weeks and not learn any new attacks. We’ll cover Errantry more later.
Oh and while we’re here, Visit the Item shop before you do anything else, and start the dialogue with Aunt Verde. You don’t need to do anything else at this point. Once introductions are complete you can exit this menu to get back to the main Ranch menu.
Next, it’s time to start doing Drills so you can raise your monster's stats and preparing your monster to compete in tournaments.
These are two stats you see immediately for your monster upon bringing it to the ranch to begin raising.
Your Style indicates the Balance of Fear and Spoil of your monster. Fear and Spoil are hidden values that determine your Loyalty stat.
Loyalty has several uses.
- It helps you in Battle. Low loyalty means your monster will get confused more often. In battle, when a monster gets confused, their chance to dodge drops dramatically, allowing the attacker a massive hit% bonus. This goes both ways.
- It helps to learn Techs. For techs that have stat requirements to learn during Errantry, Loyalty behaves like a bonus stat that is added to your current stats to try and meet the learning thresholds.
- It helps with Drills. Loyalty (specifically the Fear portion of it) is one of several factors that can help increase the chances of Success.
| Spoil-Fear | Style |
|---|---|
| 80 to 100 | Doting |
| 50 to 79 | Fond |
| 20 to 49 | Soft |
| -19 to 19 | Even |
| -49 to -20 | Strict |
| -79 to -50 | Harsh |
| -100 to -80 | Spartan |
Some Items (passives or consumables) also help adjust Fear and Spoil. Loyalty cannot reach 100 without an equal amount of both Fear and Spoil. It has a direct effect on important aspects of Battles, Errantry and Drills.
- LIF: Health Bar for Battle, Energy for Expeditions.
- POW: Increases POW Attack damage + lowers damage from POW attacks (
 Yellow Tech Icons).
 - INT: Increases INT Attack damage + lowers damage from INT attacks (
 Green Tech Icons).
 - SKI: Increases Accuracy / Counters opponent SPD.
- SPD: Increases Dodge / Counters opponent SKI.
- DEF: General defense stat that midly lowers dmg from both POW and INT attacks.
- Light Drills raises one stat a minimal amount but causes a lower amount of stress and fatigue.
- Heavy Drills can raise two stats at a time (A primary stat and secondary stat by a lesser amount) while dropping a third stat, at the cost of higher stress and fatigue.
What is Stress and Fatigue?
These are hidden values that go up and down by varying amounts based on your actions. Having high Stress and Fatigue can cause your monster to lose lifespan. It is better to be proactive about this, rather than be reactive.Colt only warns you about Stress on week 1 of every month and only if your monster is on the ranch. Colt gives you weekly status updates regarding fatigue which can also be loosely observed by your monsters animations walking around on the ranch.
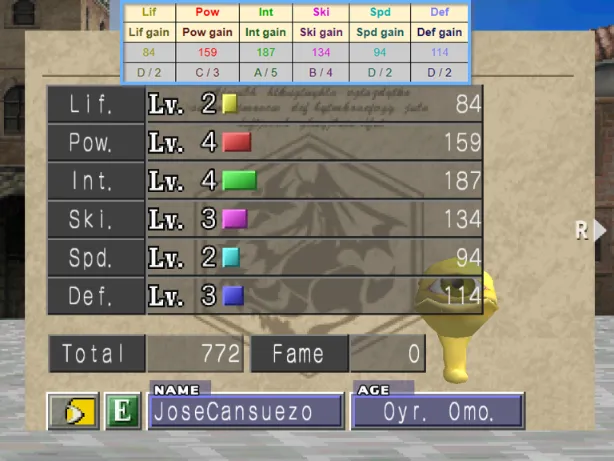
What do the letters mean? You will see in the guides that there are Letter or Numeric indicators for Stat Growth.
- E - A is most commonly used in guides.
- E is the lowest value/range and works it's way up (E < D < C < B < A)
- Some guides may also list the numeric, 1 - 5.
- In rare cases values will be documented as 0 - 4 (the internal game code for the same values).
Techs:
Most babies are born with 2 Techs, and some variants have additional bonus techs. You can use Errantry to learn more techs later. There are a few outliers with special exceptions that can be born with more.Almost all monsters are born with POW techs, and sometimes they are born with INT techs. Some have an even mix of INT & POW types, while others are heavily lopsided to one or the other attack types. While it might be a spoiler, it’s worth it to look up your monster’s Tech List to see what options it will have available to it to help in your decision making about which stats to raise. You may not want to invest heavily into INT if your monster only has POW Techs, etc. But it’s also possible that a monster’s best Techs could be ones they’re not born with, so knowing in advance can be helpful here as well.
Techs with Yellow icons use POW as their base damage stat.Techs with Green icons use INT as their base damage stat.What does all this have to do with Drills?
Now you’re at a good decision point to know which stats to focus on based on your monster's Gains and current or future techs. As a new player in a fresh game, raising all the stats high is very unlikely, and in most cases raising stats very evenly feels strong at first, but by the late game you won’t have enough punch to knock out the end game monsters. Instead, you’ll want to focus a few stats heavily with a couple of backup stats.- Choose 1 attacking stat (POW or INT) for your monster.
- Choose 1 defensive stat for your monster (SPD or LIF/DEF).
- Supplement SKI in your routine, this is very important later.
- Enough LIF to avoid 1-hit KO for Speedsters, or Loads of LIF for slow tanky monsters.
SKI is a secondary stat and has no Heavy Drills to help raise it by large amounts, but it is incredibly important to keep this stat raised as you progress through the game. Opponents will inevitably get faster (high SPD) and your SKI stat helps counter the opponent’s SPD and helps increase the base accuracy of a given Tech.
Raising/Drill Schedules:
There are many different schedules you can follow, and while it is not a requirement, their importance is for allowing your monster to live the longest by keeping associated Stress and Fatigue under control. Cash on hand is usually the determining factor for single player raising schedules, since this is a Beginner's Guide, You can use the Cheap Schedules to begin raising your monster. These are the cheapest lifespan neutral schedules that can be done, but once you have money you can refer to some of the more advanced schedules for more stats per month.When you do which drills is important!
Monsters live through 10 "Life Stages" from Baby to Adult/Prime to Twilight. In addition to a monster's aptitude towards a given stat (stat gain) their overall gains start low and scale upwards as they age towards adulthood, then gradually scale back down as they become elderly. The amount of time they spend in each stage is also determined by their Life Type (also called Aging Type)
-
This demonstrates scaled Life Stage Stat Gains, for Light and Heavy drills, based on monster's aptitudes for a given stat. You can see that if a monster's stat gain is "E" in a given stat, raising it will be far fewer points per drill than a stat with an "A" gain:

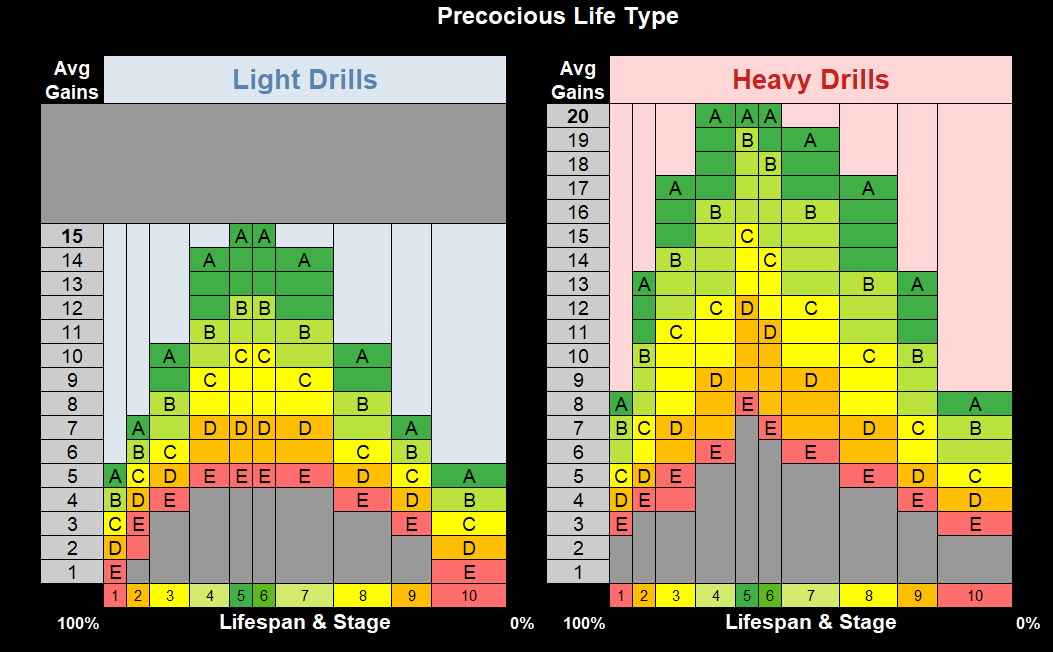
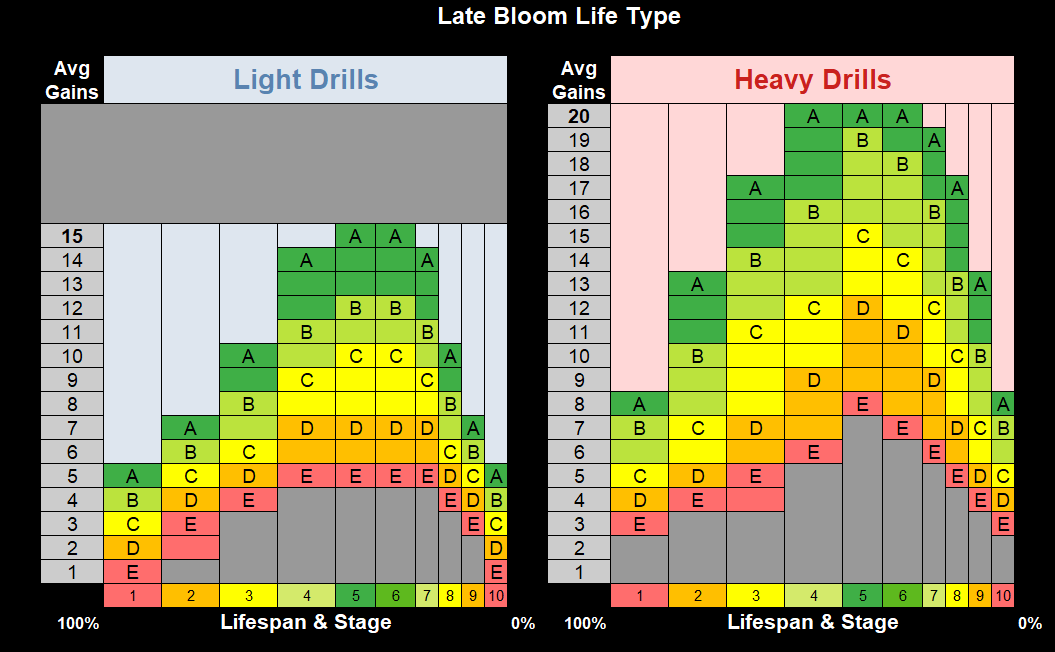
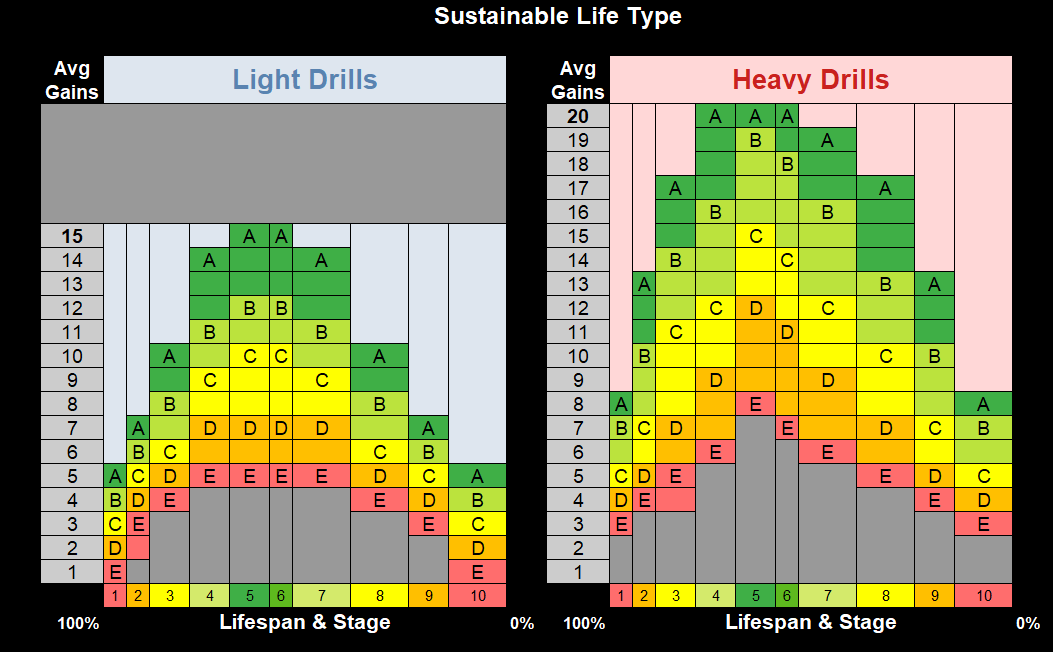
If you paid attention to what your monster is good at, and have determined which stats you will be raising, the most efficient way to gain the most stats, is to:
- Drill for the stats they are best at during the early life stages when the stat scaling is low overall. This ensures the most points per week in the early stages.
- Avoid the Stats they're bad at during the early stages because the gains of stat points per week will be incredibly low by comparison and you have a finite amount of lifespan to work with.
- Wait until they are closer to prime to raise stats they're bad at, if you happen to need/chose one of those stats to raise.
- SPD is weighted as a more valuable stat than DEF, so if you focused DEF on your monster, Prime is a good time to also catch SPD back up if your other stats are sufficient.
What do the Stars on the Drills mean?
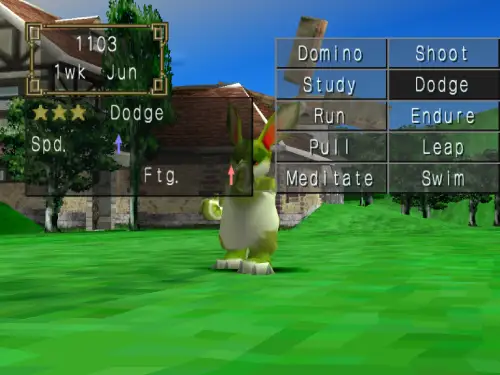
As as you play, you may notice that the drills have:
This is the drill difficulty, and directly correlates to how high your stat is for the drill that raises it. In short, the higher your stats get, the more difficult it is to Succeed at the drill (Easier to "Fail" the drill). This Drill success or failure is not pre-determined, and a reset may give you a different result.
What is the +1 that shows up on Drills and Errantry?
These are breed-specific traits that indicate you are getting a bonus point on a specific drill or errantry stat. Mixed breed monsters can benefit even more if the breed of the main and the sub both would give bonuses.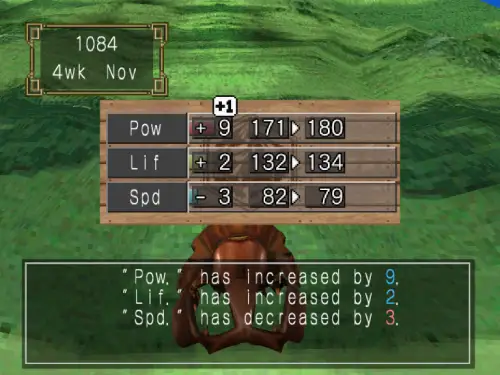 For example: Henger gets a +1 to Shoot drills, and Zuum gets a +1 to Run drills, so an Omega (which has both breeds present: Henger/Zuum) get's +1 to BOTH Run and Shoot drills!
Additionally, some monster's Disc Chips, when used in combining at the lab, can pass on these bonuses to breeds that might not otherwise have them.
Continuing from the last example, if we combined a Henger and Zuum to get an Omega, and used Durahan Disc Chips in the process (which gives a +1 bonus to Domino light drill), then the baby monster would have +1 to Shoot, Run and Domino drills!
Not every breed has a bonus to drills. Some have bonuses to Errantry, or battle specials like Grit for example.
The +1 bonus is already applied to the visible result, so if you see a "9" with the +1 bonus, that means your result would have been 8 without the bonus.
Weird technical stuff with "1s"
Play Time
You might find that while doing drills, your monster will request to play. This is a big destresser for your monster and relieves a bit of fatigue too. The type of mini game played is determined by the breed of monster you're playing with.
- Mud Fight: Ape, Arrow Head, Beaclon, Centaur, Dragon, Gali, Henger, Jell, Jill, Joker, Kato, Mew, Mocchi, Mock, Naga, Phoenix, Pixie, Plant, Tiger, Undine, Worm, Zilla
- Sparring: Bajarl, Durahan, Golem, Hare, Hoper, Niton, Wracky, Zuum
- Sumo Battle: Baku, ColorPandora, Ducken, Gaboo, Ghost, Monol, Suezo
- A reaction before doing a drill can indicate a monster's motivation for that drill. Motivation for drills changes sporadically. Motivation doesn't guarantee Success or Failure but sways the chances of it.
- Requesting an Item or Activity from you just after committing to a drill.
- And Drill results: Sucesss, Cheat, Great, Fail.
There is a complete (and very technical-heavy) break down of Drill Processing and how it works, but for sake of simplicity of the beginner's guide, this is what you can expect:
- Drills: The following table are typical/simplified results for reactions:
Behavioral Positive Reinforcement Result Reaction Nature Stress Fear Spoil Cheat Scold Cheat Don't Scold - Great Praise - Great Don't Praise Fail Scold - Fail Don't Scold - - - Requests:
- Deny Requests: Stress goes up.
- Grant Requests: Most of the time this just avoids the Stress of denying the request. There are a few minor exceptions.
- Playing with your monster is almost like a Rest action (less effective but decent).
- Requesting Nuts Oil actually gets the full fatigue relief and doesn't count towards your weekly items fed.
- Most other items have almost no additional benefit (usually +/- 1 point for the better).
You can get a general idea of a monster's nature in the Monster Data window. This chart shows the differing natures a monster can have. What they're born with can change, as you can see from the above example with positive reinforcement of a desired behavior.
| Increased Cheats Decreased Greats | Increased Greats Decreased Cheats | |||
|---|---|---|---|---|
| Worst | Bad | Neutral | Good | Best |
For the single player game, there's little reason to want to stay bad natured. Many monsters have Nature-Based attacks that can only be learned while a specific nature (and they can always be used reglardless, once learned) but you really want as high a nature as possible for the additional "Great" chances.
There will come a time when you do want to learn new attacks. Either because it's fun, or you need a new or better attack type to help you progress because the Basic attacks just don't do it in tournaments anymore.
Always attempt to start Errantry on Week 1 while in the best condition (No stress or fatigue). Avoid skipping over week 1. It may feel like you're saving big by not having to feed your monster the monthly foods, but the monthly food is an opportunity to help drop stress which helps avoid unnecessary lifespan hits.
Do you qualify? The Errantry locations will require specific prerequisites to learn a new attack. This is why the beginning of the guide mentions to avoid the Errantry sale at the beginning since it's highly unlikely you'll qualify on a fresh/new game.
Without using tools, pay attention to what Errow says when you select a location. If Errow says "It must be quite difficult" it means you don't yet meet some requirement(s) to learn available Techs. Use the Monster Techs & Errantry Calculator web app in the main guides if you want exact % chance to learn which attacks from which locations, once you've input your monster's stats.
Which location to send to? The locations aren't arbitrary. They teach very specific attacks and represent an attack type regardless if the Tech uses POW or INT as it's base damage. (Just because a location raises Power doesn't mean it teaches POW based attacks etc).
- Basic Techs: Can be learned at any Errantry.
- Hit Techs: Learned from Torble Sea.
- Heavy Techs: Learned from Mandy Desert.
- Sharp Techs: Learned from Papas Mountains. (Sharp = Crit Chance. Critical hits deal 150% damage).
- Wither Techs: Learned from Parepare Jungle. (Wither = A focus on damage to guts over damage to health)
- Special Techs: Learned from Kawrea Volcano. Your monster must be B Grade to visit this locale. Special are usually high cost attacks that often have several attributes of the other locales.
What are these icons? Some Techs specifically require Good or Bad nature to learn (in addition to any other possible requirements). The Good or Bad nature icon shows up on the tech as vanity only. You can always use the attack, regardless of your monster's current Nature, you just had to be a specific nature to have learned it in the first place.
| Good Nature | Bad Nature |
|---|---|
 |  |
Monster Preference - Monthly Items: Every monster has a baseline preference for each of the 6 monthly foods. You can tell based on their reaction if they Like it, Hate it, or are neutral to it. These natural preferences can be overwritten upon birth where a randomly rolled Like/Dislike item can replace their baseline preferences.
- Tablet is always the best food, even if they Dislike it, but it is expensive.
- If your monster Likes Fish or Cup Jelly (Either specified in Monster Data screen or you observe the "Like" reaction) these can be used on a budget until you can afford Tablets.
- Avoid Potato unless it is the only way to avoid a Game Over by running out of money. It is the worst food and can end up causing lifespan hits due to stress. (If they randomly request Potato, it is OK to give it to them.)
Weekly Items: While you may not be able to afford it yet, Nuts Oil and Mint Leaf are the only items you should concern yourself with for typical monster raising. If you see a Shop sale, these are the two items you want to stock up on. These two items drop Fatigue and Stress respectively by a static amount and can even be used to replace rest entirely (meaning more weeks to raise stats). Some shop items do have a niche use, but for a new player and fresh game, don’t worry about these yet. You can always view the Items List page to see every item’s exact use later.
Pro Tip: Regardless of the version you're playing, Get Gemini Pots! These can be acquired by winning the May Week 4 D Grade tournament. This is a passive item that uses up 1 inventory slot, and stacks for each pot held in inventory. Try to collect 3 to 5 of these for early game. More is better but you have a small house and low inventory capacity when first starting out. Speaking of tournaments...
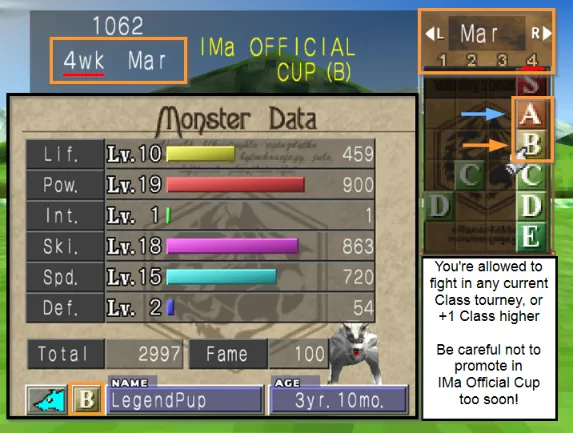 You are allowed to fight in your Current Grade, and 1 Grade higher (useful to see if you are ready for Official tournaments, or making extra money), or any Grade lower than your current Grade (There is a small penalty to Fame and loyalty for fighting below your weight).
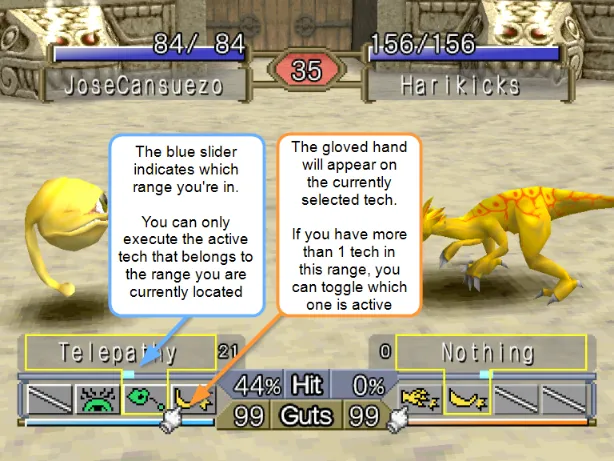 The Arena and fighting in tournaments introduce new mechanics apart from your pet raising sim portion of the game. Matches in a tournament last 1 minute. Each fighter starts with 50 Guts and can regenerate up to 99 Guts at different speeds based on the Monster and which sub-breed it has. Some battle specials can change your Guts regeneration too!
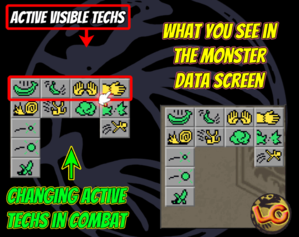
Guts is the resource for your Techs (Attacks) and different Techs have different costs. Additionally, there are 4 ranges in the arena, and Specific Techs fall into 1 of these 4 ranges and can only be used while your monster is in that range. You can change your range by moving forward or backwards. If you have more than one Tech to use in a particular range, you can toggle the currently active Tech. (There will be a gloved hand that has the range/tech pointed to; Move the pointer to the range that has multiple Techs, and you will see an arrow. Press down or up to cycle through that range’s available techs).
Changing the Active Tech
- For MR2 (1999/NTSC): Use the shoulder buttons to move the gloved hand to the range slot that you want to change, and press the ☐ button to cycle through the techs. (D pad is only used to move monster left/right)
- For MR2DX (2021): With a controller, use the D pad Left/Right move the gloved hand to the range slot you want to adjust, then press D pad Up/Down to change the active tech. The shoulder buttons now move your monster Lef/Right.
For Mobile and Keyboard: Touch/Click on the tech in a given slot to cycle through the techs.
The arena has limited space. You can push your opponent back to force range 3 or 4, but if you are too far on their side of the arena, you will have to move backwards instead. Alternatively, you can only back up so far.
The more Guts you have, the better! Saving up Guts is advantageous as it increases hit%, damage given, and lowers damage taken. It is very tempting to spam attacks immediately to try and KO an opponent before they can hurt you, but if you can’t win easily this will put you in a bad spot, because the Opponent will get the same benefit. While attacking, the Attacker’s Guts is frozen in place (and subtracts the Guts spent to perform the attack), meanwhile the Defender’s Guts is still regenerating the whole time. If you can dodge or soak the first attack or two, this will put you at the advantage. It also opens up opportunity to attack while the opponent is confused!
Observe your Opponent: Pay attention to opponent stats, especially their Attacking Stat (POW or INT). Try to stay in the range of their weakest techs or supported by their weakest attacking stat. You can often force a Guts advantage by dodging/soaking weak hits then retaliating after.
Confusion/Foolery: When the attacker’s Tech icons convert to "?" in each slot and does an animation that isn’t an attack, and their chance to dodge drops significantly, indicated by the attacker’s hit% increasing for a short duration. Confusion is caused by low Loyalty. As your loyalty increases the chances of this happening decrease, but Tournament opponents don’t evolve over time, so they always retain a chance for Confusion which you can use to your advantage, especially if you have a hard-hitting attack with a low hit%/SKI. Patience can help win fights!
Know your attacks: POW and INT determine damage for Yellow and Green Techs respectively, however there are different attack types that can be either POW or INT: Hit, Heavy, Sharp, Wither and Special. Some are heavy hitting with low accuracy... others are low damage but high accuracy. Early game you'll be relying a lot on the base stats of the Techs, but by raising correlating stats you can adjust the Tech's function. (Raising SKI, for example, raises HIT% across the board, but is very beneficial for Heavy Techs to have a better chance of landing). Use the appropriate Techs for the opponent, and for which stats you've raised.
- Basic Techs: As the name implies, these are fairly basic techs.
- Hit Techs: Usually much higher base hit% with very low damage.
- Heavy Techs: These can be 1-hit KO moves with a high enough supporting stat, though at the cost of base accuracy.
- Sharp Techs: Sharp = Crit (150% damage). They may not be strong as a base tech but have a higher chance to critically hit.
- Wither Techs: Withering attacks do damage primarily to the opponent's Guts.
- Special Techs: These are often high Guts cost techs that can be a mix of any of the above Types, available at B Grade or higher.
Techs with Yellow icons use POW as their base damage stat.Techs with Green icons use INT as their base damage stat.
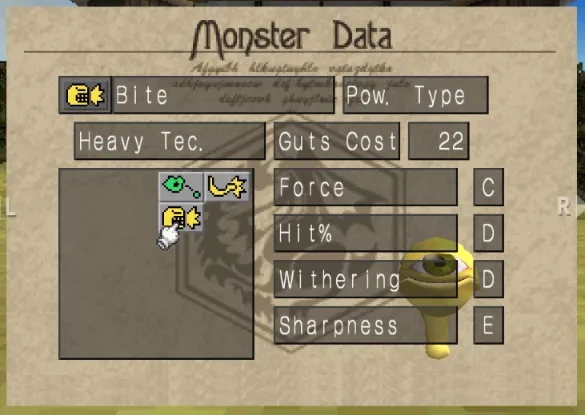
Techs (Attacks) Also have their own attributes. Each tech has letters as values indicating a Tech's attributes.
From weakest to strongest: E < D < C < B < A < S... The letters are an approximation. The techs do actually have specific numerical values assigned to them.
- Force: The base damage of a tech before POW or INT stat adjustment.
- Hit%: the base % chance to hit from 50% (-10 is 40%, 10 is 60%) before your SKI, or opponent SPD adjustment.
- Withering: Guts damage to the opponent
- Sharpness: base % chance to crit from 0% (E(5) is 5% Crit. E(9) is 9%, etc.) before fame adjustments. Every 10 Fame gives 1% extra crit.
- Fame is a monster stat rather than a tech stat, but it adds 1% additional crit chance for every 10 Fame your monster has.
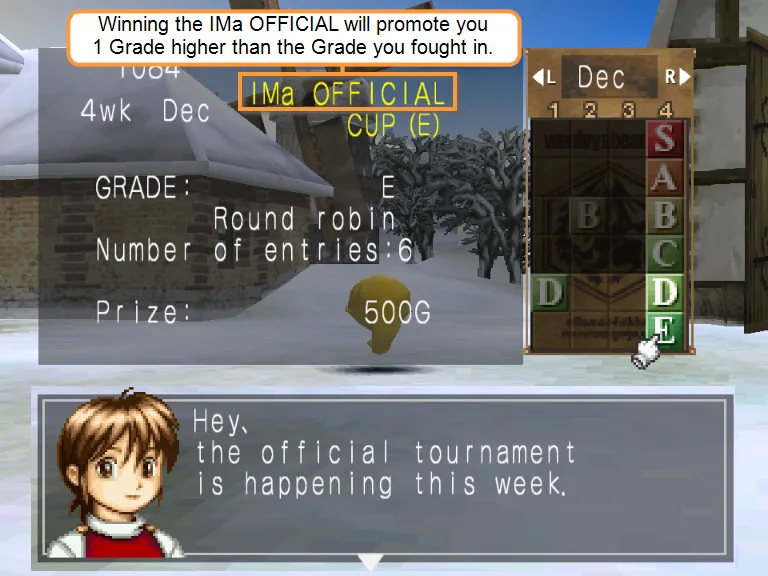 It's time to progress! Maybe you’ve raised your monster a long time, maybe you’re easily defeating the current Grade of tournaments without effort, then it’s time to do the IMa Official Cup. Beating an official cup promotes your monster to the next Grade where there are higher payout tournaments, and if you hadn’t beat a particular Grade before, then you will also earn a new Breeder rank. Beating E through S Grade will get you to rank 6, then the last four ranks are earned from special invitational tournaments called "The Major 4". Breeder Ranks are permanently earned, and once you reach Rank 10, you will get the game credits.
If you don't have enough money, Colt will not prompt you for the ranch upgrades. You will need 5000 G + the cost of the current qualifying upgrade for your Breeder rank to be prompted. Ranch upgrades range from 5000 G to 20000 G. All ranch upgrades combined come to 90,000 G.
Refer to the Unlock Everything section in the main guides for specifics.
What does this mean? Your monsters have a finite lifespan. Before factoring in lifespan reductions or extensions that can change a monster's baseline lifespan, Every week that it lives reduces their remaining lifespan by 1 week, until eventually their lifespan is exhausted, and they die.
Colt's Warnings are an indicator that you're reaching close to the end of a monster's lifespan. You will typically receive 3 warnings, the first warning is roughly a year's notice. The last warning is 9 weeks remaining.
What to do to retire my monster? When a monster dies, it's gone forever. There's no in-game option to retire, but the "Retirement Warning" is a chance to put your monster into the Freezer, which means it can be used later for combining, or for PVP if desired.
Should I always retire my monster? It is entirely up to you. Death is a part of the game, and 3 hidden monsters actually require a death event as part of their unlock conditions, however the game does provide monsters that only live 1 week that can be used to trigger these events without throwing away all your hard work for a well raised monster. This allows you the option to keep all your monsters before they die, and if you want to, you can use the 1-week monsters to trigger the death events.
Unlocks: There are 22 hidden/locked monsters (39 in MR2DX) that you can acquire. You may have already unlocked some by this point. They aren’t necessarily overpowered or better/worse than other monsters (Though, several certainly are), they’re just more choice and options with some fun monster designs.
Combining for super babies! Combining isn't as random as you think, quite the opposite. With planning, you can engineer parents to create ridiculously amazing babies with incredibly high starting stats or number of techs.
PVP: it's not as scary as it sounds. Most tournaments have stat caps and specific rules to follow so that it's not just "max everything out" and fight. Some of the more exciting tournaments are lower stat cap tournaments. Stat Capped tourneys will indicate what is the Total number you can allot to your monster's stats, if there are any stat ceilings to obey, or banned monsters. The tournament host will take submissions then usually live-stream the matches. It can be Round Robin or Elimination (or double Elimination) based on the Host's preference or number of entrants. Please join the Discord for more details.
- Make sure your monster is frozen at the Lab.
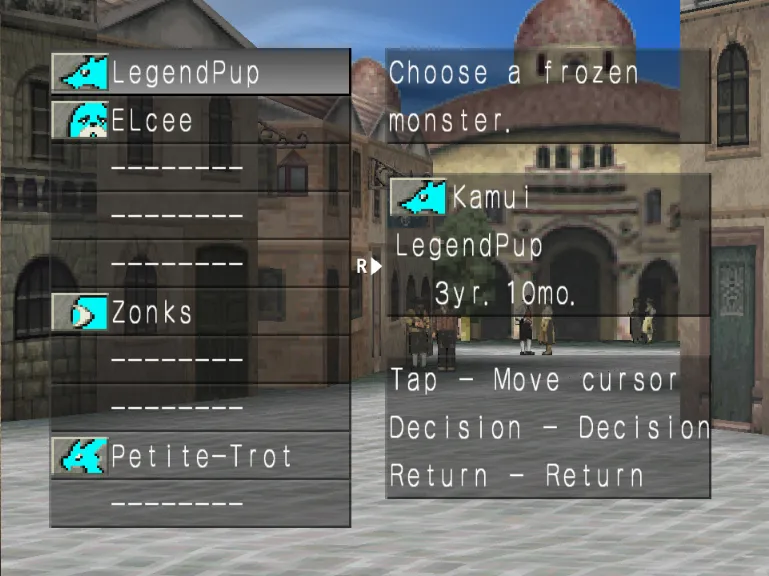
- Save your game on any numbered save slot.
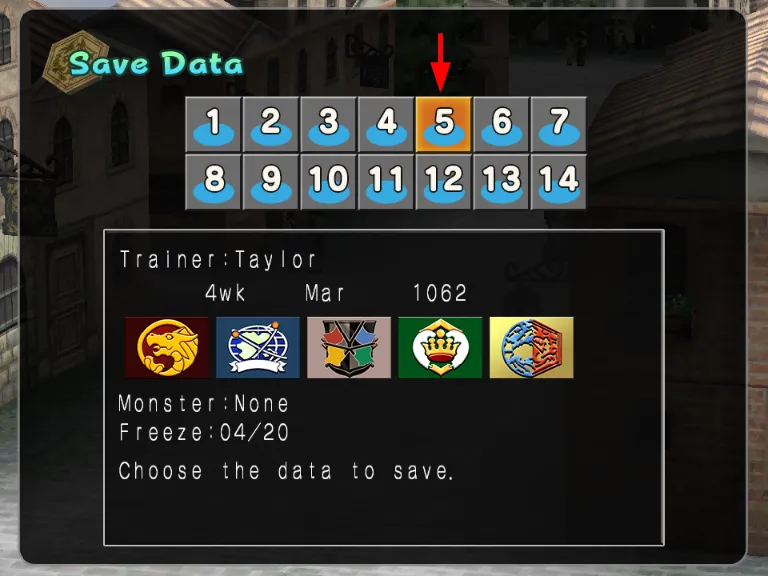
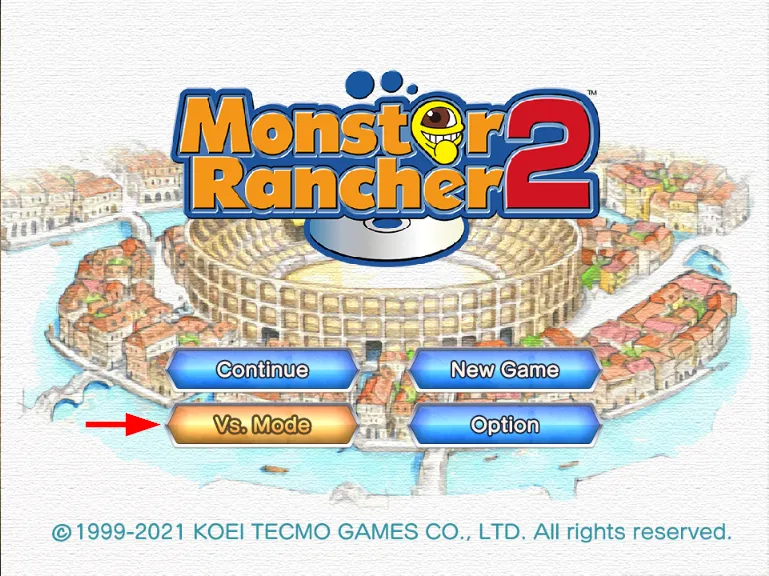
- Exit the game and go back to the Title, and choose "Vs. Mode" in the menu.
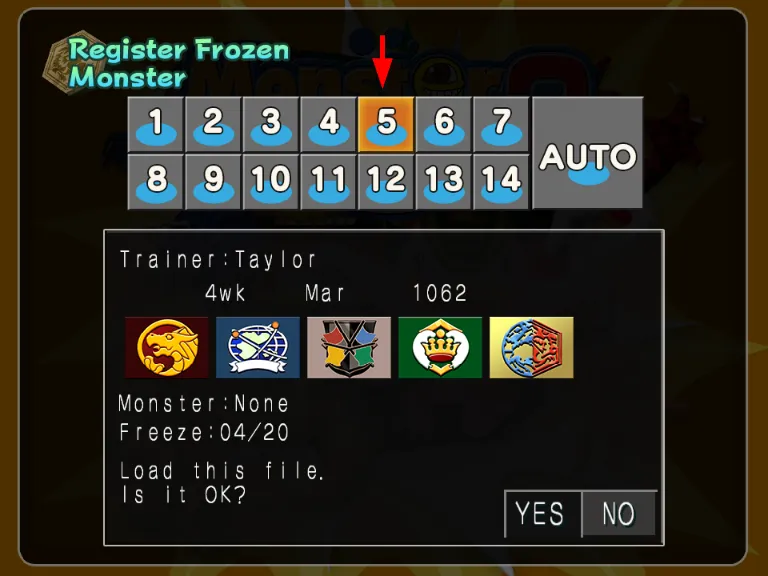
- Choose the same numbered save slot from Step 2, to register the frozen monsters online.
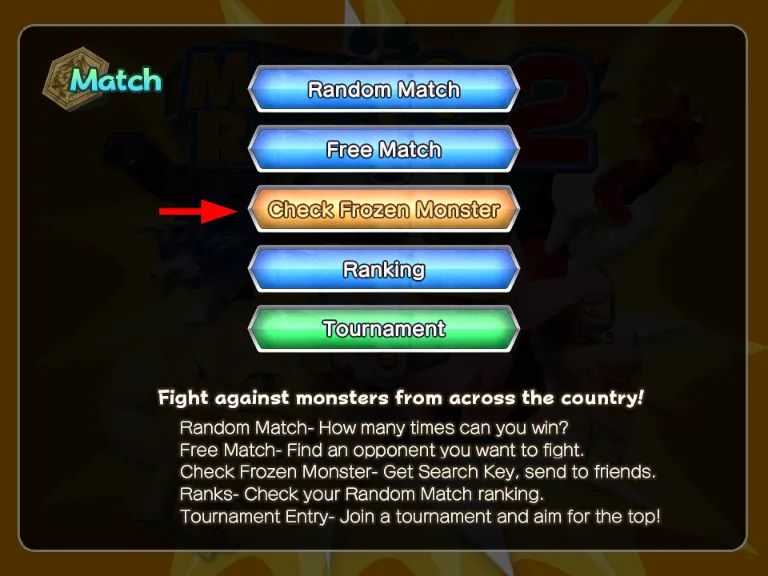
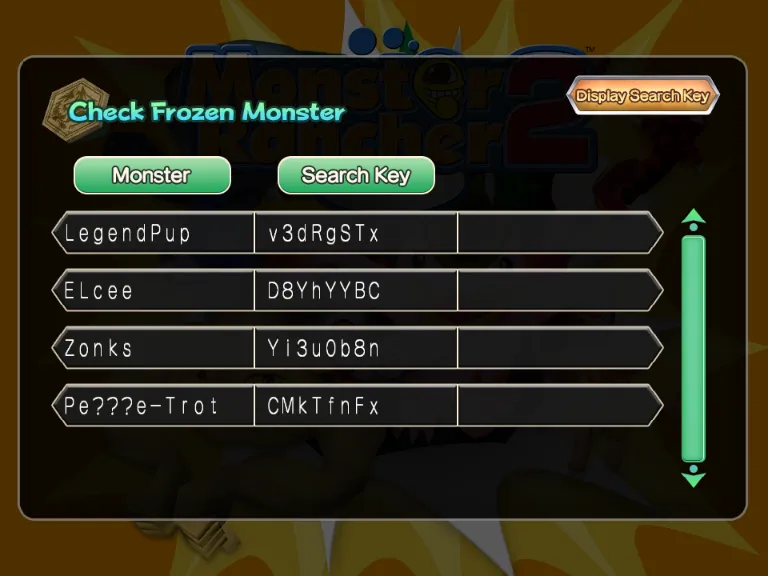
- Once the Frozen monsters have been registered, Select "Check Frozen Monster".
- In the list, confirm your monster shown, then click "Display Search Key".
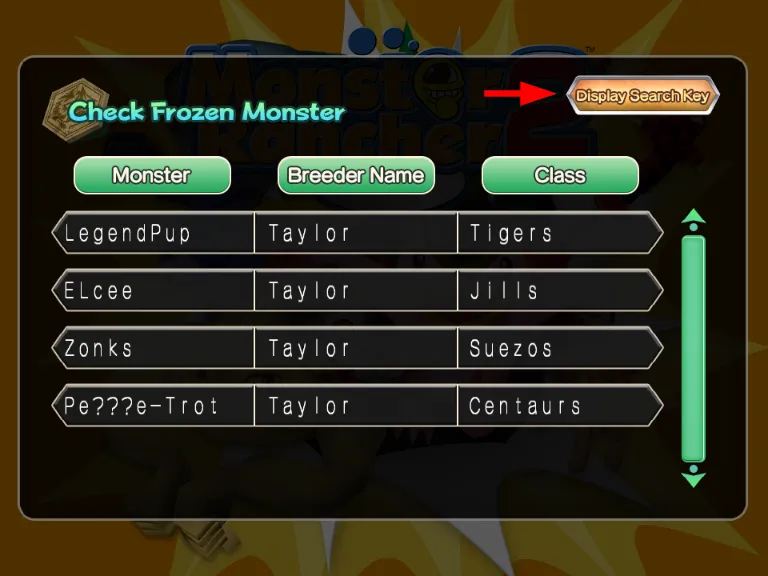
- Note the Search Key. Providing your Search Key may be required to submit your monster, if the monster name has censored characters. Censored character strings show up as question marks.
NOTE: you can only have 1 save slot uploaded at a time. Whatever is the last save uploaded is the only save in the cloud. You may overwrite the save slot on your local game however you want, it will not change what was already uploaded unless you re-register/upload it again.
Your First Playthrough:
- Don't expect to beat the game with your first monster, on your first playthrough! While it is possible, it's not the norm for a new player, and the game is originally meant to have replay value and played through multiple times.
- To beat the game/get to credits, you must get to Trainer Grade 10. You do this by beating Official tournaments E through S (rank 1-6), then four new S Grade tournaments are opened (Major 4) for ranks 7-10. After there's an optional Legend Cup which can get your monster into the Hall of Fame but is not required.
- Instead of racing to Rank 10, Use your first monster not for Trainer Grade progression, but to accumulate as much money as possible, as easily as possible.
- Don't promote your difficulty too soon by fighting in the Official Tournaments. Instead, fight in the 1-off tournaments for money in-between Officials.
- If the tournaments are too easy, THEN promote to the next Grade for higher tournament money payouts, and keep saving.
- Letters as Values are littered through out the game.
- E is the lowest value/range and works it's way up (D < C < B < A)
- S is the Highest value/range.
- These letters shown in your Attacks to give a rough indication of their strength for each of your attack's attributes.
- Raising Methods: There's no need to use the most advanced methods immediately, in fact you won't be able to.
- However, You can use the cheaper raising schedule on a new game to maximize lifespan and drill gain potential until you've saved enough money for more rigorous raising methods.
- Stress/Fatigue warnings: While the game warns you when a monster is tired or stressed, it is more advantageous to be proactive, rather than reactive. In either scenario you will have to do something to lower fatigue and stress (rest/feed items, or both), but being reactive means you are also likely losing small bits of lifespan each time you have to correct it after the fact.
- Errantry is for learning new attacks. It can be tempting with the sale notices, but you don't often need Errantry. SAVE before you do Errantry.
- Learning new Techs/Attacks often have stat thresholds to reach before they can be learned.
- Use Light and/or Hard Drills to raise stats until you can qualify to learn a new attack.
- When Errow says there's a chance to learn, then you have a 1% to 100% chance to learn it depending on your qualifications.
- When Errow says "It must be quite difficult" then try later when your stats are higher, or try a different Errantry.
- It's an unnecessary lifespan hit to do Errantry without getting the Attack you want from it. If you don't learn a new attack, or it's an attack you don't want, then reload and don't do the Errantry/Try again/Try a different location.
- Expeditions are optional story and in-game progression. They can provide a variety of items useful for selling for cash, unlocking new monsters, raising stats, increasing lifespan etc. (See Expedition Maps guide for details)
- They can be skipped the first time around, but eventually you'll have to complete the Phoenix Volcano Adventure, which is a novice training expedition.
- Once the training expedition is completed, more complex expeditions become available if your monster meets the requirements.
- Most useful items require high INT to find, and medium POW to break down obstacles reliably, and you'll want a lot of LIF for more exploration time.
- Your first monster/playthrough probably isn't going to be a great expedition monster unless you lucked out or planned it that way before attending. Most advanced players have a monster dedicated specifically for Expedition with the important stats optimized.
- Money is indirectly one of the soft gate-keeper hurdles in the game.
- With Trainer Grade comes opportunity to upgrade your Ranch (without enough money you will never be prompted to upgrade)
- You need money to afford frequent items for raising strong monsters (which can help raise your Trainer Grade)
- With Trainer Grades, Ranch upgrades, and Strong monsters, you'll have an easier time unlocking the locked breeds later on.
- The Raising Methods page has several recommendations for making money at various progression points in the game.
Your First Monster:
- If you're going in blind, be aware that some monsters are harder to raise than others, even the beginning ones.
- If you refer to the DX Song List (or Monster Data for 1999 version) you can choose a monster with high nature, which will Cheat less and get Greats more on drills.
- The above Song List/Monster Data pages can show you other Monster Data too, like which stats a monster is good at (E/1 being the worst, and A/5 being the best)
- Avoid keeping stats too even. It's OK to specialize in just a few stats, while taking into account what the monster is good at.
- Typically you'll choose POW or INT, not both. Tech List Preview (POW increases damage of Yellow techs. INT increases damage of Green techs)
- You will almost always want SKI to help your attacks land. Raise this stat in-between hard drills or alternating light drills.
- LIF is a stat that is nice to have, but not always needed. If you always dodge, LIF is unnecessary. If you have a low SPD monster you might raise LIF to help win by %, but either way you'll probably want just enough to at least soak a hit or two just in case.
- Typically you'll choose SPD or LIF+DEF, not both. Generally SPD is preferred since DEF is mathematically not very strong, however in Single Player this matters much less and LIF is considered a tank stat.
- Avoid fighting in the Official Tournaments too soon. The Official Tournaments that Colt tells you about will raise your monster's rank and put you into the next level of difficulty. There are Many non-official tournaments in-between that you can fight in to make money and see how you're doing.
Early notable battles:
There's many beneficial rewards from battles, but a few to keep an eye out for:- Artemis Cup: September Wk 2, E Grade tournament: Prize sells for 1500 G
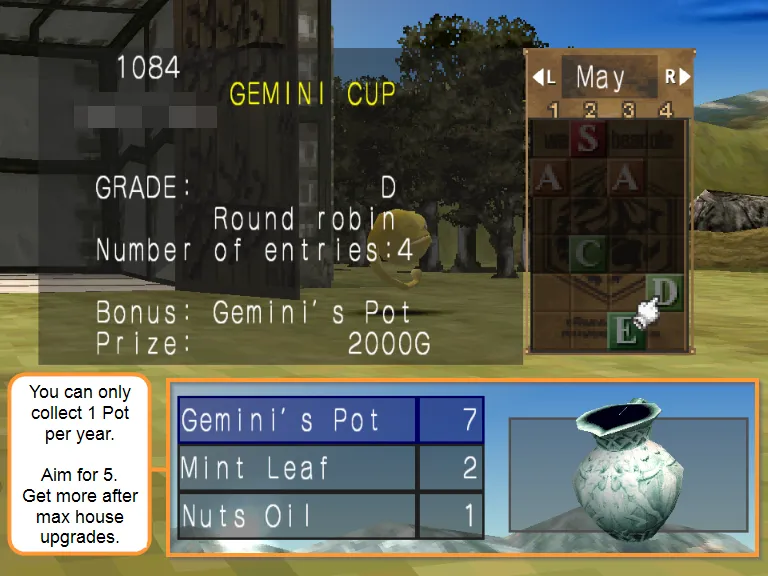
- Gemini's Cup: May Wk 4, D Grade tournament: Prize is a stackable passive item. You'll want to aim for 3 early on, and eventually up to 8 for access to the most efficient raising methods.
- ELIMINATION + IMa VS FIMBA: July Wk 4 (Elimination) and August Wk 4 (IMa - FIMBA Meet): This is a "Once every 4 years" tournament which triggers the date/year that you first promote a monster to D grade or higher. You must win the Elimination tournament to get invited to the IMa - FIMBA meet. Participation in the latter tournament will unlock 4 monsters, and can also provide very challenging encounters at higher grades.
- Crab Cup/Papas' Cup: July Wk 2. These C and B grade tournaments give decent reward money and the prizes sell well too.
Moosebones' Rancher Rundown series
Nash's series "Rancher Rundown" to help familiarize you with the game, and breakouts of breeds