
- Chat! Get help. Share Monsters.
- World-wide fans & players
- Community run & moderated MR Subreddit
- If Discord isn't your thing.
Community Tournaments
- PVP & Event Calendar
- Multiple Hosts, Games & Formats Challenges
- Speed Runs & Nuzlocke Social Media & Websites
- Official and Fan channels
Please Donate!
Your contributions help keep
the site and archives going!
Create Monsters at the Shrine! MR1 DX Song List (EN) MR2 DX Song List (EN) Ultra Kaiju MR Keywords (EN) Ultra Kaiju MR Song list (SEA)
PS1 CD DB & Tools
 GameBoy Advance
 Ultra Kaiju MR
Monster Rancher Expedition Maps
Expeditions are key for unlocking several monsters, hold special items to feed to your monster, or to use in combining, and can be a great source of income as well. This guide will detail out the expedition paths, obstacles and requirements to traverse each area, along with which locations have what items.General Info:
- There is a Success/Fail check to get to the expedition. If your monster succeeds you will have 14 days to search. If it fails you will have 10 days to search.
- You can wander or search as much as you want until the days run out or your monster becomes lost. You do not need to return to the starting point.
- If your monster's loyalty is low, your monster may ignore instructions at crossroads and go a different way.
You MUST participate in Titus expedition once to unlock Hartville and Reno expeditions.
Expeditions from Easiest to Hardest: Titus < Hartville < Reno
Important stats:
- INT (Removes INT based obstacles; Factors into finding items; Lowers chance of getting LOST)
- SKI (Removes SKI based obstacles)
- POW (Removes POW based obstacles)
ALWAYS SAVE BEFORE EXPEDITION! Finding Items can be random even with high stats. Reset if you do not find what you are looking for and try again.
| INT | Duration |
|---|---|
| 1-200 | 6 wks |
| 201-400 | 5 wks |
| 401-600 | 4 wks |
| 601-800 | 3 wks |
| 801-999 | 2 wks |
INT is the highest priority stat because it:
- Lowers your risk of getting lost (though never eliminates it).
- Lowers the duration of being lost if you get lost.
- Raises your chances to find important items while searching the ruins.
Expedition Monsters
Expedition Monster Suggestions
You must consider what you need to do in Expeditions. Are you looking for an all in 1 monster to clear all obstacles and also be able to search? Have you already cleared all obstacles and just need the fasted INT gains possible? Your needs will determine which is best, but all of the below monsters will be decent picks.
- Green Picks: Choose Omen or Allure since they have good POW and SKI gains for obstacles paired with A INT Gains.
- Yellow Picks: Good Guy, Titan, Woody, and Cross Eye are decently above average across the board in the required stats, with decent seriousness.
- Orange Picks: Choose Dean, Jupiter For high Seriousness (low hassle) paired with A INT Gains.
- The Rest: these are the remaining monsters with A gains in INT that exclude late bloom types.
| Breed | Main | Sub | Lif Gain | Pow Gain | Def Gain | Ski Gain | Spd Gain | Int Gain | Life Type |
|---|---|---|---|---|---|---|---|---|---|
| Omen | Gali | Suezo | E | C | D | C | D | A | 1:Prec./Weak |
| Allure | Pixie | Naga | E | B | D | C | C | A | 3:Normal/Avg. |
| Good Guy | Hare | Plant | C | B | E | C | C | B | 4:Prec./Avg. |
| Titan | Golem | Suezo | B | B | D | C | E | B | 1:Prec./Weak |
| Woody | Suezo | Hare | E | B | E | B | D | B | 1:Prec./Weak |
| Cross Eye | Hare | Suezo | E | B | E | B | C | B | 1:Prec./Weak |
| Dean | Golem | Pixie | D | D | C | E | D | A | 0:Normal/Weak |
| Jupiter | Jell | Suezo | E | D | C | C | D | A | 1:Prec./Weak |
| Ray | Suezo | Plant | C | E | D | C | D | A | 4:Prec./Avg. |
| Valentino | Dino | Pixie | D | E | D | B | D | A | 0:Normal/Weak |
| Pixel | Gali | Pixie | D | E | C | C | C | A | 0:Normal/Weak |
| Vanity | Pixie | Suezo | C | D | E | A | D | A | 1:Prec./Weak |
| Pink Jam | Jell | Pixie | D | E | C | B | D | A | 0:Normal/Weak |
| Pink Eye | Suezo | Pixie | E | E | D | B | C | A | 0:Normal/Weak |
Plenty of other monsters are just fine for expedition.
The above list filters for all monsters with A gains for INT, (plus a few B INT Gain picks) and excludes Late Bloom types (faster raise to Prime life stages).
This list is meant to help you choose in the event of decision paralysis.
- S Starting Point
- : POW Obstacles.
- 15%-30% w/ 100
- 30%-43% w/ 300
- 100% w/ 600
- : INT Obstacles.
- "J" req. 400.
| INT | % | INT | % | INT | % |
|---|---|---|---|---|---|
| 100 | ~20% | 300 | ~50% | 550+ | 95% |
Emerald (8k), Fire Stone(5k), Pure Gold (6k), Pure Silver (4k)
Old Mirror, Fire Stone, Frelia God Statue
Searchable Areas
Location: 1 (Stone Monument)
| INT | LOST % |
|---|---|
| ~1 | 25.0% |
| ~100 | 12.5% |
| ~200 | 6.3% |
| ~300 | 0.0% |
| INT Ranges | 1 | 100 | 200 | 600 |
|---|---|---|---|---|
| Mint Leaf | 31.3% | 25.0% | 25.0% | 18.8% |
| Mystic Snake | - | 6.3% | 6.3% | 6.3% |
| Golem CD Chip | - | - | 3.1% | 6.3% |
| Tiger CD Chip | - | - | 3.1% | 6.3% |
| Pure Silver | - | - | - | 3.1% |
| Emerald | - | - | - | 3.1% |
| Old Mirror | - | - | 3.1% | 6.3% |
Location: 2 3 4 5 (Outer Buildings)
| INT | LOST % |
|---|---|
| ~1 | 46.9% |
| INT Ranges | 1 | 200 | 300 | 400 |
|---|---|---|---|---|
| Mint Leaf | 25.0% | 25.0% | 25.0% | 12.5% |
| Mystic Snake | 6.3% | 6.3% | 6.3% | 12.5% |
| Golem CD Chip | - | - | 3.1% | 6.3% |
| Tiger CD Chip | - | 6.3% | 6.3% | 6.3% |
| Hare CD Chip | - | - | 3.1% | 6.3% |
| Monol CD Chip | - | - | - | 3.1% |
| Pure Silver | - | - | - | 3.1% |
Location: 6 (Titus School)
| INT | LOST % |
|---|---|
| ~1 | 46.9% |
| ~100 | 25.0% |
| ~250 | 9.4% |
| ~500 | 3.1% |
| INT Ranges | 1 | 100 | 200 | 500 |
|---|---|---|---|---|
| Mint Leaf | 25.0% | 25.0% | 25.0% | 12.5% |
| Mystic Snake | - | 6.3% | 6.3% | 6.3% |
| Golem CD Chip | - | - | 3.1% | 6.3% |
| Tiger CD Chip | - | - | - | 6.3% |
| Monol CD Chip | - | - | 3.1% | 6.3% |
| Hare CD Chip | - | - | - | 6.3% |
| Frelia God Statue | - | - | - | 6.3% |
Location: 7 (Titus School)
| INT | LOST % |
|---|---|
| ~1 | 46.9% |
| ~150 | 25.0% |
| ~250 | 9.4% |
| ~500 | 3.1% |
| INT Ranges | 1 | 100 | 200 | 500 |
|---|---|---|---|---|
| Mint Leaf | 31.3% | 25.0% | 25.0% | 12.5% |
| Mystic Snake | - | 12.5% | 12.5% | 9.4% |
| Golem CD Chip | - | - | - | 6.3% |
| Tiger CD Chip | - | - | 3.1% | 6.3% |
| Monol CD Chip | - | - | - | 6.3% |
| Hare CD Chip | - | - | 3.1% | 6.3% |
| Fire Stone | - | - | - | 3.1% |
Location: 8 (Main Hall)
| INT | LOST % |
|---|---|
| ~1 | 46.9% |
| ~100 | 31.3% |
| ~300 | 12.5% |
| ~500 | 3.1% |
| INT Ranges | 1 | 100 | 300 | 600 |
|---|---|---|---|---|
| Mint Leaf | 25.0% | 28.1% | 25.0% | 6.3% |
| Mystic Snake | 6.3% | 6.3% | 6.3% | 3.1% |
| Pure Silver | - | - | 3.1% | 6.3% |
| Pure Gold | - | - | - | 3.1% |
| Old Mirror | - | - | 6.3% | 9.4% |
| Fire Stone | - | - | - | 6.3% |
| Frelia God Statue | - | - | - | 9.4% |
Location: 9 (Back Hall)
| INT | LOST % |
|---|---|
| ~1 | 46.9% |
| ~150 | 31.3% |
| ~250 | 12.5% |
| ~500 | 6.3% |
| INT Ranges | 1 | 100 | 300 | 600 |
|---|---|---|---|---|
| Mint Leaf | 25.0% | 25.0% | 25.0% | 9.4% |
| Mystic Snake | 6.3% | 6.3% | 9.4% | 12.5% |
| Golem CD Chip | - | 3.1% | 3.1% | 6.3% |
| Monol CD Chip | - | 3.1% | 3.1% | 6.3% |
| Old Mirror | - | - | 6.3% | 12.5% |
| Fire Stone | - | - | - | 6.3% |
| Frelia God Statue | - | - | - | 6.3% |
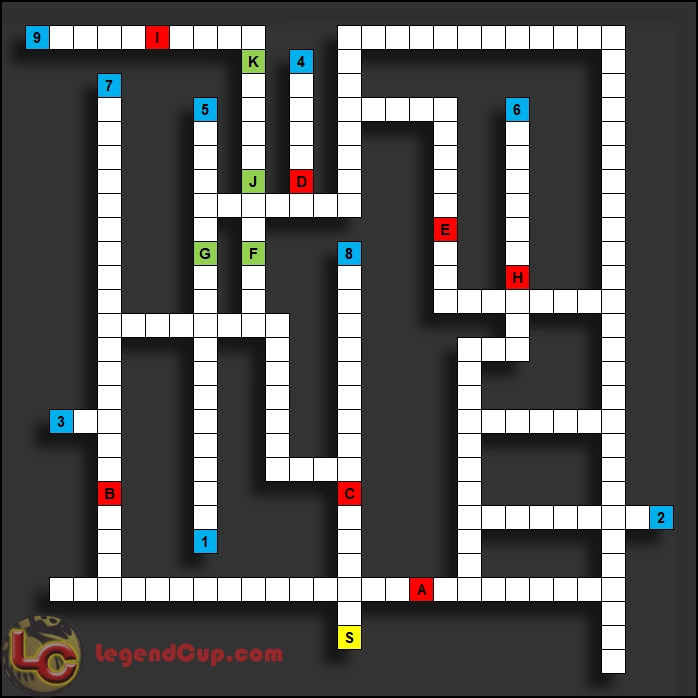
Visual CD Fragments Guide
Dino: +10 SKI
(sell: 500 G)
Gali: +10 INT
(sell: 1000 G)
Golem: +10 POW
(sell: 500 G)
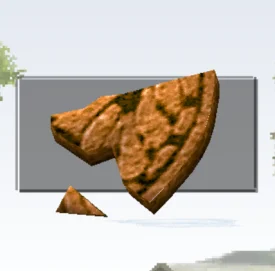
Hare: +10 SKI
(sell: 500 G)

Jell: +10 DEF
(sell: 500 G)
Monol: +10 DEF
(sell: 1000 G)
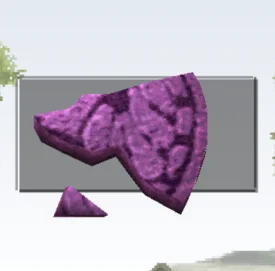
Naga: +10 POW
(sell: 1000 G)
Pixie: +10 INT
(sell: 2000 G)
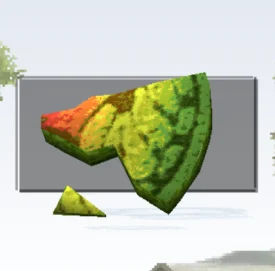
Plant: +10 LIF
(sell: 1000 G)
Suezo: +10 SKI
(sell: 500 G)
Tiger: +10 SKI
(sell: 500 G)
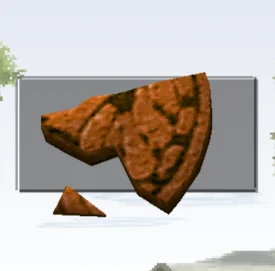
Worm: +10 LIF
(sell: 500 G)
MYTH Alert:
Similar to the Myth of the Gold Peach, the Plang Egg is not time gated, however, Any single monster can only find 1 Plant Egg in it's lifetime. Also, any single monster can be fed multiple Plant Eggs.
- S Starting Point
- : SKI Obstacles.
- 15% w/ ~100
- 31% w/ ~300
- 93% w/ ~500
- : POW Obstacles.
- 15%-30% w/ 100
- 30%-43% w/ 300
- 100% w/ 600
- : INT Obstacles.
- "I" req. 300
- "J" req. 400
- "K" req. 500
- "L" req. 600
| INT | % | INT | % | INT | % |
|---|---|---|---|---|---|
| 100 | 15% | 300 | 31% | 550+ | 95% |
Diamond (10k), Emerald (8k), Pure Gold (6k), Calm Stone(5k), Medicine A&B (5k)
Plant Egg, Magic Banana, Calm Stone, Paragama God Statue
Searchable Areas
Location: 1 (Temple of the Warrior)
| INT | LOST % |
|---|---|
| ~1 | 31.3% |
| ~100 | 21.0% |
| ~200 | 9.4% |
| ~300 | 3.1% |
| INT Ranges | 1 | 150 | 250 | 550 |
|---|---|---|---|---|
| Herb | 12.5% | 18.8% | 18.8% | 18.8% |
| Gali CD Chip | - | - | 3.1% | 6.3% |
| Pure Gold | - | - | - | 3.1% |
| Emerald | - | - | - | 3.1% |
| Diamond | - | - | - | 3.1% |
| Medicine A | - | - | - | 3.1% |
| Medicine B | - | - | - | 3.1% |
Location: 2 (Altar of Victory)
| INT | LOST % |
|---|---|
| ~1 | 31.3% |
| ~100 | 18.8% |
| ~200 | 6.3% |
| ~300 | 3.1% |
| INT Ranges | 1 | 100 | 200 | 500 |
|---|---|---|---|---|
| Herb | 12.5% | 12.5% | 12.5% | 12.5% |
| Dino CD Chip | - | 3.1% | 6.3% | 9.4% |
| Pure Gold | - | - | - | 3.1% |
| Emerald | - | - | - | 3.1% |
| Diamond | - | - | - | 3.1% |
| Calm Stone | - | - | - | 3.1% |
| Magic Banana | 6.3% | 12.5% | 12.5% | 12.5% |
Location: 3 (Observatory)
| INT | LOST % |
|---|---|
| ~1 | 18.8% |
| ~100 | 6.3% |
| ~200 | 3.1% |
| ~400 | 3.1% |
| INT Ranges | 1 | 100 | 200 | 400 |
|---|---|---|---|---|
| Mango | 12.5% | 18.8% | 18.8% | 18.8% |
| Herb | 12.5% | 18.8% | 18.8% | 18.8% |
| Plant Egg | - | - | - | 3.1% |
| Dino CD Chip | - | 3.1% | 6.3% | 9.4% |
| Pure Gold | - | - | - | 3.1% |
Location: 4 (Small Temple)
| INT | LOST % |
|---|---|
| ~1 | 31.3% |
| ~100 | 18.8% |
| ~200 | 6.3% |
| ~400 | 3.1% |
| INT Ranges | 1 | 100 | 200 | 400 |
|---|---|---|---|---|
| Mango | 25.0% | 25.0% | 25.0% | 25.0% |
| Herb | 12.5% | 12.5% | 12.5% | 12.5% |
| Plant Egg | - | - | - | 3.1% |
| Dino CD Chip | - | 3.1% | 6.3% | 9.4% |
Location: 5 (Sun Temple)
| INT | LOST % |
|---|---|
| ~1 | 31.3% |
| ~100 | 18.8% |
| ~200 | 6.3% |
| ~350 | 3.1% |
| INT Ranges | 1 | 200 | 400 | 600 |
|---|---|---|---|---|
| Mango | 25.0% | 25.0% | 25.0% | 25.0% |
| Herb | - | 6.3% | 6.3% | 6.3% |
| Dino CD Chip | - | 3.1% | 6.3% | 6.3% |
| Gali CD Chip | - | 3.1% | 6.3% | 6.3% |
| Pure Gold | - | - | - | 3.1% |
| Emerald | - | - | - | 3.1% |
| Magic Banana | 6.3% | 6.3% | 12.5% | 12.5% |
Location: 6 (Disk Stone Temple)
| INT | LOST % |
|---|---|
| ~1 | 31.3% |
| ~200 | 25.0% |
| ~350 | 9.4% |
| ~500 | 6.3% |
| INT Ranges | 1 | 200 | 400 | 600 |
|---|---|---|---|---|
| Herb | 12.5% | 12.5% | 12.5% | 12.5% |
| Dino CD Chip | 3.1% | 6.3% | 6.3% | 12.5% |
| Pixie CD Chip | - | - | 3.1% | 6.3% |
| Gali CD Chip | - | - | 6.3% | 9.4% |
| Naga CD Chip | - | - | 6.3% | 9.4% |
| Plant CD Chip | - | - | 6.3% | 9.4% |
| Magic Banana | 6.3% | 6.3% | 12.5% | 12.5% |
Location: 7 (Arena)
| INT | LOST % |
|---|---|
| ~1 | 46.9% |
| ~100 | 25.0% |
| ~300 | 9.4% |
| ~500 | 6.3% |
| INT Ranges | 1 | 150 | 250 | 550 |
|---|---|---|---|---|
| Herb | 12.5% | 18.8% | 18.8% | 18.8% |
| Naga CD Chip | - | - | 3.1% | 6.3% |
| Pure Gold | - | - | - | 3.1% |
| Emerald | - | - | - | 3.1% |
| Diamond | - | - | - | 3.1% |
| Medicine A | - | - | - | 3.1% |
| Medicine B | - | - | - | 3.1% |
Location: 8 (Observatory)
| INT | LOST % |
|---|---|
| ~1 | 46.9% |
| ~150 | 25.0% |
| ~250 | 9.4% |
| ~400 | 6.3% |
| INT Ranges | 1 | 100 | 200 | 500 |
|---|---|---|---|---|
| Mango | 25.0% | 25.0% | 25.0% | 25.0% |
| Herb | 630.0% | 12.5% | 12.5% | 12.5% |
| Dino CD Chip | - | 3.1% | 3.1% | 6.3% |
| Pixie CD Chip | - | - | - | 3.1% |
| Gali CD Chip | - | - | 3.1% | 6.3% |
| Pure Gold | - | - | - | 3.1% |
| Emerald | - | - | - | 3.1% |
Location: 9 (Palace)
| INT | LOST % |
|---|---|
| ~1 | 46.9% |
| ~100 | 25.0% |
| ~200 | 9.4% |
| ~500 | 3.1% |
| INT Ranges | 1 | 100 | 300 | 600 |
|---|---|---|---|---|
| Plant CD Chip | 3.1% | 6.3% | 6.3% | 12.5% |
| Pure Gold | - | - | 3.1% | 6.3% |
| Diamond | - | - | - | 3.1% |
| Medicine A | - | - | - | 3.1% |
| Medicine B | - | - | - | 3.1% |
| Magic Banana | 6.3% | 6.3% | 12.5% | 18.8% |
| Paragama God Statue | - | - | - | 3.1% |
Location: 10 (Priest's Residence)
| INT | LOST % |
|---|---|
| ~1 | 46.9% |
| ~100 | 31.3% |
| ~200 | 12.5% |
| ~500 | 6.3% |
| INT Ranges | 1 | 200 | 300 | 500 |
|---|---|---|---|---|
| Mango | 25.0% | 25.0% | 25.0% | 25.0% |
| Herb | 12.5% | 12.5% | 12.5% | 12.5% |
| Pixie CD Chip | - | - | 3.1% | 6.3% |
| Gali CD Chip | - | 3.1% | 6.3% | 6.3% |
| Plant CD Chip | - | 3.1% | 6.3% | 6.3% |
| Calm Stone | - | - | - | 3.1% |
| Paragama God Statue | - | - | - | 3.1% |
Location: 11 (Black Temple)
| INT | LOST % |
|---|---|
| ~1 | 53.1% |
| ~100 | 37.5% |
| ~250 | 15.6% |
| ~550 | 9.4% |
| INT Ranges | 1 | 250 | 500 | 700 |
|---|---|---|---|---|
| Mango | 25.0% | 25.0% | 25.0% | 25.0% |
| Herb | 15.6% | 18.8% | 15.6% | 18.8% |
| Dino CD Chip | 3.1% | 3.1% | 9.4% | 12.5% |
| Naga CD Chip | - | 3.1% | 6.3% | 9.4% |
| Calm Stone | - | - | - | 3.1% |
| Magic Banana | - | 6.3% | 12.5% | 15.6% |
| Paragama God Statue | - | - | - | 3.1% |
Location: 12 (Royal Tomb)
| INT | LOST % |
|---|---|
| ~1 | 53.1% |
| ~100 | 31.3% |
| ~200 | 12.5% |
| ~500 | 6.3% |
| INT Ranges | 1 | 200 | 400 | 650 |
|---|---|---|---|---|
| Plant Egg | - | - | - | 3.1% |
| Pixie CD Chip | - | 3.1% | 6.3% | 9.4% |
| Gali CD Chip | 3.1% | 9.4% | 9.4% | 9.4% |
| Pure Gold | - | - | - | 6.3% |
| Emerald | - | - | - | 3.1% |
| Magic Banana | 6.3% | 6.3% | 12.5% | 18.8% |
| Paragama God Statue | - | - | - | 3.1% |
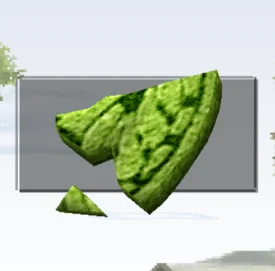
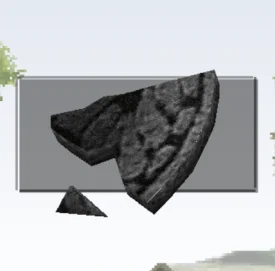
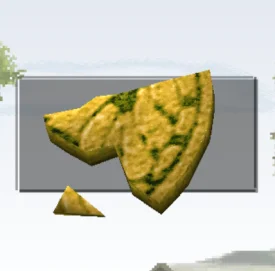
Visual CD Fragment Guide
Dino: +10 SKI
(sell: 500 G)
Gali: +10 INT
(sell: 1000 G)
Golem: +10 POW
(sell: 500 G)
Hare: +10 SKI
(sell: 500 G)
Jell: +10 DEF
(sell: 500 G)
Monol: +10 DEF
(sell: 1000 G)
Naga: +10 POW
(sell: 1000 G)
Pixie: +10 INT
(sell: 2000 G)
Plant: +10 LIF
(sell: 1000 G)
Suezo: +10 SKI
(sell: 500 G)
Tiger: +10 SKI
(sell: 500 G)
Worm: +10 LIF
(sell: 500 G)
MYTH Alert:
There are many misconceptions about how often the Gold Peach can be found, or how many such as "can only find 1 every 10 years".
The Gold Peach is not time gated, however, Any single monster can only find 1 Gold Peach in it's lifetime, after which, an internal flag is set that prevents it from appearing on future loot results for that monster. But you could, for example, use 3 different monsters that have never found one on consecutive years and find one every year. Also, any single monster can be fed multiple Gold Peaches.
- S Starting Point
- : SKI Obstacles.
- 15% w/ ~200
- 31% w/ ~400
- 81% w/ 500 to 600
- : POW Obstacles.
- 15% w/ ~100
- 30% w/ ~300
- 100% w/ 600
- : INT Obstacles.
- "H" req. 400
- "I" req. 600
| INT | % | INT | % | INT | % |
|---|---|---|---|---|---|
| 200 | 15% | 400 | 31% | 700 | 93% |
Diamond (10k), Emerald (8k), Pure Gold (6k), Wind Drum(5k), Wind Whistle(5k)
Golden Peach, Henger Doll Parts, Wind Drum, Wind Whistle, Gadamon God Statue
Searchable Areas
Location: 1 2 (Guardhouse)
| INT | LOST % |
|---|---|
| ~1 | 46.9% |
| ~100 | 25.0% |
| INT Ranges | 1 | 100 | 200 | 600 |
|---|---|---|---|---|
| Worm CD Chip | - | - | 3.1% | 6.3% |
| Suezo CD Chip | - | - | 3.1% | 6.3% |
| Pure Gold | - | - | - | 3.1% |
| Diamond | - | - | - | 3.1% |
| Gadamon God Statue | - | - | - | 3.1% |
| Doll Leg L | - | 3.1% | 3.1% | 9.4% |
Location: 3 (Government Office)
| INT | LOST % |
|---|---|
| ~1 | 46.9% |
| ~100 | 25.0% |
| ~200 | 9.4% |
| ~500 | 6.3% |
| INT Ranges | 1 | 200 | 400 | 600 |
|---|---|---|---|---|
| Sting Dust | 12.5% | 18.8% | 18.8% | 12.5% |
| Worm CD Chip | 3.1% | 3.1% | 3.1% | 6.3% |
| Suezo CD Chip | - | - | 3.1% | 6.3% |
| Emerald | - | - | - | 3.1% |
| Wind Whistle | - | - | - | 3.1% |
| Doll Hand L | - | 3.1% | 6.3% | 9.4% |
| Doll Hand R | - | 3.1% | 6.3% | 9.4% |
Location: 4 (Collapsed Office)
| INT | LOST % |
|---|---|
| ~1 | 46.9% |
| ~100 | 25.0% |
| ~200 | 9.4% |
| ~500 | 6.3% |
| INT Ranges | 1 | 200 | 400 | 600 |
|---|---|---|---|---|
| Sting Dust | 12.5% | 18.8% | 18.8% | 12.5% |
| Worm CD Chip | - | 3.1% | 3.1% | 6.3% |
| Jell CD Chip | 3.1% | 3.1% | 3.1% | 6.3% |
| Emerald | - | - | - | 3.1% |
| Wind Drum | - | - | - | 3.1% |
| Doll Leg L | - | 3.1% | 6.3% | 9.4% |
| Doll Leg R | - | 3.1% | 6.3% | 9.4% |
Location: 5 (Hall of Fame)
| INT | LOST % |
|---|---|
| ~1 | 46.9% |
| ~100 | 25.0% |
| ~300 | 9.4% |
| ~500 | 6.3% |
| INT Ranges | 1 | 200 | 400 | 600 |
|---|---|---|---|---|
| Sting Dust | 12.5% | 12.5% | 12.5% | 12.5% |
| Golden Peach | - | - | - | 6.3% |
| Worm CD Chip | 3.1% | 3.1% | 6.3% | 6.3% |
| Jell CD Chip | - | 3.1% | 3.1% | 6.3% |
| Suezo CD Chip | 3.1% | 3.1% | 6.3% | 6.3% |
| Pure Gold | - | - | - | 3.1% |
| Gadamon God Statue | - | - | - | 6.3% |
Location: 6 (Checkpoint)
| INT | LOST % |
|---|---|
| ~1 | 46.9% |
| ~200 | 25.0% |
| ~250 | 9.4% |
| ~500 | 6.3% |
| INT Ranges | 1 | 200 | 300 | 600 |
|---|---|---|---|---|
| Sting Dust | 12.5% | 12.5% | 12.5% | 12.5% |
| Golden Peach | - | - | - | 3.1% |
| Jell CD Chip | 3.1% | 3.1% | 6.3% | 6.3% |
| Pure Gold | - | - | - | 3.1% |
| Emerald | - | - | - | 3.1% |
| Wind Drum | - | - | - | 3.1% |
| Doll Leg R | - | 3.0% | 6.3% | 9.4% |
Location: 7 (Barracks)
| INT | LOST % |
|---|---|
| ~1 | 46.9% |
| ~100 | 25.0% |
| ~200 | 9.4% |
| ~500 | 6.3% |
| INT Ranges | 1 | 150 | 400 | 600 |
|---|---|---|---|---|
| Sting Dust | 12.5% | 18.8% | 18.8% | 12.5% |
| Emerald | - | - | - | 3.1% |
| Wind Drum | - | - | - | 3.1% |
| Doll Hand L | 3.1% | 3.1% | 6.3% | 9.4% |
| Doll Hand R | 3.1% | 3.1% | 6.3% | 9.4% |
| Doll Leg L | 3.1% | 3.1% | 6.3% | 9.4% |
| Doll Leg R | 3.1% | 3.1% | 6.3% | 9.4% |
Location: 8 (Central Government Office)
| INT | LOST % |
|---|---|
| ~1 | 46.9% |
| ~100 | 31.3% |
| ~300 | 12.5% |
| ~600 | 6.3% |
| INT Ranges | 1 | 200 | 500 | 700 |
|---|---|---|---|---|
| Sting Dust | 12.5% | 18.8% | 18.8% | 12.5% |
| Suezo CD Chip | - | 3.1% | 6.3% | 12.5% |
| Pure Gold | - | 3.1% | 3.1% | 3.1% |
| Emerald | - | - | - | 3.1% |
| Diamond | - | - | - | 3.1% |
| Doll Hand L | - | 3.1% | 12.5% | 15.6% |
| Doll Hand R | - | 3.1% | 12.5% | 15.6% |
Location: 9 (Stone Monument)
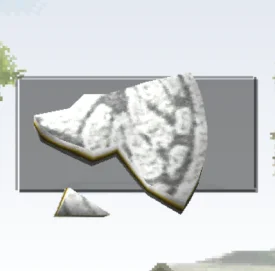
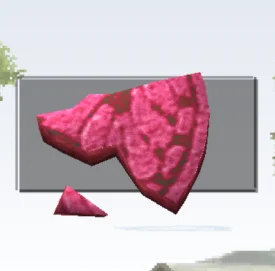
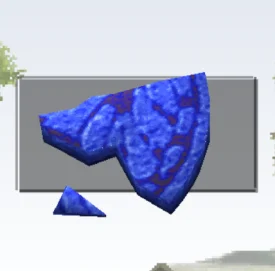
Visual CD Fragments Guide
Dino: +10 SKI
(sell: 500 G)
Gali: +10 INT
(sell: 1000 G)
Golem: +10 POW
(sell: 500 G)
Hare: +10 SKI
(sell: 500 G)
Jell: +10 DEF
(sell: 500 G)
Monol: +10 DEF
(sell: 1000 G)
Naga: +10 POW
(sell: 1000 G)
Pixie: +10 INT
(sell: 2000 G)
Plant: +10 LIF
(sell: 1000 G)
Suezo: +10 SKI
(sell: 500 G)
Tiger: +10 SKI
(sell: 500 G)
Worm: +10 LIF
(sell: 500 G)