
- Chat! Get help. Share Monsters.
- World-wide fans & players
- Community run & moderated MR Subreddit
- If Discord isn't your thing.
Community Tournaments
- PVP & Event Calendar
- Multiple Hosts, Games & Formats Challenges
- Speed Runs & Nuzlocke Social Media & Websites
- Official and Fan channels
Please Donate!
Your contributions help keep
the site and archives going!
Create Monsters at the Shrine! MR1 DX Song List (EN) MR2 DX Song List (EN) Ultra Kaiju MR Keywords (EN) Ultra Kaiju MR Song list (SEA)
PS1 CD DB & Tools
 GameBoy Advance
 Ultra Kaiju MR
Monster Rancher 1 - Raising tips: Work, Training, Feeding, Money
There are many aspects to raising your monster. Work to raise stats, Training to learn to attacks, participating in tournaments for money or game progression. This page is not meant as a Walkthrough or step by step guide to beat the game, rather it breaks down several of the aspects of the game into smaller consumable bits of information that you can apply to your overall experience which will lead to beating the game. Some of the advanced raising schedules won't really be affordable on a fresh game, it's OK to use a first monster or two to help stockpile your funds so you can concentrate on a very strong monster later.
Adjust as your budget requires: Start at your most comfortable financial level, but move up to a better schedule when you can afford it.
Meat gives +1 week of lifespan, while Taffy and Mint are the major Fatigue and Stress reducing items
Note* These assume the worst case scenario for the best result (a fresh/new game with NO passive items or Stable upgrades yet).
- Earning Upgrades and passive items will give more leniency for weekly item use.
Offset Cost: This is the Final Cost of the method per month (Total cost of Items minus the money made back from Successful work).
The schedules below are the cheapest options for keeping Stress and Fatigue under control. It should be noted that anywhere you see ![]() Mango, you can use
Mango, you can use ![]() Taffy instead. Taffy is more money but it can help simplify your inventory if Money isn't a concern.
Taffy instead. Taffy is more money but it can help simplify your inventory if Money isn't a concern.
| All Heavy | ||
| Monthly: | ||
| Week 1: | Heavy Work | |
| Week 2: | Heavy Work | |
| Week 3: | Heavy Work | |
| Week 4: | + | Heavy Work |
Raw Cost: 1300 G.
All Work Succeeds: +600 G.
Best Scenario Final Cost: 700 G.
| 3x Heavy | ||
| Monthly: | ||
| Week 1: | Heavy Work | |
| Week 2: | Heavy Work | |
| Week 3: | Light Work | |
| Week 4: | Heavy Work | |
Raw Cost: 1100 G.
All Work Succeeds: +550 G.
Best Scenario Final Cost: 550 G.
| Alternating | ||
| Monthly: | ||
| Week 1: | Heavy Work | |
| Week 2: | No Item | Light Work |
| Week 3: | Heavy Work | |
| Week 4: | + | Light Work |
Raw Cost: 950 G.
All Work Succeeds: +500 G.
Best Scenario Final Cost: 450 G.
| Budget | ||
| Monthly: | ||
| Week 1: | Light Work | |
| Week 2: | Light Work | |
| Week 3: | Light Work | |
| Week 4: | + | Light Work |
Raw Cost: 850 G.
All Work Succeeds: +400 G.
Best Scenario Final Cost: 450 G.
| Cheap | ||
| Monthly: | ||
| Week 1: | No Item | Heavy Work |
| Week 2: | No Item | Light Work |
| Week 3: | Light Work | |
| Week 4: | No Item | Rest |
Raw Cost: 500 G.
All Work Succeeds: +350 G.
Best Scenario Final Cost: 150 G.
| Destitute | ||
| Monthly: | ||
| Week 1: | No Item | Light Work |
| Week 2: | No Item | Light Work |
| Week 3: | No Item | Light Work |
| Week 4: | No Item | Rest |
Raw Cost: 300 G.
All Work Succeeds: +300 G.
Best Scenario Final Cost: 0 G.
1 If you have the budget, you can use Taffy instead of Mango to simplify your inventory items. Additionally, Taffy massively more effective than Mango, so it's a safe bet to use anyway. Mango is mainly listed above for the cheapest possible options while still managing fatigue.
| 4th Week / Immortal | ||
| Monthly: | ||
| Week 1: | Frozen | |
| Week 2: | No Item | Frozen |
| Week 3: | No Item | Frozen |
| Week 4: | No Item | Drill of Choice |
All Work Succeeds: +150 to 300 G.
Best Scenario Final Cost: 200 to 350 G.
The Meat and Taffy is enough reduction to reset Stress/Fatigue to 0 and allow Heavy Work. Since Meat also adds +1 week of Lifespan, and you're essentially feeding Meat every week, it will hold the monster perpetually in this specific stage of lifespan. Its age will increase numerically, but it will not lose remaining lifespan while this method is followed.
This is a pretty bording schedule and a lot of work, but it essentially immortalizes your monster while doing it.
Light work pays 100g per success and raises 1 stat.
Heavy work pays 150g per success and raises 2 stats (one higher than the other) and drops a third stat by a small amount.
+3 Stress / +18 Fatigue
| Cart | Pow ↑ | Fatigue ↑ |
| Hunt | Ski ↑ | Fatigue ↑ |
| Field | Int ↑ | Fatigue ↑ |
| Forest | Spd ↑ | Fatigue ↑ |
| Guard | Def ↑ | Fatigue ↑ |
| Logging | Lif ↑ | Fatigue ↑ |
+8 Stress / +33 Fatigue
| Circus | Spd ⇈ | Int ↑ | Pow ↓ | Fatigue ⇈ |
| Build | Pow ⇈ | Lif ↑ | Spd ↓ | Fatigue ⇈ |
| Mine | Lif ⇈ | Def ↑ | Ski ↓ | Fatigue ⇈ |
| Mailman | Int ⇈ | Ski ↑ | Def ↓ | Fatigue ⇈ |
Work Planning: Which work to use with a schedule?
Maximizing Gains:- Gains: Know your monster's Stat Gains (1997 Original -- MR1 DX).
(E or 1 are the lowest gains. C or 3 is average. A or 5 are the highest gains) - Before Prime: For A and B gain stats, Focus-raise the stats.
(Baby stage through adolescence should be enough to near max out one or two of these with No-Rest since B and A gains can still get high gains before Prime) - Around/During Prime: Raise any remaining desired stat a given monster has low gains in.
(This is the best Gains-per-week a low gain stat can get and is the best time to catch these up.) - Dump Stat: Heavy Work drop a given stat by a low amount based on the work, but you may not need the dropped stat, or it may be a stat you can easily catch back up later. Heavy works are key for maxing multiple stats.
- Using any of the training schedules, choose Hard work and Light work that Compliment each other. Avoid works that constantly raise and lower the same stat.
Example: INT/SPD/SKI build is the easiest with the following- Mailman(H) + Hunt(L), or Circus(H) + Hunt(L), and Field(L), Forest(L), Logging(L) mixed in as needed.
POW/SPD build is a bit more difficult based on a given monster's gains, since the Build heavy work also lowers SPD, but it is perfectly achievable when planning ahead.
Other Considerations:
- Consider avoiding Mine work and just use Guard. DEF is incredibly powerful in MR1, a little goes a long way, and a lot is very overpowered. However, the Mine heavy work drops SKI, another very important stat that doesn't have a heavy drill to make up for it.
- With some upgrades and items, Training can be used in place of Heavy Drills without lifespan hits, great as a "SKI Heavy" or a "DEF Heavy" that doesn't drop SKI.
- Once your main stats are maxxed out (or as high as you want them to be) then you can start raising the lower stats up. This optimizes stat gains instead of swapping between drills that raise and lower a stat over and over.
- Techs: Know what you want prior to training. This helps you know how you are going to raise your monster and know stat requirements for techs in advance, and avoid unnecessary lifespan hits by sending to the wrong Training.
- Drugs? Planning ahead using Vitamin C & D can yield great results in Baby stages and help you get to. Using at the wrong time is a waste of lifespan.
- Gold Peach & Plant Egg: These can be used to great effect extending your monster's lifespan, best used after Prime but before gains drop off. A monster can only find 1 of each of these per monster, but any monster can be fed as many Peaches & Plant Eggs as you can get your hands on.
- See the item list for a deeper understanding on why the items work.
Total: +16 Stress / +68 Fatigue (+4 Stress / +17 Fatigue Each Week)
- Training is a mechanism in the game to learn new attacks for your monster.
- Training costs 2000g (1000g when on sale), lasts for 4 weeks and will raise a particular stat depending on the location you send to training.
- Learning new attacks has parameters that must be met based on the Locale's Stat + Fear + Loyalty + a random number. Fear and Spoil are hidden but you can estimate this value by using your Loyalty (at least up to 100 loyalty. Fear and Spoil both can go up to 100 each), or use the MR1 Advanced Viewer to see the values. The Random Number is between 0 and 99 and is also hidden.
For example:- Altra Vista raises LIF. To learn a new attack from Alta Vista your LIF + additional hidden factors must reach 250 or higher.
- If you have 200 LIF and 50 Loyalty then you already 100% qualify since you meet the 250+ requirement.
- If you have 100 LIF and 100 Loyalty this is only 200. The Random Number (between 0 and 99) can happen here equating to a roughly 50% chance to learn a new Tech.
- Most Locations have a combined value of 250 to learn an attack. Special attacks require a combined value of 500 to learn.
- A limited number of attacks that can be learned from each location.
- If you don't learn an attack, it's worth it to reset and try again (or try later), or check the Tech list to make sure there's even a new attack to learn from a given location.
It is important to note that optimally, you should always begin training at "Very Well" and on Week 1, so that they take as small a lifespan hit (or no lifespan hit) as possible, and can feed Meat on return for the +1 week lifespan.
No Upgrades/Passives
- With 0 Stress and 0 Fatigue, Send to training on Week 1.
- You will return with +16 stress / +68 fatigue, and incur an additional lifespan hit.
- Feed Meat when asked for the monthly food to bring Stress down to 6 and mitigate the 1 week lifespan hit from Stress and Fatigue.
- Before doing any other action: Feed 2 Taffy and 1 Mint Leaf to bring Stress and Fatigue down to 0.
WITH Upgrades and Passives
- You have the 2nd Stable upgrade, and 1 Calm Stone & 1 Fire Stone in inventory...
- With 0 Stress and 0 Fatigue, Send to training on Week 1.
- You will return on the following Week 1 with +3 stress / +63 fatigue and will not take the additional lifespan hit.
- Feed Meat when asked for the monthly food to bring Stress down to 0.
- Before doing any other action: Feed 2 Taffy (-50 fatigue each) to bring Fatigue down to 0.
- In early game you will mostly make money from doing Work and E or D Grade tournaments.
Choosing a HIGH Seriousness monster (over 50) in the beginning can help alleviate frustration with poorly behaving/more difficult to raise monsters. - After you have farmed up enough money through Tournaments and Work you can begin to start using Items consistently.
- Items will allow you to maximize lifespan and train harder (depending on what you can afford)
- When you can beat C Grade tournaments with regularity, you should be able to start affording items required in the Work/Feeding schedules.
- Once you can start raising a monster on a Work/Feeding schedule with at least 2 Hard Work per month, your stats will starting being high enough to win higher reward tournaments. You can stay in this Grade range, or promote up to the point you think you can win consistently in Non-Official (Non-promoting) Grade tournaments.
- Keep farming the Non-official / high pay-out tournaments, and sell the items you win. (Any item from a tournament can be won again from the same tournament later if needed)
- B and A Grade tournaments can make a lot of money.
- B Class: Excluding Invitationals & Official tournaments, bring in over 31,000g in a year, before selling items and additional winnings.
- A Class: Excluding Invitationals & Official tournaments, bring in 34,000 in a year (Just two tournaments that give Emerald and Diamond tournaments are half of these winnings)
- Once you reach S Grade you will be invited to the Big 4 tournaments, one at a time. Each one of these is worth 10k gold.
- Freeze your monster and bring them out on a Big 4 invitation date to get invited to the tournament, then fight in that tournament.
- You can repeat this until the monster dies, keeping it frozen and only bringing it out for the invitation, and then the tournament itself. Always feed Taffy before/after tournaments.
- See the Calendar for Tourney dates and rewards.
- With a proper expedition monster you can bring home a year's worth of Big 4 tournament winnings in just 1 expedition.
- Always save before expedition. Your monster can randomly get lost on the first search, and items are randomly rolled on each expedition. Reset your expedition if the results are not satisfactory.
- Removed obstacles stay removed for future expeditions. If you raised a high POW monster first, consider taking it on expedition just to remove POW obstacles in advance for your INT monster later.
- You can also keep your Expedition monster in the freezer until you're ready for it to be invited, extending the number of expeditions the monster can go on.
- Hartville expedition has many locations in close proximity that contain items which sell for a lot of money. Locations 1, 2, 7 can have Gold, Emerald, Diamond, Medicine, Calm Stone that can be sold.
- Meat: -10 Stress (cost 300g)
(Also +1wk lifespan) - Mint Leaf: -50 Stress (cost 200g)
- Taffy: -50 Fatigue (cost 200g)
- Mango: -10 fatigue (cost 50g)
- Rest: -8 Stress / -55 Fatigue
- Gold Peach: +50 weeks Lifespan
- Plant Egg: +25 weeks Lifespan
- Cocooning: +100 weeks Lifespan
- Light Work: +3 Stress / +18 Fatigue
- Hard Work: +8 Stress / +33 Fatigue
- Training: +4 Stress / +17 Fatigue Each Week
(16 Stress / 68 Fatigue total)
Training uses 1wk lifespan per week + LI hits.
With passives you may stay below LI hits. - Expedition: MR1DX Monsters don't age while on expedition.
Not Lost: +10 Stress / +70 Fatigue-
When starting at 0/0, you will return at LI 2 (-1wk).
Reduce Stress/Fatigue back to 0/0 before the next LI calc
takes place to avoid a lifespan hit
Lost: +5 Stress / +65 Fatigue-
When starting at 0/0, you will return with LI 1 (-0 wks).
Monster will not lose lifespan while being lost.
Reduce Stress/Fatigue back to 0/0 before the next LI calc
takes place to avoid a lifespan hit
- 2nd Stable upgrade: -2 Stress each week.
- Calm Stone: -5 Stress on Week 1 only
- Fire Stone: -5 Fatigue on Week 1 only
Taking more than double your health
in a single hit can result in death.
| Placement | Lifespan | Stress | Fatigue |
|---|---|---|---|
| 1st | -2 wks | -60 | +30 |
| 2nd - 3rd | -4 wks | -50 | +40 |
| 4th - 8th | -8 wks | -40 | +50 |
| Injured* | -16 wks | -30 | +50 |
* Injury Info
There are 2 determinations for Injury(Translated from JP Wiki)
- A: Value = Fatigue + Excess Damage
- If <50 there is no determination.
- If >50 Injury or Death determination: See "B"
- B: Injured/Death: Value of A -(Spoil /2)
- If <100 = Monster Injured
- If >100 = Death
- Injury: Fatigue is 0, excess damage is 50+
- Death: Fatigue is 0, excess damage is 150+, Spoil 1+
LI = (Stress/10 (tc)) + (Fatigue/20 (tc))
tc = truncated; 2.5 is 2 etc.
| Index | LI | Additional Weeks lost |
|---|---|---|
| 0-3 | 1 | -0 wks |
| 4-5 | 2 | -1 wks |
| 6-7 | 3 | -2 wks |
| 8-9 | 4 | -3 wks |
| 10-11 | 5 | -4 wks |
| 12-13 | 6 | -5 wks |
| 14-15 | 7 | -6 wks |
Holly will randomly give one of the below messages for each notice:
- Prime (180 weeks remaining)
- "Whether the monster becomes a good fighter or not depends on how you raise it now."
- "It's going through the most important stage now. Take good care of it."
- Retirement Warning (50 weeks remaining)
- "It seems tired and worn out... It may be time for it to retire."
- "It isn't acting like its old self. Better let it retire."
- Retirement Warning (10 weeks remaining)
- "It has worked hard enough. Let it retire."
- "It can no longer fight. Let it retire."
Your First Playthrough:
- Don't expect to beat the game with your first monster, on your first playthrough! While it is possible, it's not the norm for a new player, and the game is originally meant to have replay value and played through multiple times.
- To beat the game/get to credits, you must get to Trainer Rank 10. You do this by beating Official tournaments E through S (rank 1-6), then four new S Grade tournaments are opened (Big 4) for ranks 7-10.
- Instead of racing to Rank 10, Use your first monster not for Trainer Rank progression, but to accumulate as much money as possible, as easily as possible.
- Don't promote your difficulty too soon by fighting in the Official Tournaments. Instead, fight in the tournaments in-between Officials for money.
- If the tournaments are too easy, THEN promote to the next Grade for higher tournament money payouts, and keep saving.
- Money is indirectly one of the soft gate-keeper hurdles in the game.
- With Trainer Rank comes opportunity to upgrade your Ranch (without enough money you will never be prompted to upgrade)
- You need money to afford frequent items for raising strong monsters (which can help raise your Trainer Rank)
- With Trainer Ranks, Ranch upgrades, and Strong monsters, you'll have an easier time creating even stronger monsters and also unlocking the hidden breeds later on
- Raising Methods: There's no need to use the most advanced methods immediately, in fact you won't be able to.
- However, You can use the cheaper raising methods on a new game to maximize lifespan and work gain potential until you've saved enough money for more rigorous raising methods.
- Stress/Fatigue warnings: While the game warns you when a monster is tired or stressed, it is more advantageous to be proactive, rather than reactive. In either scenario you will have to do something to lower fatigue and stress (rest/feed items, or both), but being reactive means you are also likely losing small bits of lifespan each time you have to correct it after the fact.
- Training is for learning new attacks. It can be tempting with the sale notices, but you don't often need Training. SAVE before you do Training.
- Learning new Techs/Attacks have stat thresholds based on the Locale's stat to reach before they can be learned.
- Use Light and/or Hard works to raise stats until you can qualify to learn a new attack.
- It's an unnecessary lifespan hit to do Training without getting the Attack you want from it. If you don't learn a new attack, or it's an attack you don't want, then reload and don't do the Training/Try again/Try a different location.
- Expeditions are optional story and in-game progression. They can provide a variety of items useful for selling for cash, unlocking new monsters, raising stats, increasing lifespan etc. (See Expedition Maps guide for details)
- There are POW, INT, and SKI obstacles peppered through out expeditions. Once removed, the obstacles stay removed.
- Most useful items require high INT to find, and high POW to break down obstacles.
- It can be strategic to bring a POW monster to expedition for the sole purpose of clearing POW obstacles (and not searching for items), then revisit expedition later with an INT monster to search the locations.
- Your first monster/playthrough probably isn't going to be a great expedition monster unless you lucked out or planned it that way before attending. Most advanced players have a monster dedicated specifically for Expedition with the important stats optimized.
Max Multiple Stats in a week
Revised by Monster Fenrick for Online MR1 tournaments.
Max out several Stats to 999 in 1 game Week
There are several drugs in the shop that become available after a certain amount of years, that actually increase stats instantly without aging your monster. Some raise stats by 20 and lower another by 10, some raise two stats by 10, and lower one by 10. Since giving your monster infinite items each week is possible, you can max out several stats by giving them these drugs multiple times.
As long as you feed these items on the last day you plan on raising the monster, (freeze immediately after) there will be no lifespan hits that week. Lifespan hits only occur the following week (after rest, drill, or event that puts you into the next week).
Here is a list of the drugs that work instantly after feeding, and their effects: (These effects may not agree with the official item values from Tecmo, but these are correct as they've been tested.)
| ITEM | RAISES THIS | Lowers This | Lifespan |
|---|---|---|---|
| Fly Pill: | +20 Speed | -10 Defense | -1 Week |
| Heart Pill: | +20 Skill | -10 Power | -1 Week |
| Vitamin A: | +10 Power +10 Life | -10 Skill | -2 Weeks |
| Vitamin B: | +10 Defense +10 Life | -10 Speed | -2 Weeks |
| Pill: | +10 Power +10 Defense | -10 Life | -2 Weeks |
The best thing to do after drugging your monster is to save on a different file, specifically for battling. You may want to battle your Drug-Free monster later or do other things with the rest of its life, and plus you may want to keep all the money you spent. Although the benifits of this method are beyond godly, it comes at a price...
- You've practically killed your monster
- Empties your wallet
- You need to create a new save for it
- Time consuming
The Advantage: if you wait until the last week of life of your monster, you can essentially raise all the other stats that are hard to raise... then at the end of the Monster's Life, you can drug the heck out of it to raise the rest of the stats! Make Sure you choose a drug that lowers a stat that you don't mind getting low. good luck and hopefully there will be more activity in the Monster Rancher 1 Tournaments!. This method combined with the Gold Peaches, and Lisa Shock's "Shock Treatment" make MR1 the easiest game to raise monsters for tournaments!
- Make sure your monster is frozen at the Lab.
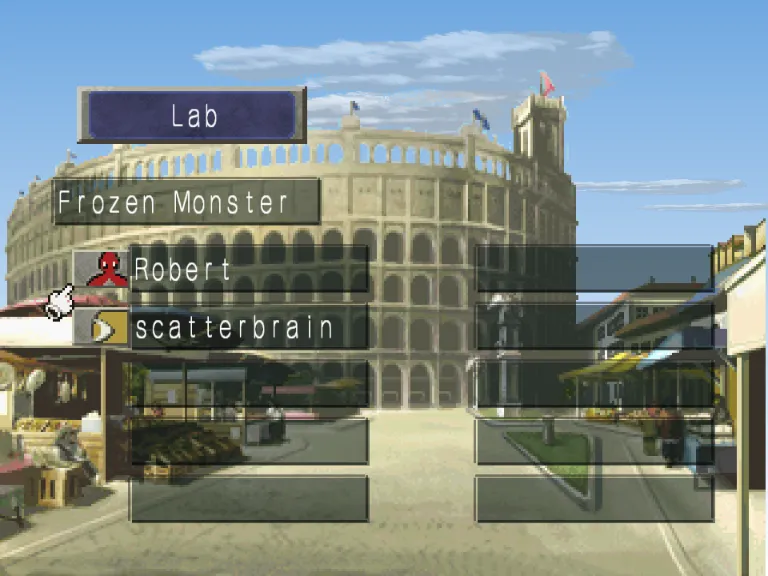
- Save your game on any numbered save slot.
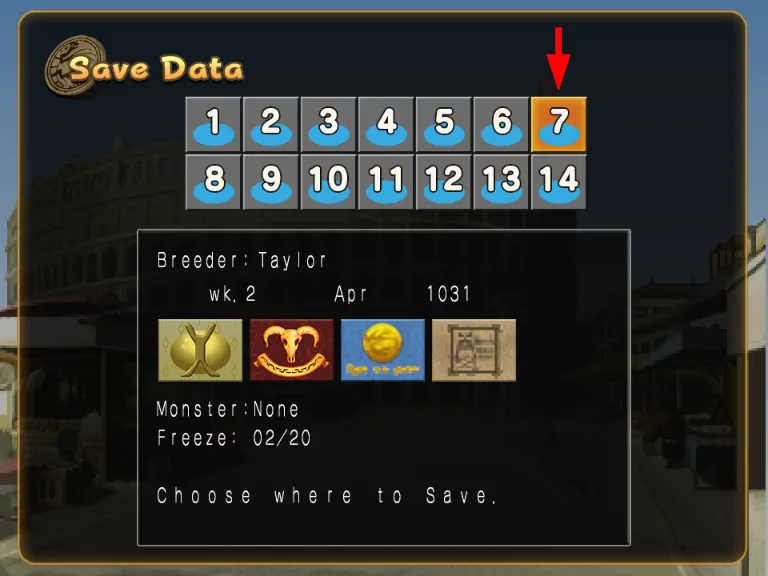
- Exit the game and go back to the Title, and choose "Vs. Mode" in the menu.
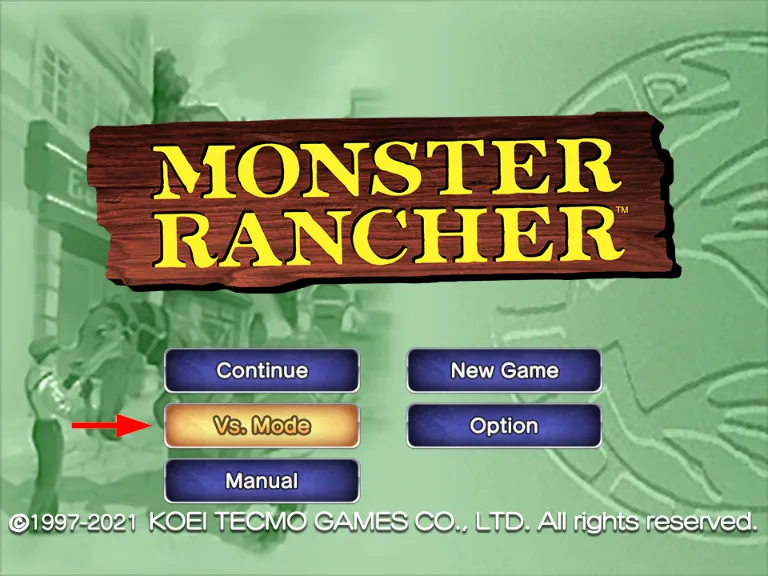
- Choose the same numbered save slot from Step 2, to register the frozen monsters online.
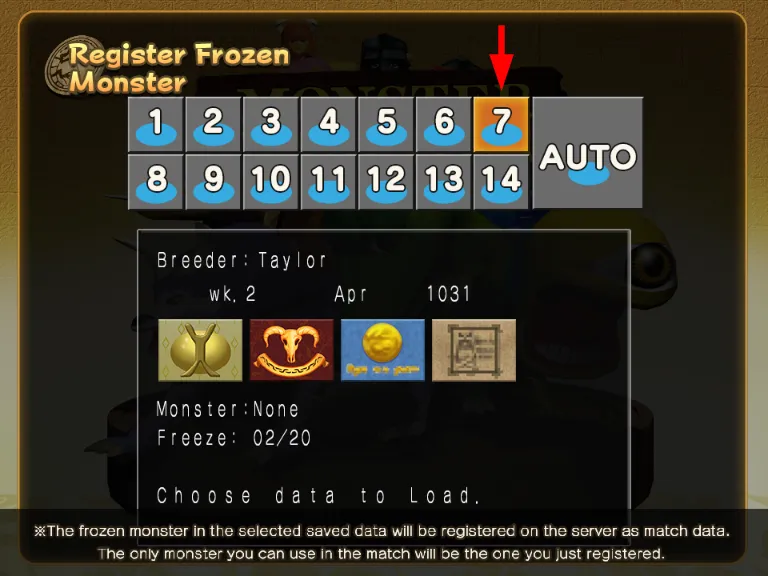
- Once the Frozen monsters have been registered, Select "Check Frozen Monster".
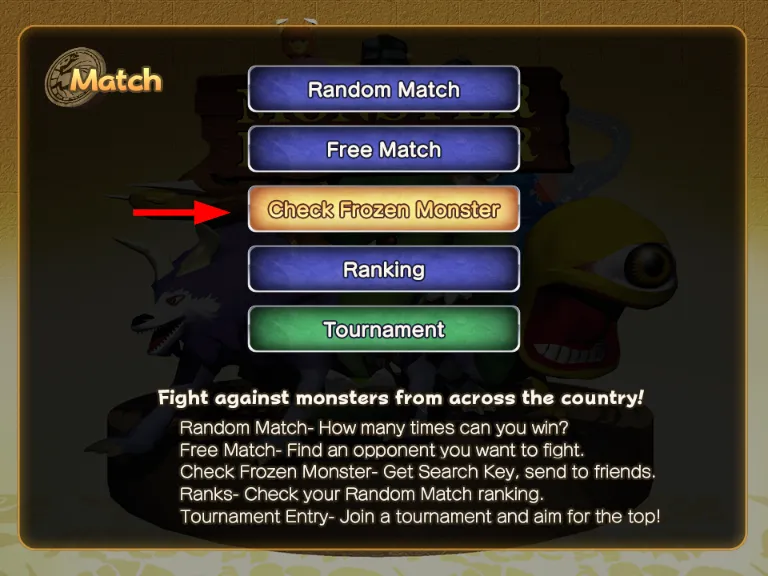
- In the list, confirm your monster shown, then click "Display Search Key".
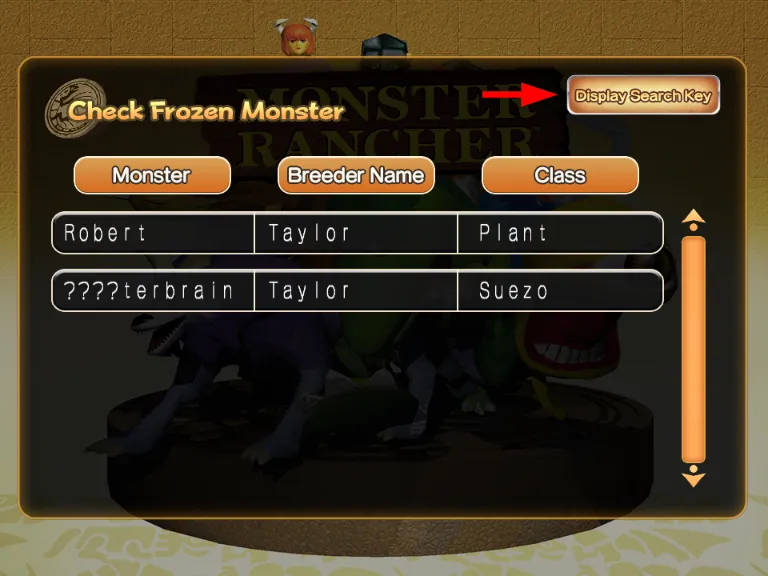
- Note the Search Key. It may be required to submit your monster and is helpful if the monster name has censored character strings.
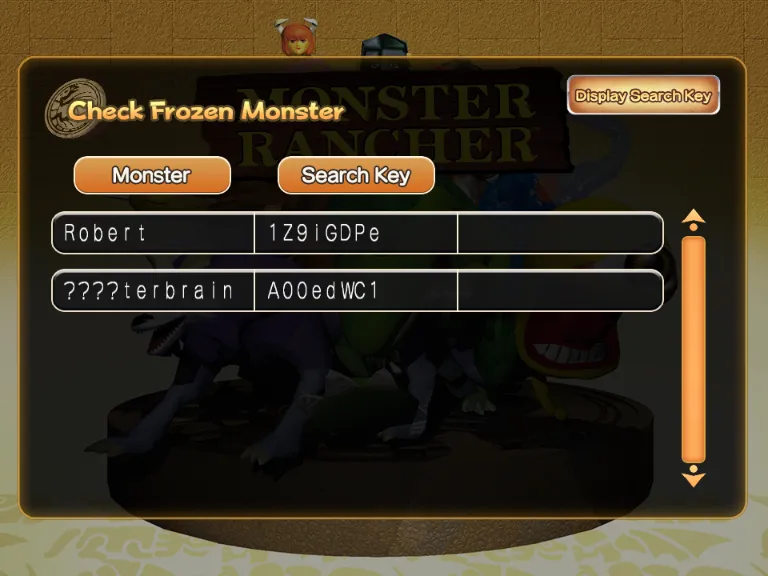
NOTE: you can only have 1 save slot uploaded at a time. Whatever is the last save uploaded is the only save in the cloud. You may overwrite the save slot on your local game however you want, it will not change what was already uploaded unless you re-register/upload it again.