
- Chat! Get help. Share Monsters.
- World-wide fans & players
- Community run & moderated MR Subreddit
- If Discord isn't your thing.
Community Tournaments
- PVP & Event Calendar
- Multiple Hosts, Games & Formats Challenges
- Speed Runs & Nuzlocke Social Media & Websites
- Official and Fan channels
Please Donate!
Your contributions help keep
the site and archives going!
Create Monsters at the Shrine! MR1 DX Song List (EN) MR2 DX Song List (EN) Ultra Kaiju MR Keywords (EN) Ultra Kaiju MR Song list (SEA)
PS1 CD DB & Tools
 GameBoy Advance
 Ultra Kaiju MR
Monster Rancher 2 - Competitive Raising
Interested in joining Online or In-Person PVP events? Most competitions and tournaments are run AI vs AI, though some tournaments may be run In-Person or via Parsec with Manual control.
Competitive raising can feel a lot different than raising monsters for single player. There are a lot of things to consider like what format you're fighting in, what the stat caps are. Do you go Tank or SPD, what kind of techs do you give your monster, will it require raising parents first to get the desired final result, these are a few of many considerations.
Engineering your monster for the best possible outcome under AI control is part of the meta of raising a competitive monster. Losing an AI vs AI tournament does not mean your monster is bad; It might still be an exceptionally raised monster that had bad luck.
Engineering your monster for manual control can be a bit easier since many factors about AI control can be ignored, for example, you can choose your attacks and when to use them without AI randomly selecting things, so skipping techs or covering up bad techs won't be as urgent or necessary.
- Complete the game and unlocks (Ranch and Monster unlocks -- Not required but really helps).
- Having the game completed and all upgrades purchased will free up your wallet to spend on raising and no surprise costly ranch upgrades.
- It opens up more monster options you'll have to submit to a given tournament.
- It opens up more potential for a better PVP monster by being able to find Disc Chips of specific monsters (that you've unlocked) while on Expedition.
- Having the ranch fully upgrades means the most inventory slots, which is important for making money on expeditions, and being able to store specific expedition items for competitive raising.
- Have some money stockpiled. A monster can be costly to raise.
- In DX it is quite profitable with a dedicated expedition monster and lots of available inventory space (See Expedition and making money sections)
- Having everything unlocked already means you can also find some of the highest value disc chips for selling, in addition to the big money items.
- Expectations of Tourneys and Raising for PVP.
- AI v AI: Most Tournaments are run AI v AI historically. Organizers will collect game saves or use DX's online upload feature to pull entrant's monsters from.
- Manual v Manual tournaments are more difficult to organize and run since players need to be in the same room on the same physical console, or have a way to use Parsec and available at the same time across time zones.
- Stat Caps: This term identifies generically how much total stats you're allotted for a monster, and your Stat Values totaled up cannot exceed this amount. Stat caps can vary depending on the Tournament Organizer and will be specified in their rules.
- Dumping Stats: Intentionally lowering undesired/uneeded stats (via drills or drugs) so that those points can be allocated to raise other desired stats as high as possible or for other desired stat distributions.
- Drop Stats: This term applies for some Tournament Organizers that will allow a stat to be dropped from the Stat Value totals. (e.g.; A Host may allow you to drop INT if it is 100 points or lower, then this value can be ignored when totaling your stats and meeting the Stat Cap of the specific tournament).
- Choosing and Signing Up for a Tournament:
- Please see the Calendar, or Discord Events channel for scheduled tournaments. These will usually have their Sign-Up information linked. There are multiple tournament organizers, and plenty of formats to pick and choose from.
- DX is cross region, cross platform compatible, so regardless if you're on Steam, Switch, or iOS, you can sign up for a tournament. (There are tournaments for other games as well, feel free to discuss in Discord!)
- Once you've decided what you'd like to participate in, refer to that specific event's Rules and Sign up form to submit your entry. (It's possible you have something that qualifies already or will have to complete your entry by a deadline)
- Plan and Raise your Monster based on the tournament format chosen.
- Don't raise a monster blindly and then hope it fits into a given tournament's ruleset. Check the rules of the tournament you want to join and be sure to fall within the restrictions set.
- The topics below cover individual considerations different aspects of a PVP monster. You may choose to apply some or all of them. The only real limitation is the Rules or Guidelines of a given tournament format, the rest is up to you to raise the best monster possible within those guidelines.
- Be prepared for a LOT of save scumming, to name a few things:
- Not every build requires it excessively, but in general, a precision PVP monster will require a ton of save scumming, especially if you're going for exact numbers.
- This may be required for Tech inheritance or Battle Special inheritance, Fusion baby outcome (or all 3 at the same time).
- This may be required on many drills, especially if you are dropping stats with Cheat! results.
- Watch your monster battle it out!
- The Tournament Organizer will have provided a date and time for the tournament you submitted your finished monster to.
- If you're able to, you can attend the event live (Most Hosts stream the events live), or if you miss the event there will be a VOD that you can watch.
- There are folks from all over the world across many time-zones participating, Support your fellow ranchers and Tournament Organizers, without them you wouldn't have anyone to compete with!
MooseBones' Rundown on breaking into competitive
Videos are a point-in-time, and this was made prior to MR2DX was released. There's a few things such as Nature, and DX variants that weren't yet known when this was made, but there's still a great bit of explanation and overview to be gleaned if you're still debating on joining the competitive scene, from one of the greats!
Guts Regeneration is a value for how many frames per second it takes to generate 1 Guts. The higher the value, the slower guts regeneration is for your monster. This directly determines how often a monster can afford to swing a hit in battle. Faster Guts regen will allow for more swings in a given fight, while slower Guts regen affords higher bonuses.
Damage Correction (Or Guts Correction) can provide more damage than usual for landed attacks. The bonus increases the more guts you have (up to 99). Based on a monster's actual Guts Regeneration value; The slower the guts regeneration is, the more of this benefit is afforded.
Damage Reduction Higher Guts can provide damage reduction. The bonus increases the more guts you have (up to 99). Slower Guts regen also has a slight bonus to damage reduction.
Tech Accuracy is increased the more Guts you have. Many things factor into your hit percent, like a Tech's accuracy, Monster SKI stat, Opponent SPD stat. Whatever this final value is, Higher guts helps raise that chance further. Slower Guts regen also has a slight bonus to accuracy.
Keep in mind that in Auto-Battles you have to hope for the best, but under manual control, saving up your guts before attacking helps increase your tech's accuracy, reduces damage taken, and improves damage done.
- Fast Guts Regen: Receives a lesser amount of these bonuses, but can afford to attack more often.
- Slow Guts Regen: Receives a higher amount of these bonuses, but may feel more risky since it can't afford to attack as often, and is also susceptible to withering.
You'll have to weigh which you'll want by selectively choosing your monster's breed and sub-breed (or special variant, or cocooned). Here's a Guts per Match chart to help you decide. You can see maximum potential guts generated and cross-reference with your monster's tech costs and animation times.
Guts per Match
| GR | Guts/Match | GR | Guts/Match |
|---|---|---|---|
| 5 | 360 | 13 | 138 |
| 6 | 300 | 14 | 128 |
| 7 | 257 | 15 | 120 |
| 8 | 225 | 16 | 112 |
| 9 | 200 | 17 | 105 |
| 10 | 180 | 18 | 100 |
| 11 | 163 | 19 | 94 |
| 12 | 150 |
This does not include:
- Starting 50 guts.
- Guts not gained when reaching max guts.
- Guts not gained during attacking animations.
If a monster's breed doesn't innately have a desired battle special, there are ways to acquire most of them through fusion. If a parent has a battle special, it has a random chance to pass it down to a baby monster. Additionally using specific disc chips will guarantee that the monster inherits the battle special that the disc chip provides.
Grit is one of the more sought after Battle Specials in PVP tournaments. While not required, It's highly encouraged to get it, as Grit can offer a chance to revive from a KO and turn the tables (Or simply get knocked back out again :P).
Ways to get Grit: Some monsters have Grit innately. In MR2DX others that don't normally have Grit, might have it on one of their variants in the Song List. In BOTH Original and DX you can combine for a chance to inherit it Grit if the parents had it, and also use Hare disc chips to get it.
Grit isn't the only Battle Special, of course. There are multiple to choose from. Fury is a great competitive Battle Special. Most monsters will have access to Power or Anger, depending on their nature and your strategy for AI battles. You can always refer to the Battle Specials page to see what monsters have naturally, and what you'd need to engineer for based on your preference.
Other Pages to reference: MR2DX Song List or PS1 Monster Data for basic monster data, Item List for what Disc Chips give which Battle Specials, Expeditions for disc chip locations & Calendar for Hare Disc Chips, or other tournaments that give disc chips as prizes.
- A limited tech selection means more chances a monster will use the techs you want on AI versus mode. Having an empty range can be beneficial to allow your monster to save up guts.
- Avoid acquiring bad techs. This isn't the same definition for every monster unfortunately. High cost/low payout is a loose gauge to use. Animation times of attacks can be considered too (While you're attacking, you don't generate guts, but your opponent does. Or long animations can help run down the clock)
- Weigh the options by referencing the Tech Charts which indicate actual values for Hit/Crit/Dmg, and consider your monster's guts regen factor and battle specials while choosing.
- Ranges 1 and 4 are the most frequented slots.
- Ranges 2 and 3 are more often quickly walked over.
Sometimes there are special tournament that allows for deleting of techs where one can have much more precision control over this, but for most tournaments you'll have to weigh and consider the risks of having techs in only some slots or many and which slots they are in, to help engineer your monster to make the fewest bad decisions with AI control.
Ways to dump stats:
- Hard Drills and some items (Like Paradoxine or Larox etc.) can help dump stats.
- Resetting to intentionally get "cheats" on Heavy Drills during baby stages (-4 is the best reduction you can get and easiest during baby stage, while not getting to much in gains in other areas)
- You can use Gold/Silver peaches to extend baby stages if you need more time with dumping stats. Be sure to use it while still in stage 1!
- INT monsters can benefit from Leap and Meditate to work together to drop POW and DEF while raising necessary stats.
- POW monsters benefit from Swim drill to drop INT.
- POW monsters also benefit from Paradoxine raising POW and SKI, and lowering SPD and DEF by 10% per week.
Drug Calculator
![]() Paradoxine uses 18 weeks of lifespan on use. Effect lasts 4 weeks.
Paradoxine uses 18 weeks of lifespan on use. Effect lasts 4 weeks.
| Enter Starting Stat Value: |
|||||
| Chosen Drug Effects: |
POW (+30/wk) |
SKI (+30/wk) |
SPD (-10%/wk) |
DEF (-10%/wk) |
Lifespan (wk) |
|---|---|---|---|---|---|
| Wk 1: Drug #1 | |||||
| Wk 2 | |||||
| Wk 3 | |||||
| Wk 4 | |||||
| Wk 1: Drug #2 | |||||
| Wk 2 | |||||
| Wk 3 | |||||
| Wk 4 | |||||
| Wk 1: Drug #3 | |||||
| Wk 2 | |||||
| Wk 3 | |||||
| Wk 4 | |||||
| Wk 1: Drug #4 | |||||
| Wk 2 | |||||
| Wk 3 | |||||
| Wk 4 |
Training Drugs Recap
Used during Baby Stages, drugs can yield much higher gains than is normally achievable in week to week raising, even after the lifespan hits.
Drugs can also be used to lower other stats. Here are some of the popular drugs.
All are eventually available from the Item Shop except Paradoxine.
| Paradoxine & Troron Schedule | ||
| Monthly: | ||
| Week 1: | Drug ( | Light Drill |
| Week 2: | Hard Drill or Light Drill | |
| Week 3: | Light Drill | |
| Week 4: | Light Drill | |
- Cost: 2200 G
- +10 POW and +10 DEF
- -10 LIF
- Duration: Single Use
- Lifespan Hit: -4 weeks
- Cost: 3000 G
- +10 LIF and +10 SKI
- -10 SPD
- Duration: Single Use
- Lifespan Hit: -5 weeks
- Cost: 1200 G
- +10 POW and +5 SKI per week
- Duration: 4 wks (non-failed drill/errantry)
- Lifespan Hit: -6 weeks
- Cost: Expedition Only
- 700 INT required to find
- +30 POW and SKI per week
- -10% to SPD and DEF per week
- Duration: 4 wks (non-failed drill/errantry)
- Lifespan Hit: -18 weeks
- In Single Player, you would generally use this 50 and 25 weeks after Prime has started, so that you can maximize the amount of stats gained and extent Prime's life stage for massive gains.
- However, in PVP, peaching in Life-stage 1 is often used to extend the time one can save-scum for when a monster "Cheats" on drills. Lowering gains in unwanted stats while maximizing dropped stats from Cheat Drills.
- Peaches add weeks by rewinding time, which can put you into an earlier Life Stage, allowing you to increase the time spent in a particular stage.
- Peaches in Life Stage 1 extend stage 1.
- Peaches in Life Stage 2 extend stage 2.
- Peaches in any other Life Stage can rewind time to a previous live stage, however, it cannot rewind time earlier than Life Stage 2.
Keep the following in mind while prepping your monster. Typically, the No Rest methods will always lean towards Skinny, so if you're planning on raising a Tank, you likely want to plan ahead so that during it's final days you can make sure Form is +100
- Form adjusts your monster's SPD and DEF, scaling between 0 (Normal) and 25% (Skinny or Plump)
- The Stat that benefits from the form will be increased, while the opposing stat will be decreased.
- You can Cap SPD or DEF if you are -100 Skinny or +100 Plump respectively.
- Calcs between DX and PS1 versions are slightly different: (800 for DX, 760 for PS1).
- PS1 version calc break-points stop every 50 points, and 950 is the effective max (except for LIF which every point counts).
- MR2DX calc breakpoints are every 12.5 points difference, and 999 is the effective max.
| Form Value Ranges In-Game | |||||
|---|---|---|---|---|---|
| Verbiage | Skinny | Slim | Normal | Fat | Plump |
| Range | -100 to -60 | -59 to -20 | -19 to 19 | 20 to 59 | 60 to 100 |
| Max Form Adjustments | PS1 (1999) | MR2DX (2021) |
|---|---|---|
| SPD or DEF is at: | 760 | 800 |
| +/- 100 Form (25%) | 950 | 999 |
Candy and Rest can help you put weight back on quickly for Tank builds, but be on the look out for other adjustments especially if you're trying to finalize with negative nature Stress-Crit builds.
Unless it's a special spawn that can't get it; Monsters at +20 (Good) Nature or better will get the POWER battle special. Monsters at -20 (Bad) Nature or worse will get the ANGER battle special.
- Positive is any nature value between 0 to 100
- Negative is any nature value between -1 to -100
- Adjustments can only be +100 or -100 from a monster's initial starting nature
- If your monster starts at -60 Nature, the highest it can be raised is 40, and lowest is -100.
| Nature Displayed | Worst | Bad | Neutral | Good | Best | |
|---|---|---|---|---|---|---|
| Nature Value | -100 to -60 | -59 to -20 | -19 to -1 | 0 to 19 | 20 to 59 | 60 to 100 |
| N.N. Crit Bonus | Yes | No | ||||
| Battle Special | Anger | Neither | Power | |||
These are noted in the DX Song List.
Positive nature monsters cap out at 10% crit. Negative nature monsters can get up to 20% crit.
- Positive nature gets 1% Crit for every 10 Fame (maxing at 10% Crit from Fame)
- Negative nature monsters gets 1% Crit for every 20 points of fame, plus 1% Crit for every 20 points of fame their opponent has, (maxing at 10% Crit from Fame)
- Negative nature monsters additionally get 1% Crit for each 10 point of Stress. (maxing at 10% crit from Stress)
- Getting to 100 Stress isn't difficult, but getting things to line up might be tricky. You will want to avoid events that decrease stress (like Gemini Pots on Week 1 rollover for example), Avoid going over your stat cap, and your nature or form being adjusted too much.
- You can use Irritators (15 Stress each) and light drills (5 stress each) over several training weeks to get to 100 stress by replacing Mint Leaf with Irritator.
- Alternate Nuts Oil and Irritators. Be sure to keep track if you're skipping the 4th week of raising to avoid the week 1 rollover items and Gemini Pot passives.
- Where to get Irritaters?
- They can be found in many places in Torles and Parepare Expeditions. However, ParePare location C, D, and H with a positive nature monster are your best bets if you have 400 INT or higher (since other locations are 0% at 400+ INT).
- Irritaters can also be found as a substitute item. If you find a disc chip of a monster you haven't unlocked yet, that item is substituted and you are given: Mint Leaf, Half-Eaten, or Irritater.
So if you haven't unlocked everything, you can have a much higher chance to find them by searching locations that drop Chips of locked monsters.
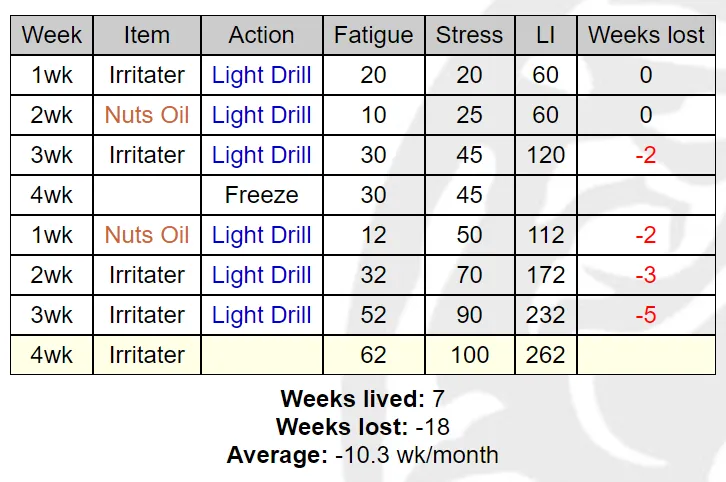
Stress Schedules for negative Nature Crit - Typically you will wait until the last weeks for Stress Crit planning, since the high stress is hugely detrimental to Lifespan and every week will shred weeks off your monster.
Why Freeze on the 4th week?
This avoids any bonus stress reduction from stored Gemini's Pots and unexpected monthly item adjustments.
Using another monster to rest into the next month applies these effects to that monster instead.
After, you can bring out your Stress/Crit monster back out on week 1 to resume increasing stress.
Stress/Crit Schedule (Non-H.A.D.)
5 Irritators + avoid Gemini's Pot effect
(Needs 25 weeks remaining)
Stress/Crit Schedule (H.A.D.)
6 Irritators + avoid Gemini's Pot effect
(Needs 35 weeks remaining)
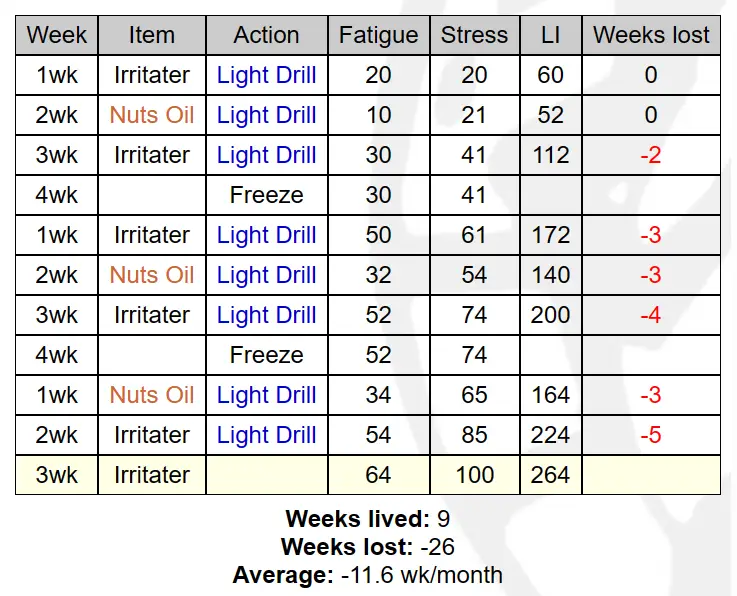
Stress/Crit Schedule
ZERO Irritaters + avoid Gemini's Pot effect
(Needs 59 weeks remaining)

See: Training Planner if you need to try a different custom schedule. You can use any of the schedules below to start with too.
Don't forget to factor gains from the drills while capping stress as this may skew your Stat Totals if your stats aren't already at 999
Various examples and how to achieve them
Please be sure to check the Tournaments page for full format breakdowns. There are also other formats not listed here that may have their own specialized rulesets.You are encouraged to try out your own monster and build combinations, but if it's still not clear how to use advice from these guides, these raising routes can show you how fellow competitors apply this knowledge to get to their end results.
Not every Format or Build is represented here. However, we hope this will help you learn to plan your own future custom monsters, be it for a league format or 1-off themed tournaments!
1400 Mixed Lightweight Format
SussyJerma (Wracky/Wracky) by Kane
This monster was raised in MR2DX for AI v AI


~Kane
Additional Context
2100 Mixed Freshman Format
ScotSterling (Wracky/Metalner) by ComradeBob
This monster was raised in MR2DX for AI v AI

~ComradeBob
2997 Middleweight Format (LIF Tank)
Smorebit (Cocooned Hare/Worm) by Jayem
This monster was raised in MR2DX for AI v AI


Note: This was built on Nintendo Switch, without access to precision tools like Advanced Viewer for aid. This is also raised for the 2997 with Stats at 100 or lower ignored towards the stat cap.
3500 Heavyweight Format (Speed)
Son of Lumpy (Jill/Hare) by MachoCheeze
This monster was raised in MR2DX for AI v AI


~MachoCheeze
3500 Heavyweight Format (Tank)
UwU. F. OwO (Niton/Metalner) by Selvious
This monster was raised in MR2DX for AI v AI


~Selvious
- Make sure your monster is frozen at the Lab.
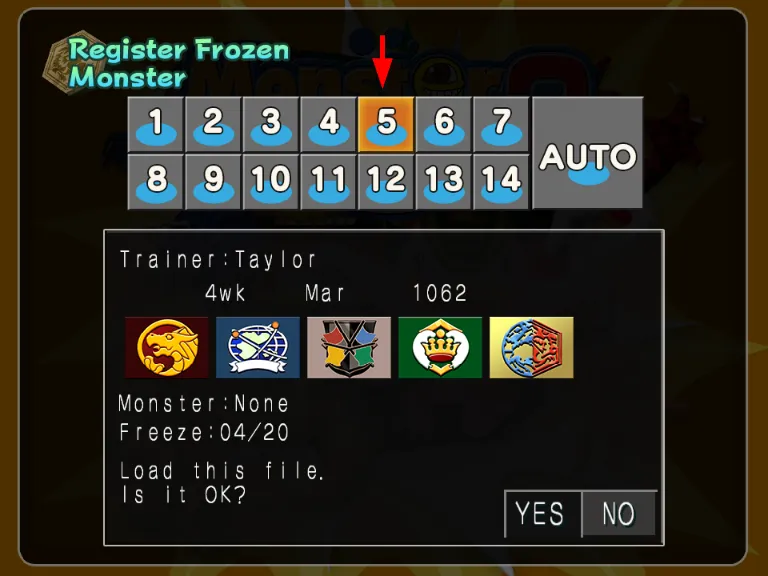
- Save your game on any numbered save slot.
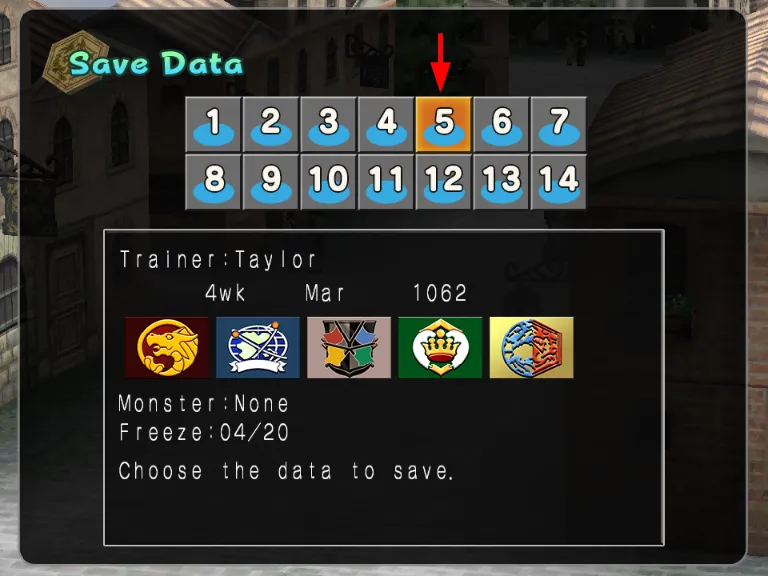
- Exit the game and go back to the Title, and choose "Vs. Mode" in the menu.
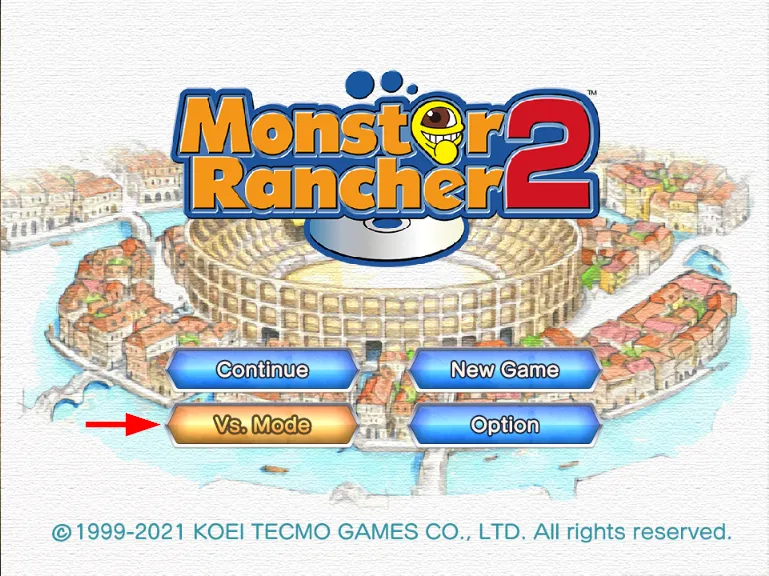
- Choose the same numbered save slot from Step 2, to register the frozen monsters online.
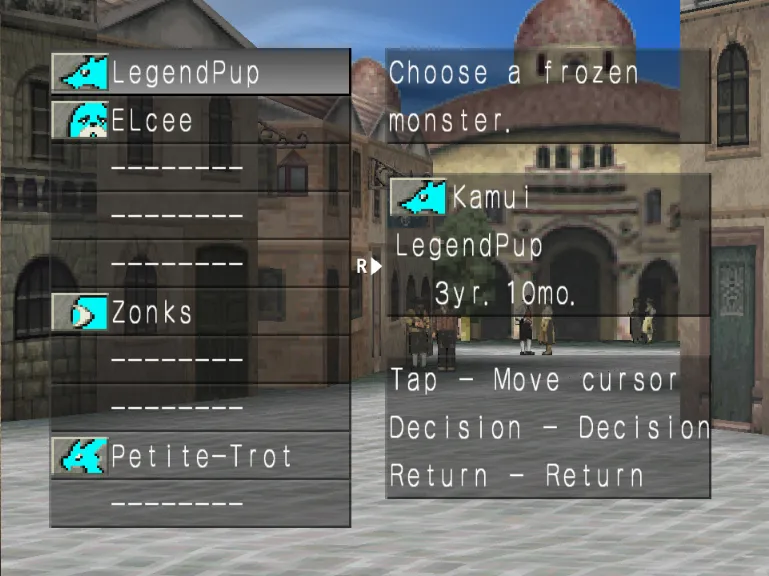
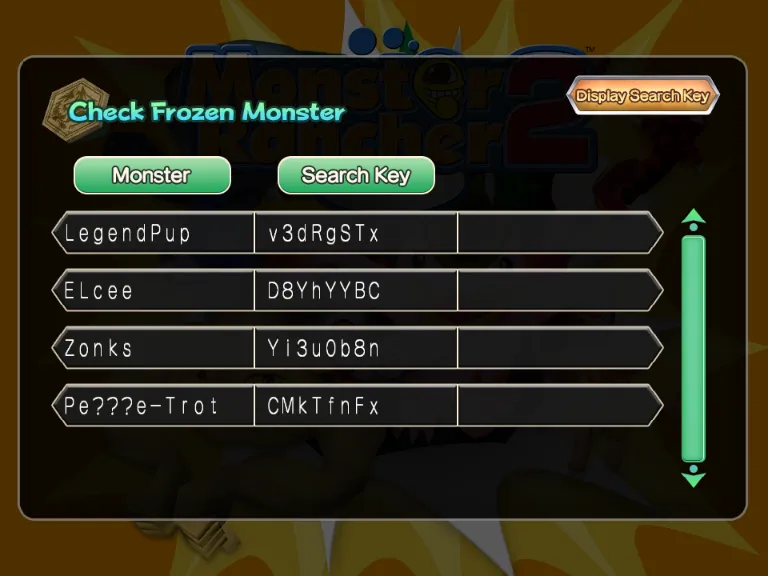
- Once the Frozen monsters have been registered, Select "Check Frozen Monster".
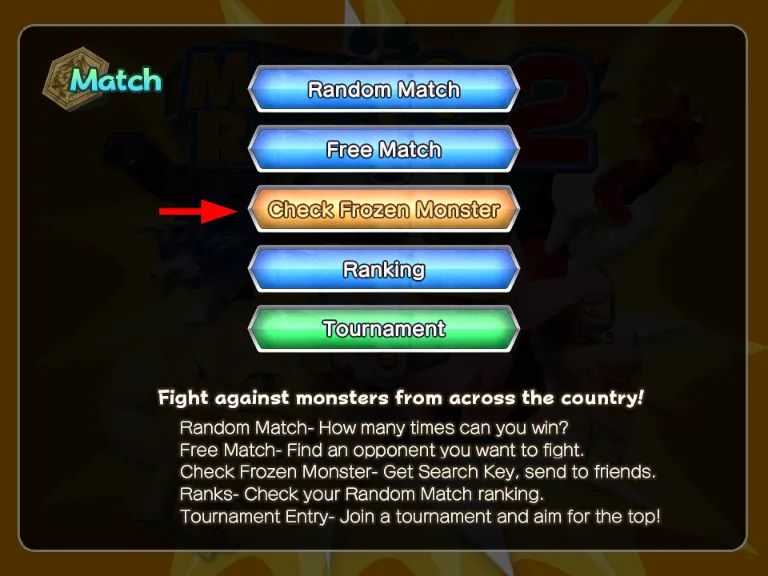
- In the list, confirm your monster shown, then click "Display Search Key".
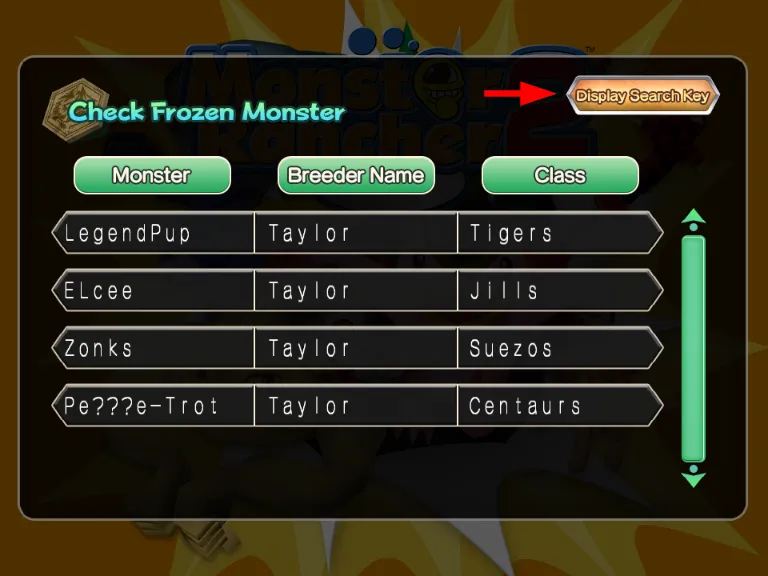
- Note the Search Key. Providing your Search Key may be required to submit your monster, if the monster name has censored characters. Censored character strings show up as question marks.
NOTE: you can only have 1 save slot uploaded at a time. Whatever is the last save uploaded is the only save in the cloud. You may overwrite the save slot on your local game however you want, it will not change what was already uploaded unless you re-register/upload it again.